|
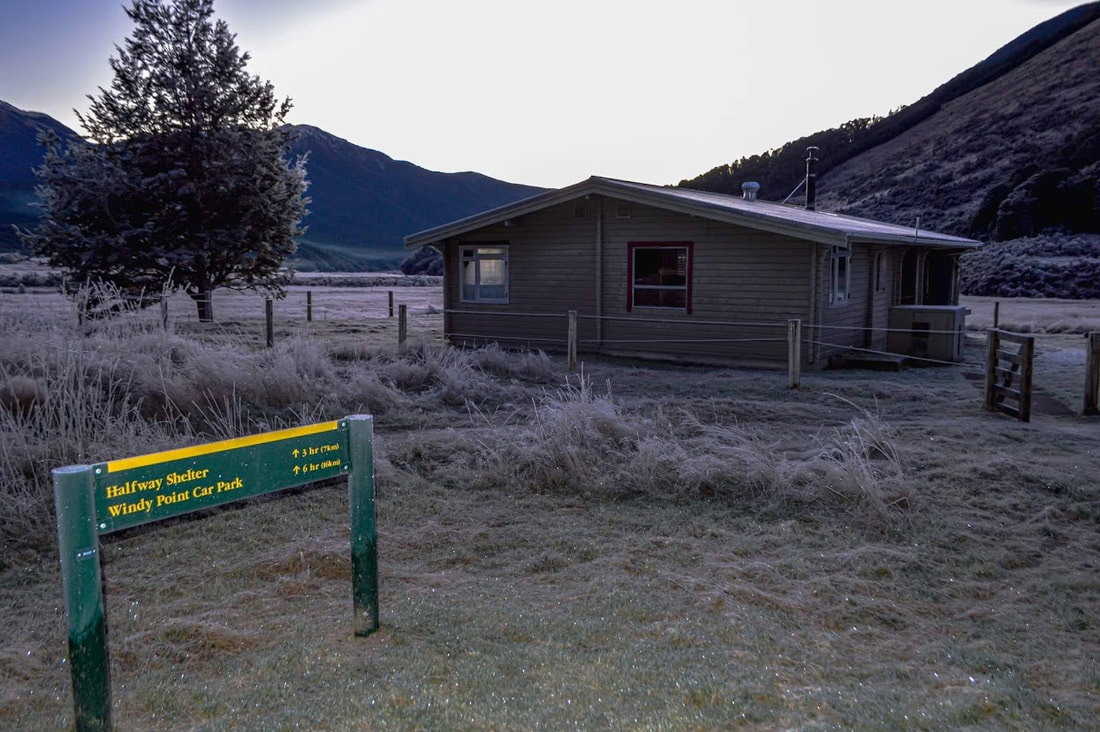
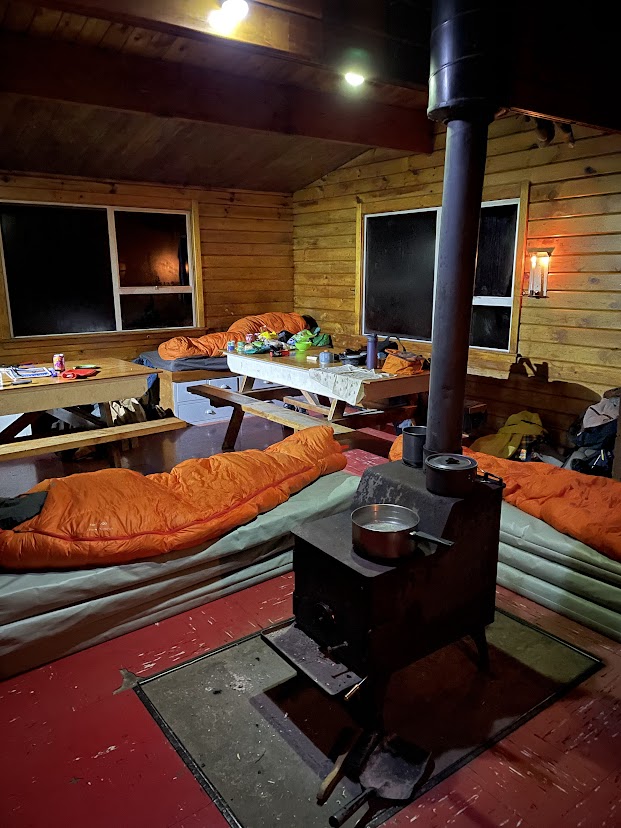
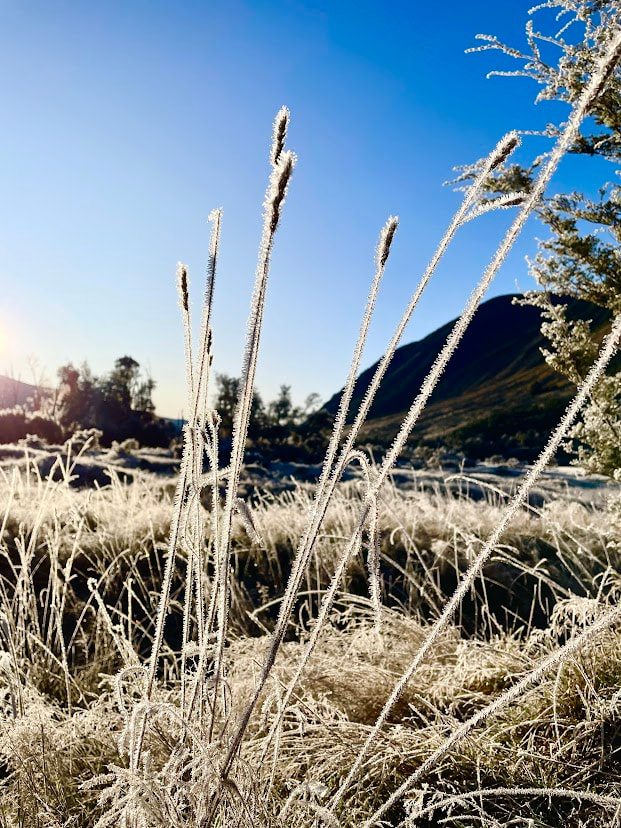
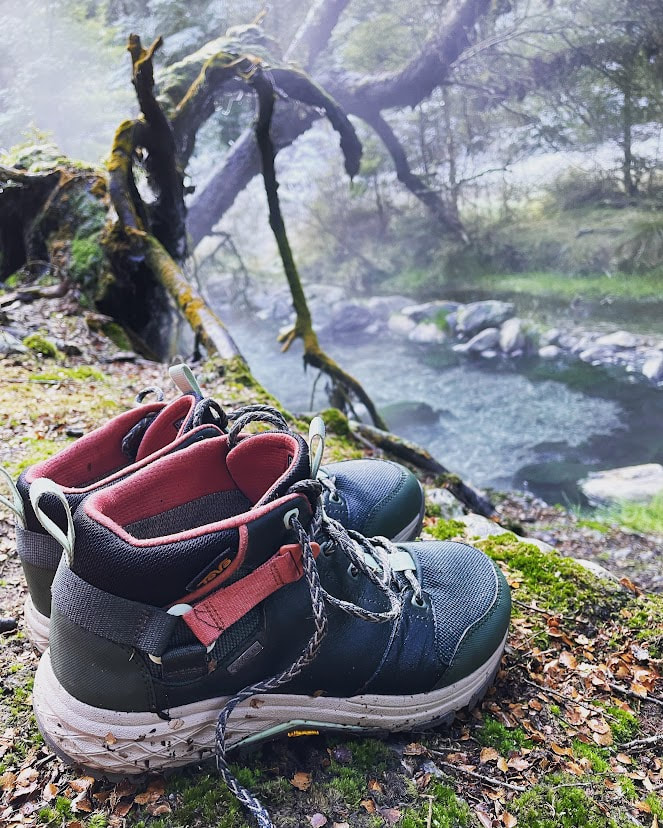
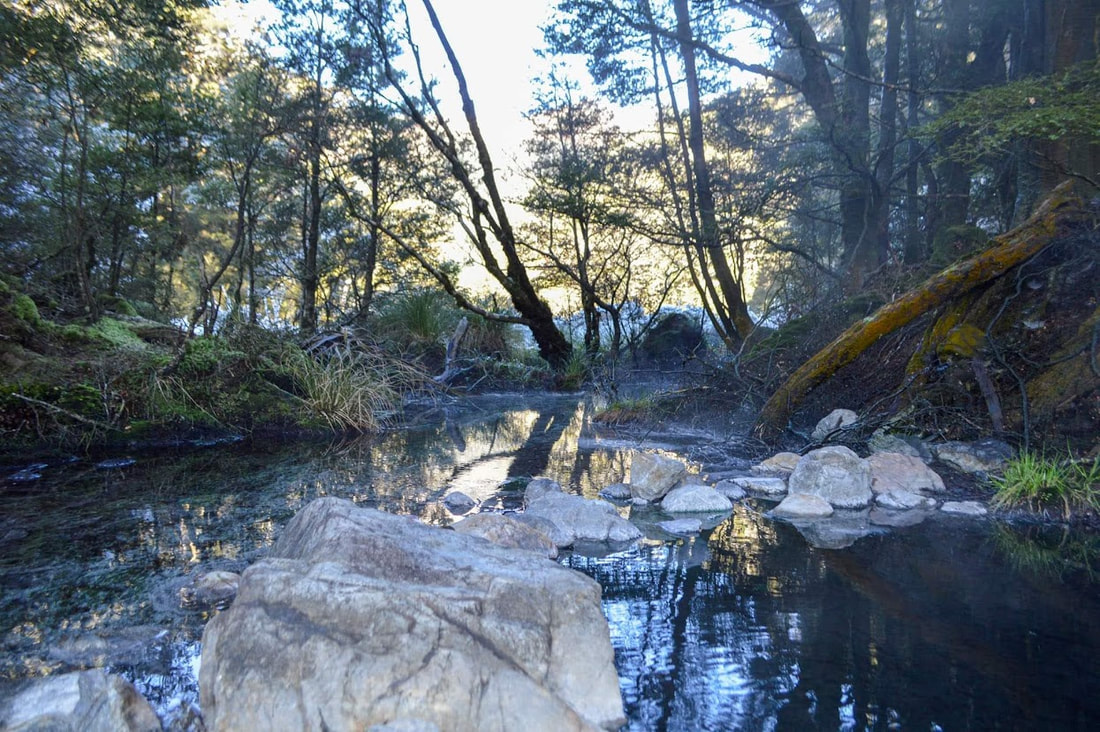
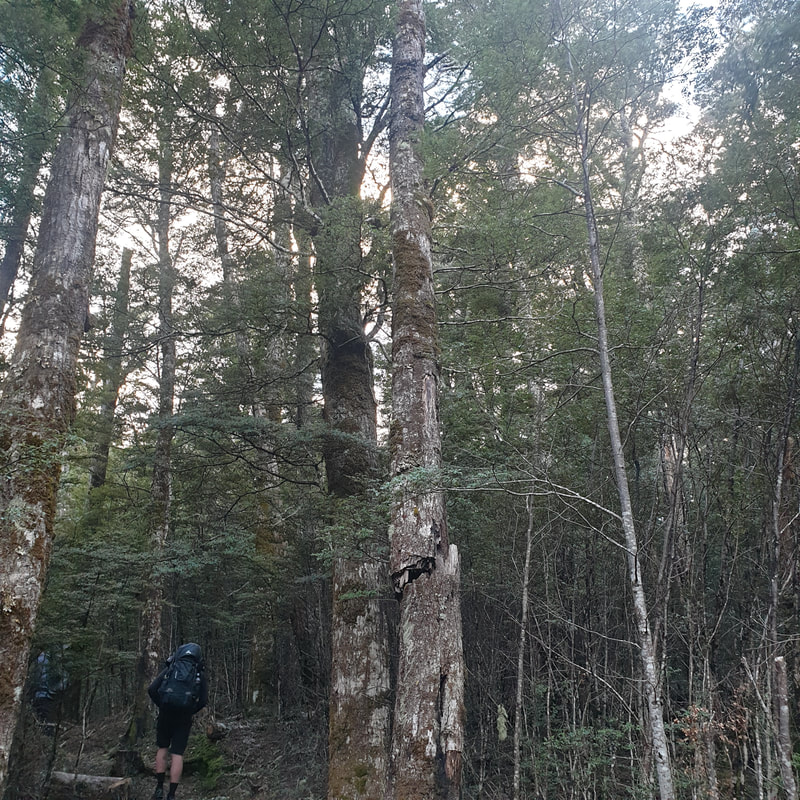
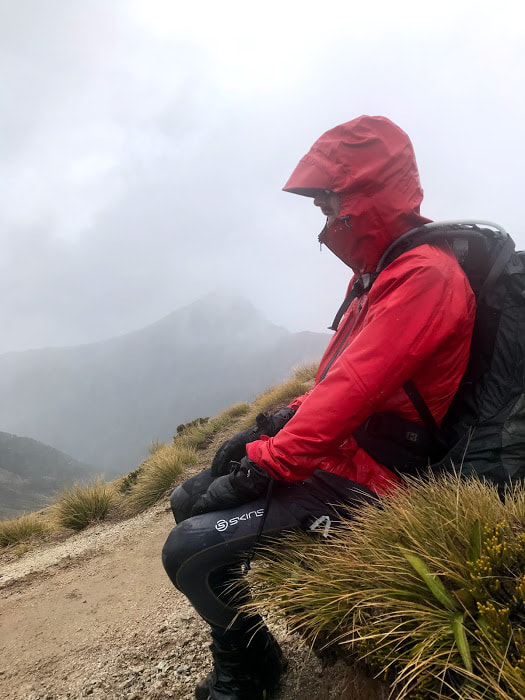
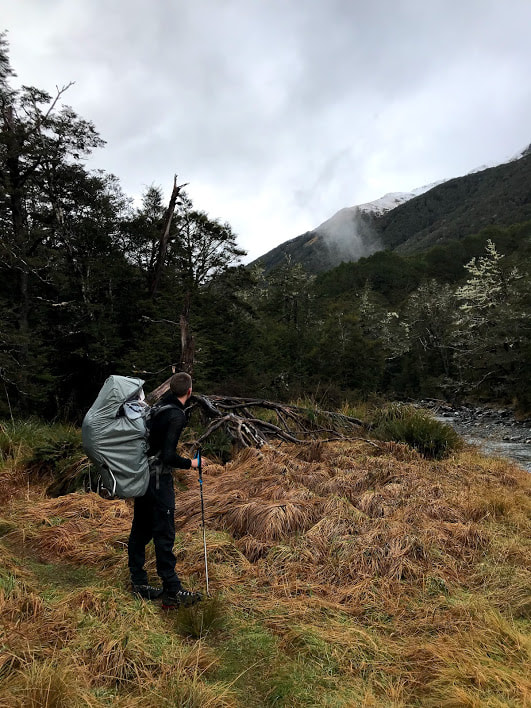
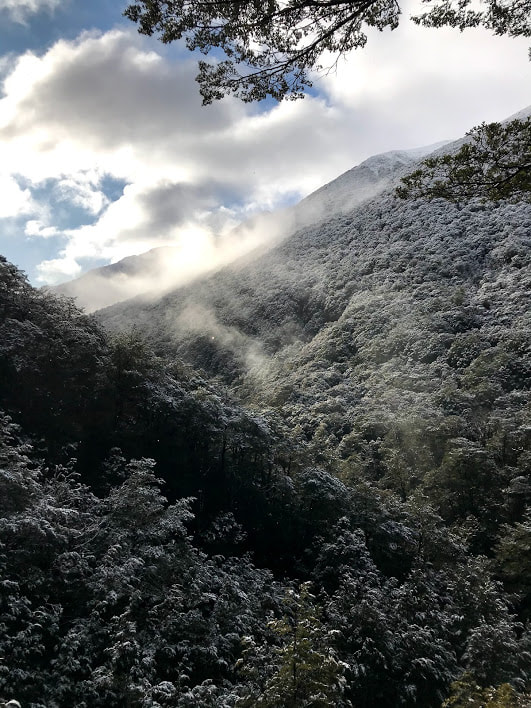
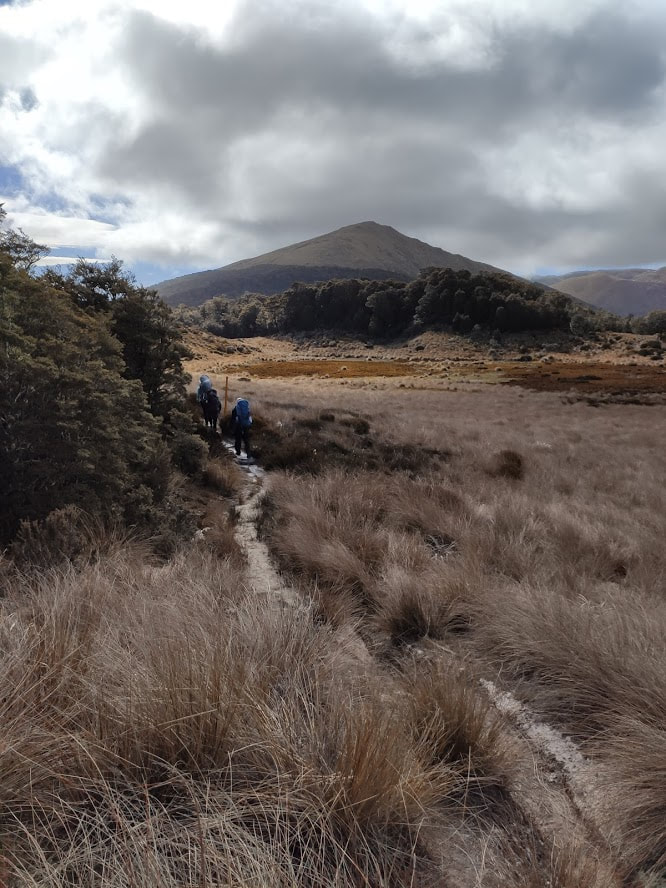
7/16/2023 2 Comments HOPE KIWI LODGE and Hot SPrings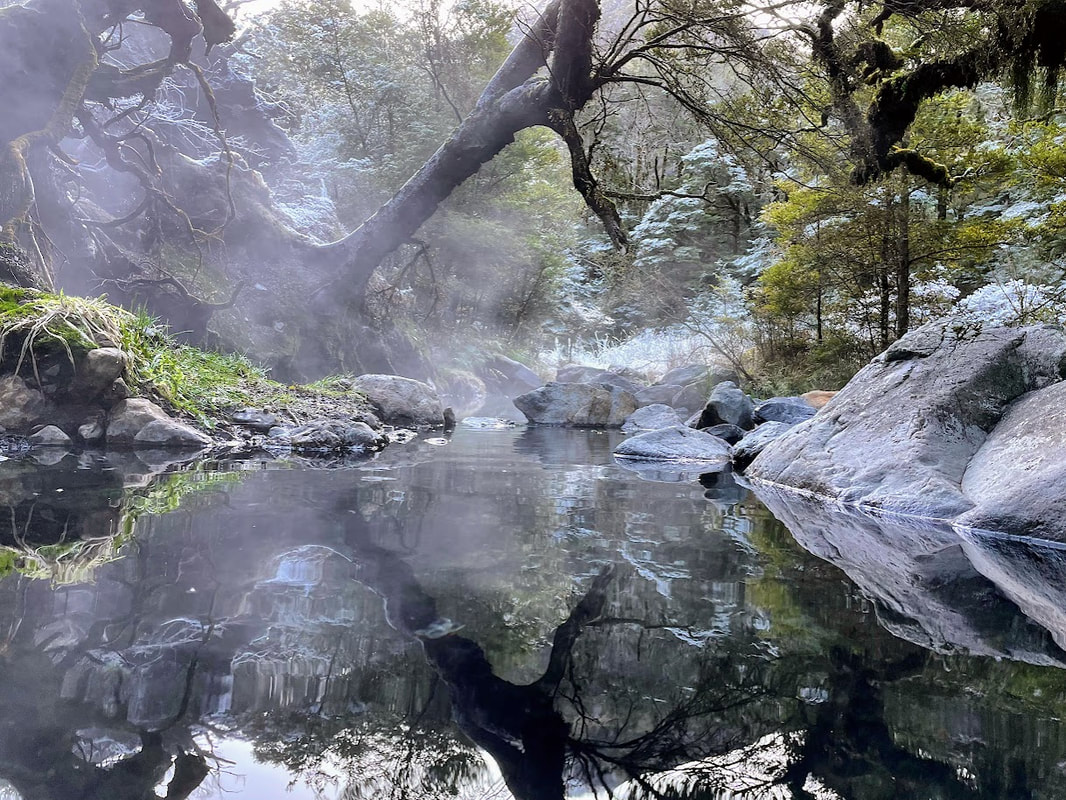 I've always thought that there was something a little magical about hiking in winter. It's hard to beat the crisp, clear mornings, snow on the surrounding mountains and sitting around a roaring fire with a great group of mates. After nearly two years away from the wilderness (although having triplets could be described by some as a type of wilderness) I may have built up a somewhat romanticised notion of what three days in the Lake Sumner area would deliver in June but I'm going to come right out and claim that this was one of the best trips I've ever done. Seriously long days on the feet and subzero temperatures kept us honest but this is a part of the country that has something pretty special to offer those who have the stamina to go the distance. 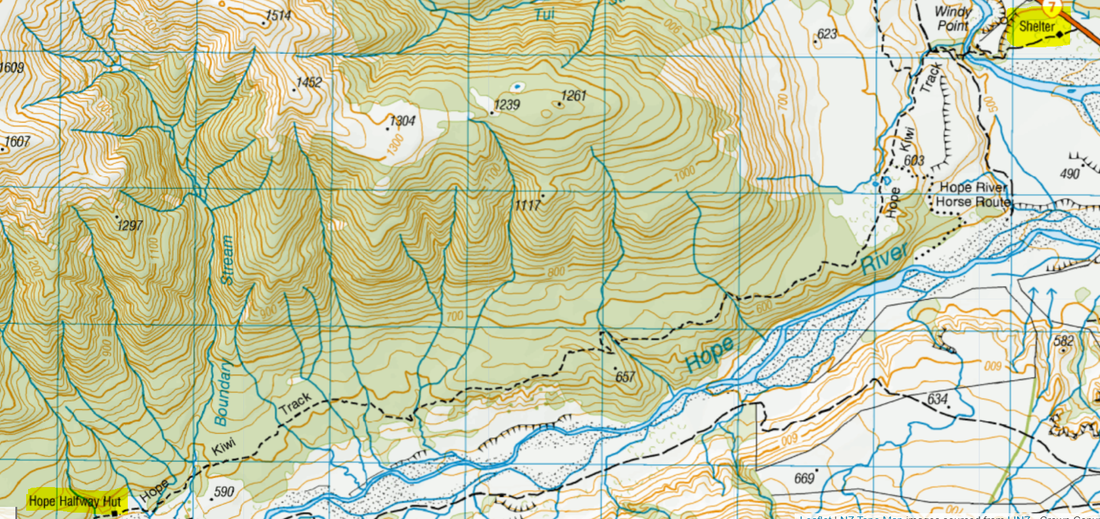 After bailing on work at midday on Friday, it wasn't until late afternoon that we made our way to Windy Point and the shelter at start of the track. From Christchurch it's a 2 hour drive towards the Lewis Pass to where the Boyle River meets the Hope and a sizable car park just off State Highway 7. We had about 2 hours of daylight before things were going to get interesting so we layered up and hit a muddy track for the 10km trudge to Hope Halfway Hut. The track is easy to follow even in the dark but the topo map obscures many of the small inclines that become all the more noticeable with a heavy pack in tow. Our small group of four made it to our dinner spot in about 3.5 hours. Only the absence of a fire at this location convinced us to set out for the second half of the walk once it was properly dark. The ground was completely frozen which made the mud easier to walk across but the water in our drink bottles had already started to freeze and staying warm was going to require a bit more consideration as we headed further up valley. 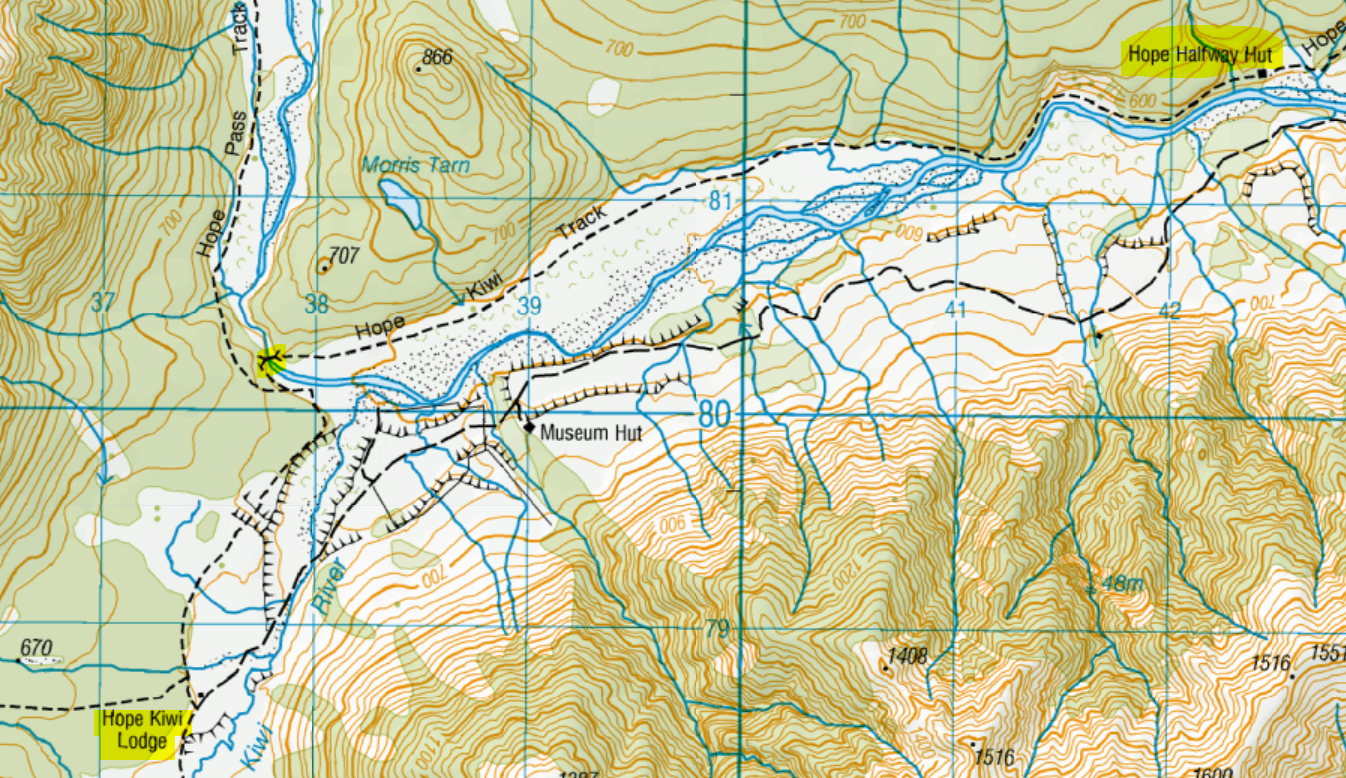 The going actually gets easier from here as the track flattens out and crosses large open areas of the river bank. The track is well marked with poles but I would still recommend a decent headtorch for navigating through here at night. The hoar frost was starting to become more apparent as we neared the swing bridge to cross the Hope River. Ice crystals were twinkling off every available surface and the tips of my hair were freezing around my cheeks. The solid white dusting gave the impression of walking through Narnia as we marched the last 5km through the forest to Hope Kiwi Lodge. Some fallen trees created some interesting detours as we neared the hut and later the next day I wandered off the path completely as I navigated this section again. 6 hours after we left the car we arrived to a single occupant in what is a rather lovely hut situated in a large clearing beside the river. Most importantly this location houses a fantastic fire, plenty of mattresses and a well equipped kitchen facility. After getting the fire cranking we turned in for some well deserved food and sleep. Saturday morning saw us split up into Alpha Team (in charge of shooting dinner) Bravo Team (just me doing hot pools recon) and Camp Mother (in charge of getting the housework done). Alpha Team were up and away early while the remaining team members enjoyed a leisurely breakfast before I set off for my real objective for the trip. Tucked away up the aptly named "Hot Springs Stream" is an amazing little hot pool that my husband had managed to get to only a few weeks earlier. Granted he had set off from the much closer St Jacobs Hut but I had all day to get there and back and the weather was pristine if not still a tad chilly. I made my way back toward the swing bridge only to hear the quiet calm of morning punctuated by not one, two or three but five separate shots ringing out across the valley. I figured Alpha team had either shot dinner or were in the midst of some sort of guerilla war style shoot out. I left them to it and continued on up the Hope Pass Track. It was easy going but as I checked my GPS every 30 minutes or so it began to dawn on me just how far I had to go and how little daylight would be available come mid afternoon. I picked up the pace as much as possible as I had opted to bring a reasonable amount of gear in case I got caught out in the cold on my own for any reason. It seemed to take forever to make it around the wide sweeping bend of the river but I finally made my way to the first check point for the day at St Jacobs Hut. This is a tidy but basic set up with everything you need but not a lot of home comforts. The valley hadn't seen any sun yet and I kept moving in search of some respite from the shadows. The track while easy to negotiate, has in fact been washed completely away in several sections from here. I found especially on my return trip that simply walking in the river bed was easier than scrambling up and down the cliffside every few hundred metres. 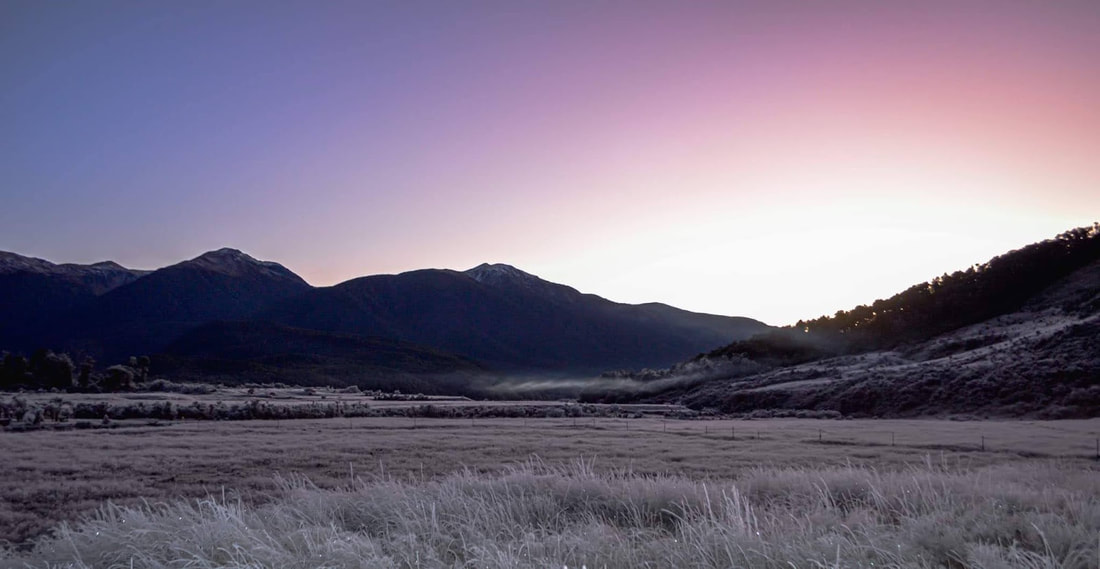 I passed the turn off to Lake Man Biv and silently wondered how often anyone makes it all the way up there to visit. I was making good time up the valley again and the sun kept my spirits high as I ticked off more and more distance between me and my sleeping bag. I still hadn't seen a single other person as I checked in at Top Hope Hut and read as much as I could by way of instructions as to how to find the pools. The notes in the back of the hut book proved incredibly helpful about 30 minutes later as I rock hoped up an icy river bed looking for the tell tale signs of thermal activity. The smell of Sulphur was obvious from the time I crossed the Kiwi and started working my way up Hot Spring Stream. I had to go further than I had anticipated though and I was already 30 minutes passed the time I had planned to be heading back. Finally I found the marker on the side of the river bed and immediately behind it two perfectly formed hot springs. The outside temperature was hovering around 5 degrees but after spending the better part of 3.5 hours getting there it would have been rude not to jump in for a quick swim. I can confirm they're perfect bath temperature and the cold water running from the stream adjacent was just enough if you needed to practice some temperature regulation. Getting out and putting on my freezing cold and soaking wet pants was possibly the lowlight of the day but I felt invigorated by my midday dip and powered back out to the main river to get my blood flowing again. The 30km round trip from Hope Kiwi is definitely not an easy way to access this magical spot but visiting alone in the dead of winter in the middle of a hoar frost was a bucket list type experience. 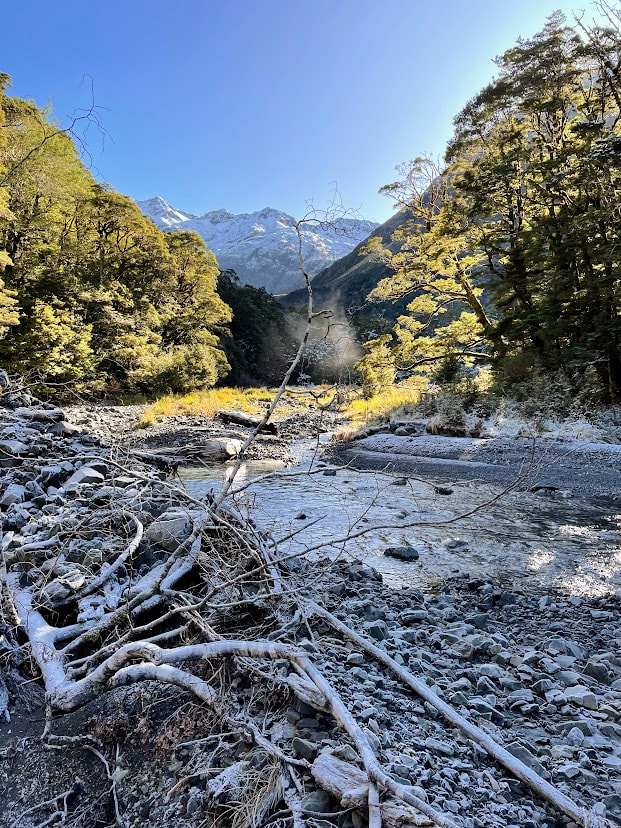 The first sign of steam giving away the location of the spring From here I really had to turn on the after burners to make sure I was back in range of Hope Kiwi before the rest of the group started to come looking for me. I had limited time to get 15km back down the river and navigate the slips that had slowed me on the trek in. I ended up jogging a few of the flatter sections to give myself some more leeway and cut the return journey down to three hours. On the whole section of track I only saw one hunter who had dropped off the tops that afternoon and a small fixed wing plane making it's way lazily up the valley. I'm not usually that big on total solitude in the mountains but there was something epic about having that day and that winter wonderland to test myself physically and mentally with a great challenge. It didn't hurt that I got to return to dinner cooking, a fire roaring and a hot water bottle warming my sleeping bag (Thanks Camp Mum!). The shots from that morning (well some of them at least) contributed to a friend's first deer and quite a bit more weight to carry out the next day. We were 5.5 hours back to the car and the legs were well and truly feeling the distance and the heavy loads by the time we found ourselves back in civilisation. While I highly recommend the walk for any ability level in terms of technicality, the distances are big and longer summer days may be a better fit for the less experienced Windy Point - Hope Kiwi Lodge: 6 hours (in the dark) Hope Kiwi Lodge - Hot Springs Return: 7 hours Hope Kiwi Lodge - Windy Point: 5.5 hours 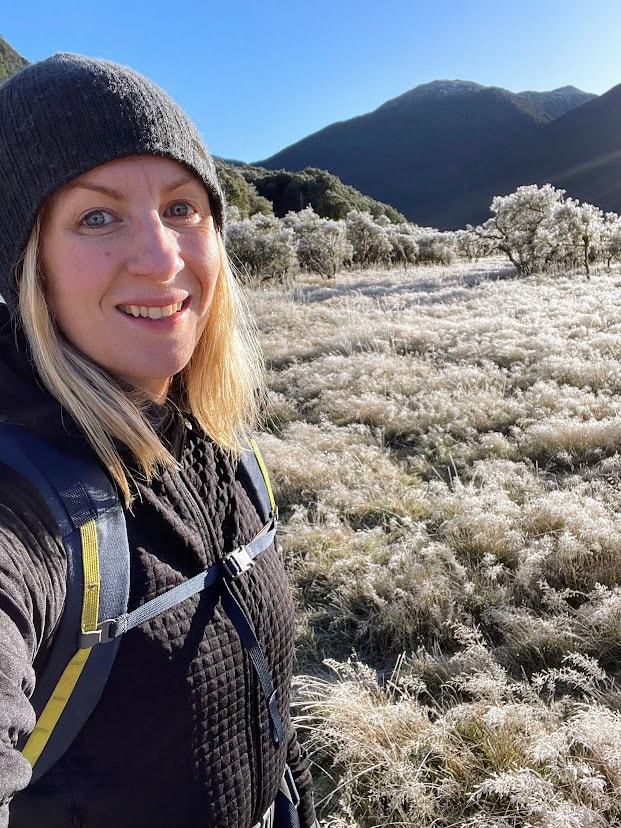 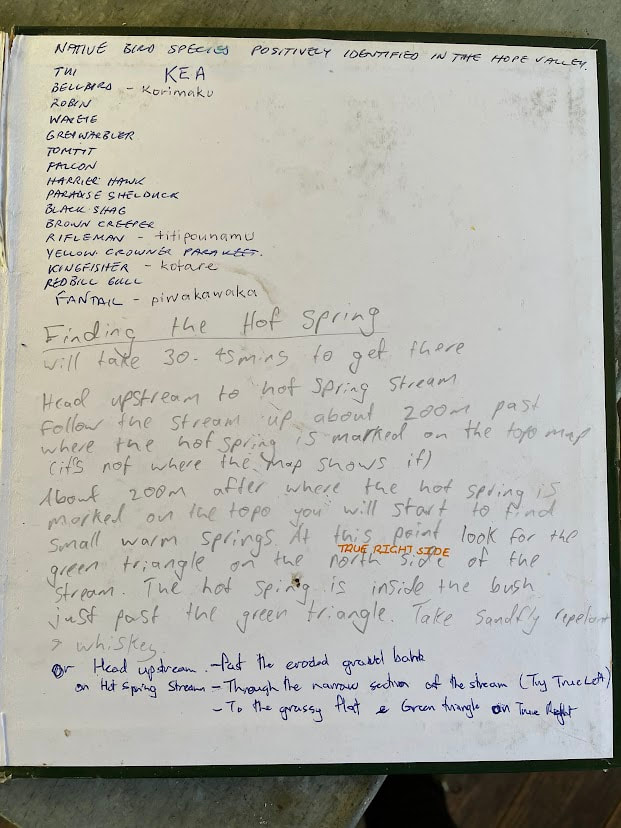 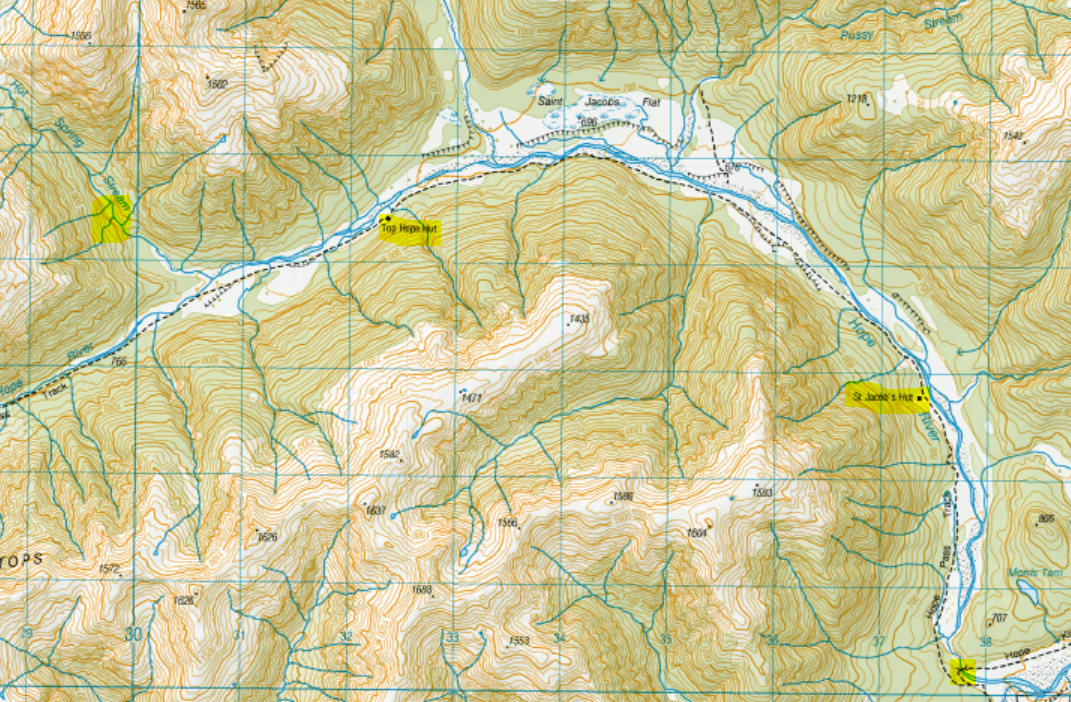
2 Comments
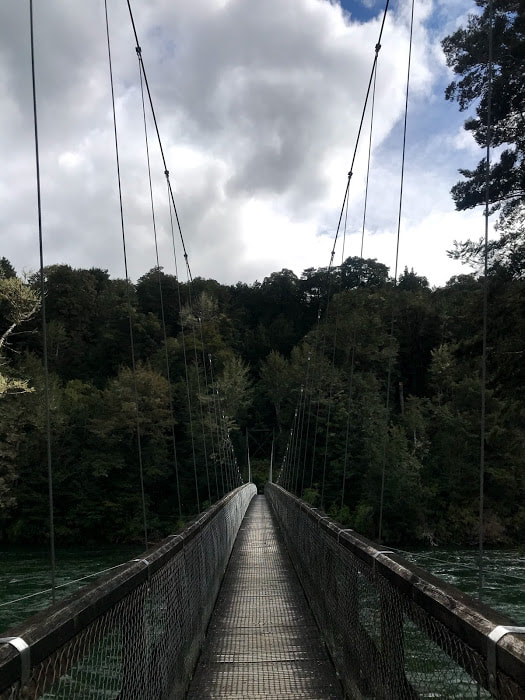
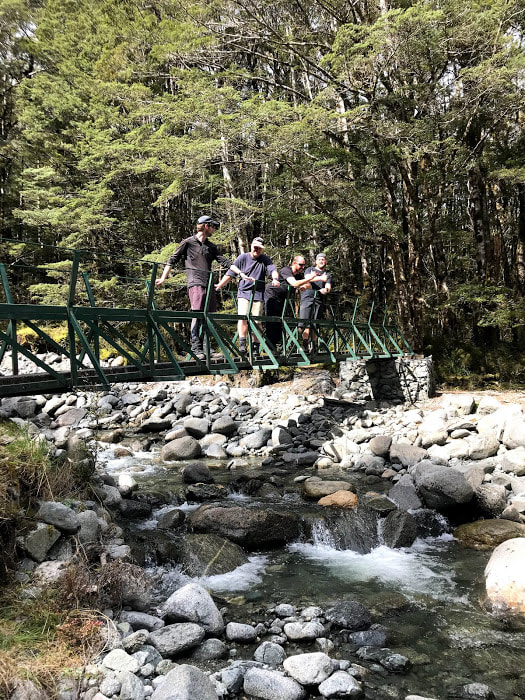
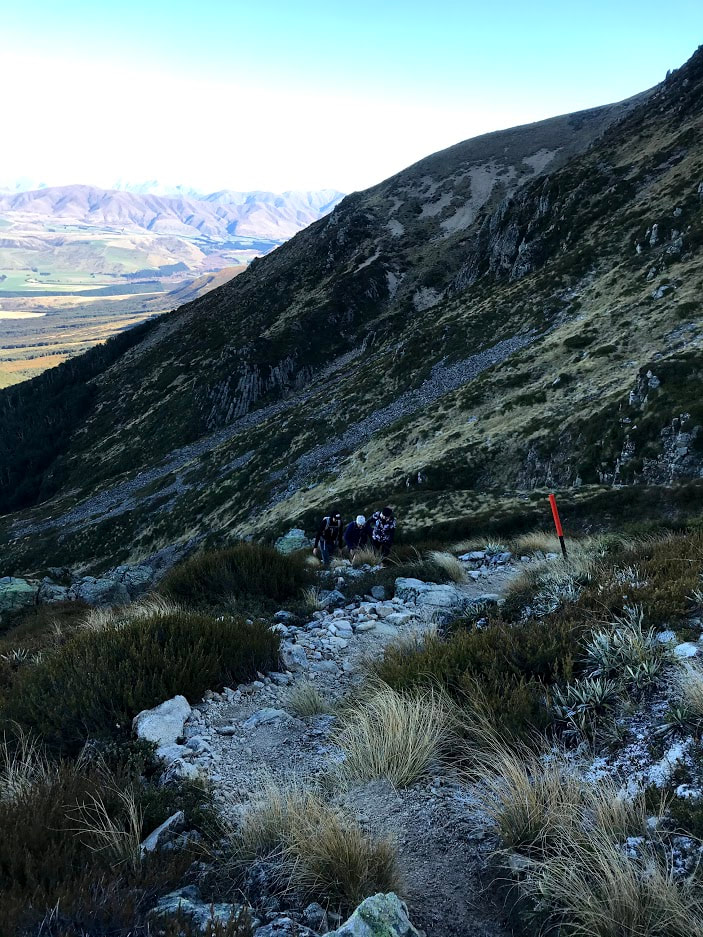
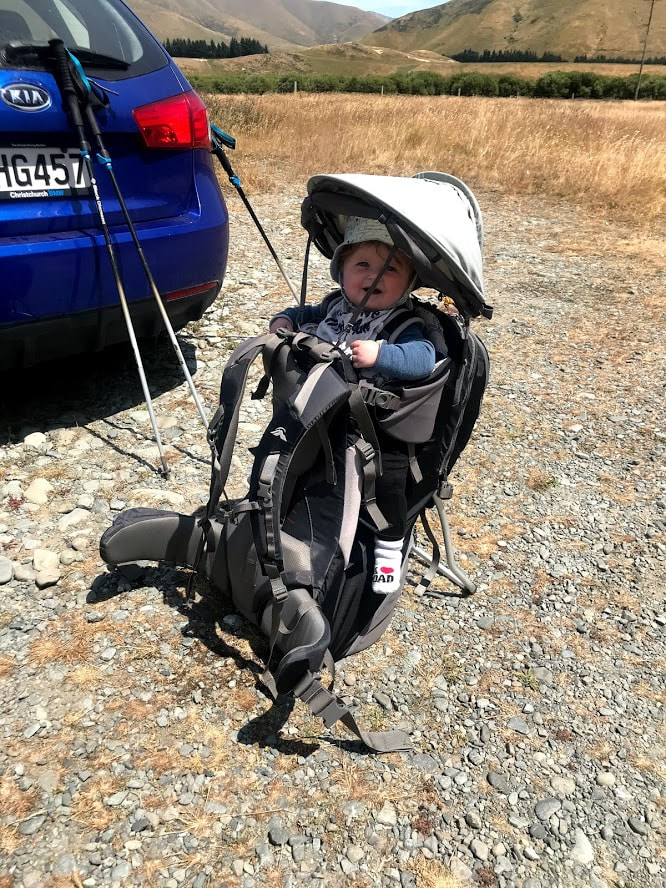
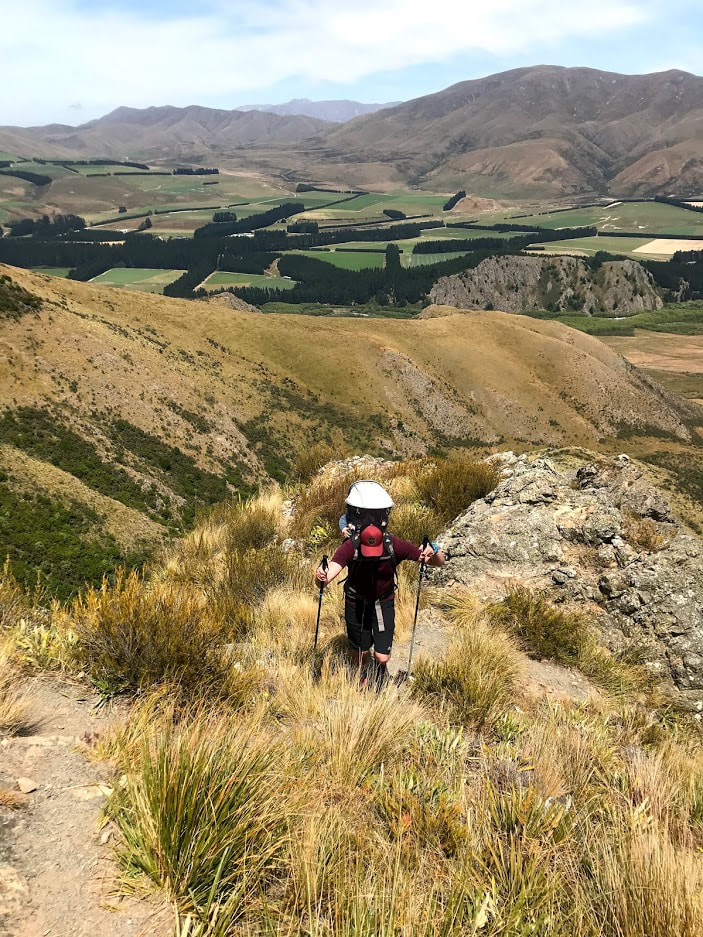
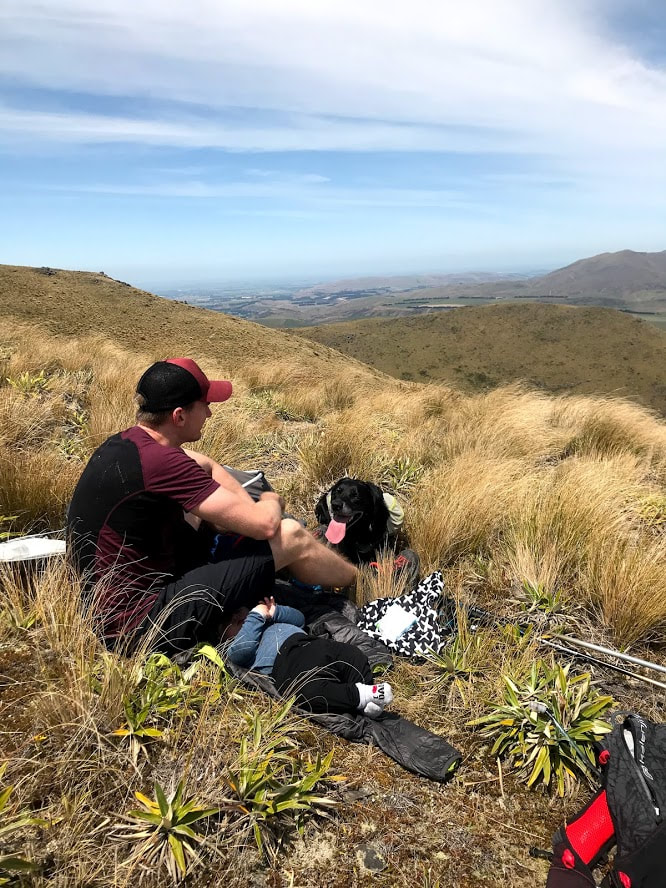
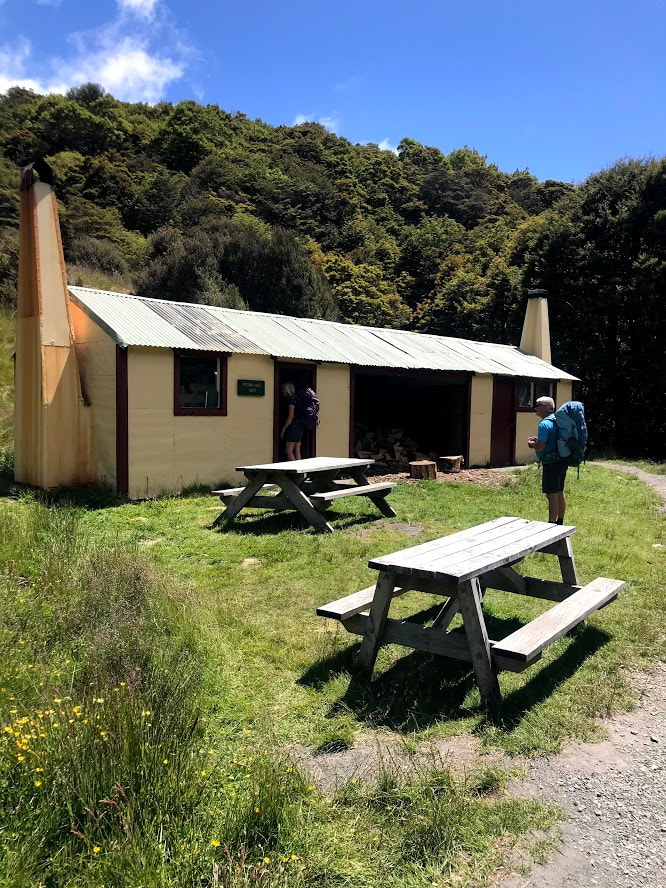
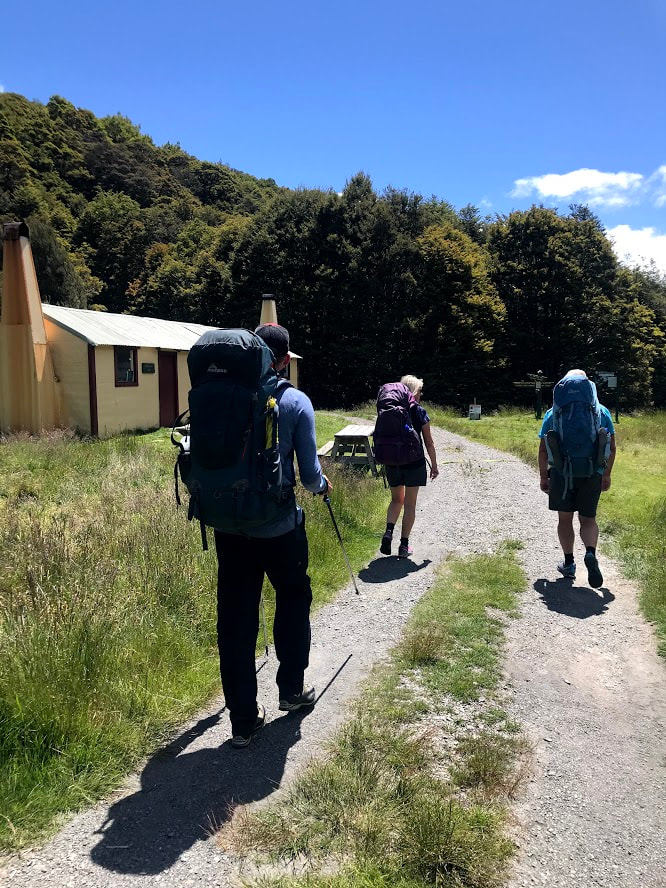
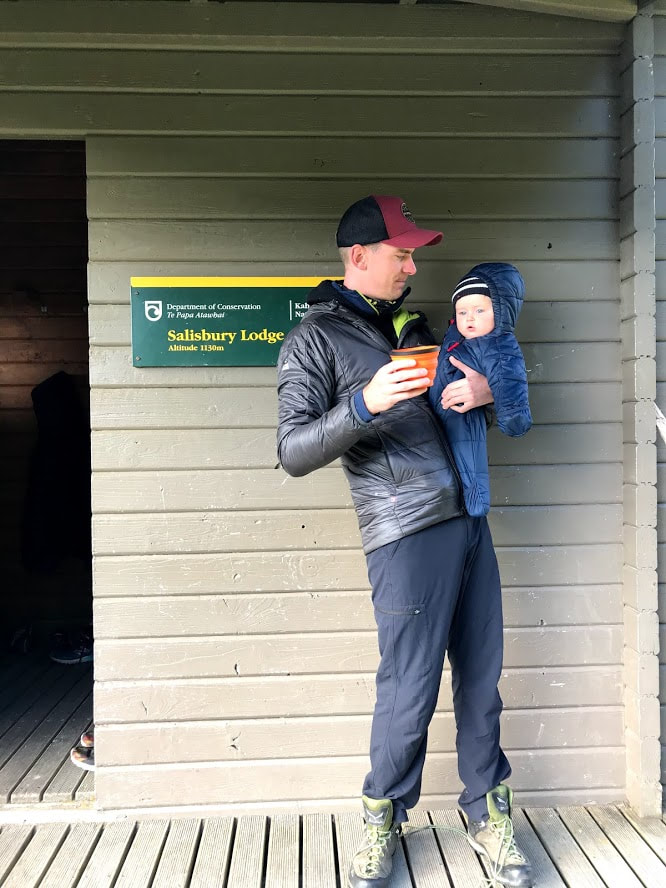
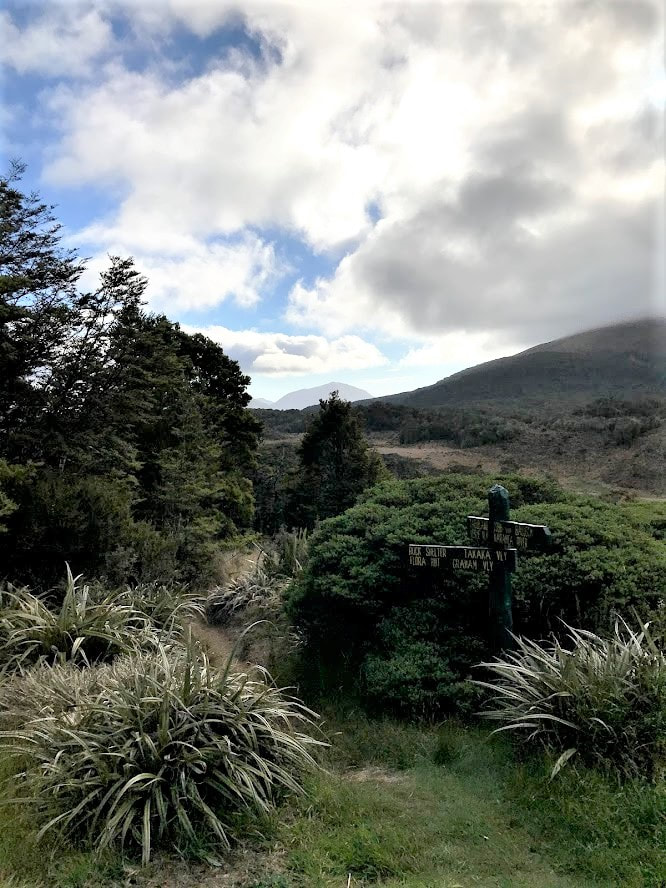
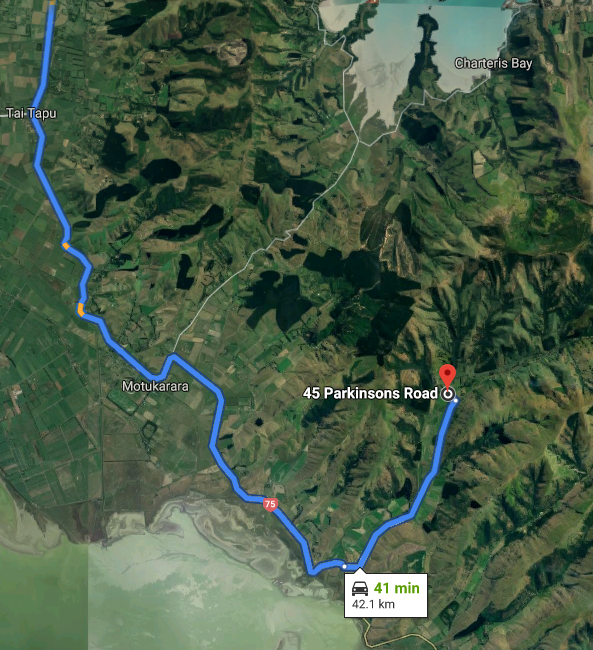
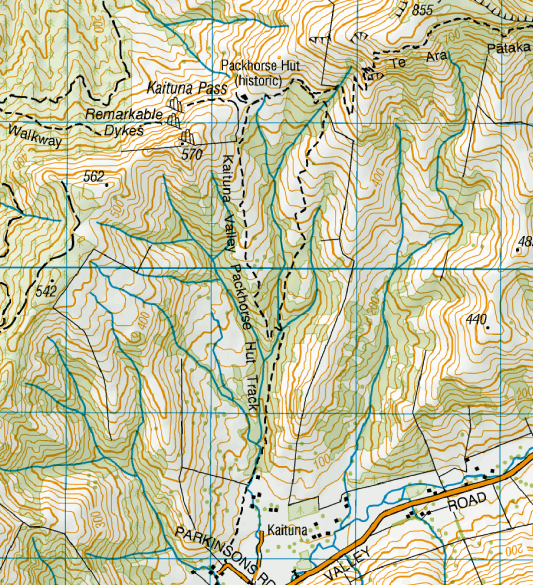
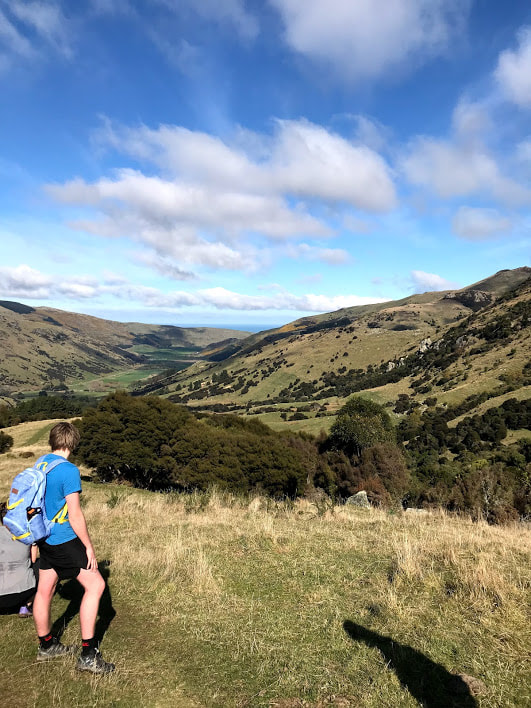
1/27/2021 3 Comments Jollie Brook Circuit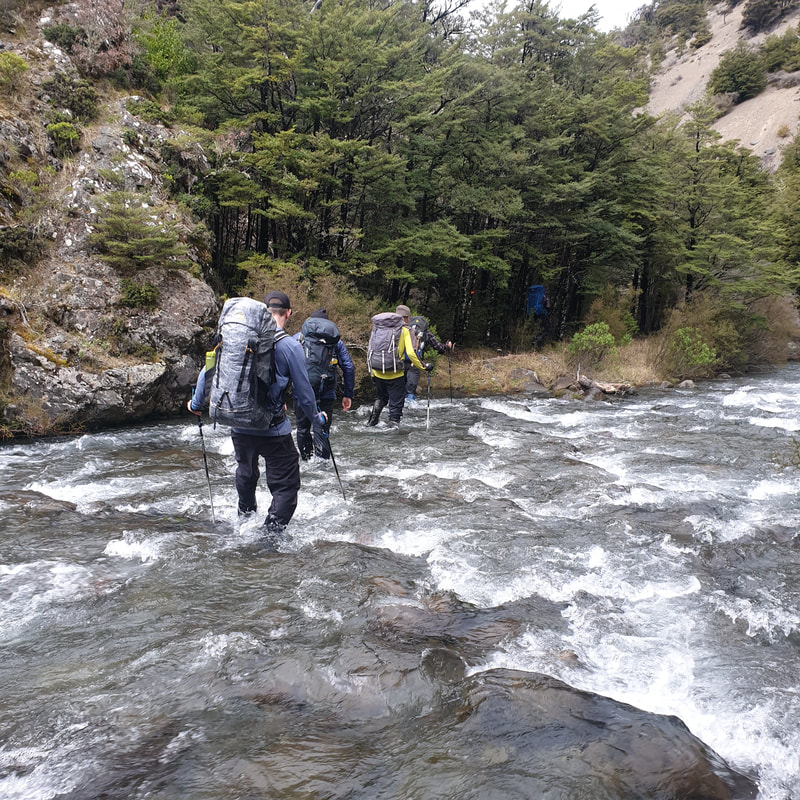 Have you had a busy week at work and just need to get away from it all? A nice easy overnighter into Jollie Brook hut might be just what the doctor ordered! This relatively popular jaunt is a perfect last minute destination and is a great intro to tramping in the Lake Sumner Forest Park. We managed to skive off work a couple of hours early on Friday afternoon and all piled into the trusty outback to hit the road. Turning off the main highway at Waikari we soon hit the stretch of windy, gravel road which would eventually deposit us at the car park near the sisters swing bridge - our ticket across the mighty Hurunui. We had a slightly iffy forecast going into the weekend, with a fair amount of rain predicted for the main divide which had scuttled our plans for a trip up the Taipo river in APNP. Our hope was that by moving north and further east of the divide we would escape the worst of it. We set out at the trailhead late afternoon and negotiated the initial quagmire of a track for 15 minutes to the sisters swing bridge. When seeing the Hurunui it becomes apparent why the swing bridge is necessary. The river at this point is swift and deep, an untamed mass hightailing it towards the ocean at pace. Definitely not a river that could be crossed on foot. After taking the obligatory photos we set off again on the true left heading upstream. The track here skirts the edge of the range before striking out across a large sparsely vegetated plateau towards Gabriel Hut, close to the eastern end of the lake itself. Gabriel hut is a pretty grim, depressing affair - better than being in the rain, but worth moving on from if you have the ability to! 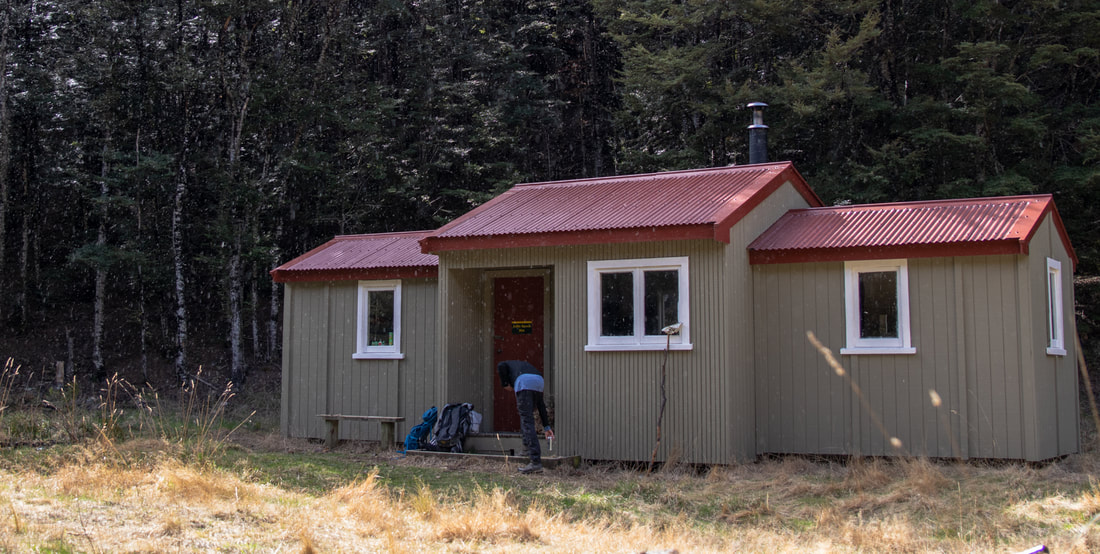 Jollie Brook Hut The Jollie Brook hut is a fantastic design, with a central room and two separate bunk rooms at each end. It has a roaring fire, and plenty of wood to go around. It has campsites galore and a meat safe out back for those of you who like to be armed while tramping. When we arrived our advance party already had the fire cranked and the billy on. Just what the doctor ordered. Our group took three and a half hours from the car into Jollie Brook but it's worth noting we were racing against the fading daylight. Our advance group took closer to an hour longer so budget on 3.5-5 hours for the walk depending on how leisurely your pace is. The rain held off for us, and other than gale force winds in the night we were pretty lucky with the weather. After spending a successful day hunting and gallivanting we decided to head out on the Sunday morning via the Jollie Brook to complete the circuit. Generally speaking you want good weather to do the full circuit as the Jollie Brook has to be forded multiple times on the way downstream and it would quickly become impassable in heavy rain. In fact even without any rain for a good 72 hours we still found the Jollie Brook swift and deep for our first few crossings after leaving the hut. The track follows the river downstream, crossing from bank to bank here and there. A few good campsites were spied along the way, with future plans to explore the valley hatched throughout the walk. Soon we found ourselves at the confluence with Cold stream. Cold stream hut is 6 bunk hut about an hour upstream from this junction. We continued our downstream meander as the Jollie Brook slowly grew in size. At no stage did we run into trouble crossing but as mentioned earlier it wouldn’t take much to make it dicey. Before the Jollie Brook meets the Hurunui we decided to cross and follow the track on the true left of the Hurunui back towards the sisters swingbridge and our cars. There is also a further swingbridge downstream of the Jollie Brook - Hurunui confluence which is another popular parking spot (the Jollie Brook Swingbridge). After hopping back over the swingbridge and dodging the mud we arrived back at the car for a celebratory beer before heading back to civilization. The walk out took us a cruisy four and a half hours. An overnight trip into Jollie Brook hut is suitable in most weather due to the bridged river crossings and would make a great family trip. The full circuit in good weather is very achievable with easy navigation and simple river crossings. If the weather is poor, or it has been raining heavily within 48-72 hours - perhaps give the circuit a miss. If you are going to attempt the circuit and are unsure of your river crossing ability then I would suggest travelling clockwise on the circuit as this gives you an easy bailout option if you struggle with the river levels.  1/8/2021 36 Comments The Kepler - Te Anau Just because it's a Great Walk, it doesn't mean the weather can't still kick your arse! Near the bottom of the South Island, nestled at the end of Lake Te Anau, is the stunning but potentially punishing Kepler Track. 3-4 days of breathtaking vistas, fantastic huts and the odd swim in pristine mountain rivers and lakes sounds pretty idyllic and I can see why tourists and residents flock to the area en masse. The track is incredibly well maintained and very achievable for a variety of fitness levels if you give yourself adequate time but in this part of the country the weather can also be absolutely brutal which will be our main memory of the loop for some time to come! Driving down from Christchurch the day before, we stopped just out of Queenstown for the night before continuing on to Te Anau early the next morning. This is one hell of a long commute by kiwi standards but if you're from a slightly bigger country I'm sure the 7-8 hours will just fly by. I had a weekend free from parenting duties and was teaming up with a long time friend who was temporarily stuck back in the country (thank you Covid) and my brother in law's small group of tramping buddies. We met at a cafe in town for a leisurely breakfast before finishing the drive out to the start of the track. You have a few options to complete the loop which includes an almost 10km section between two possible car parks. Most people start at the Kepler Track Shelter and walk up towards Luxmore Hut as their first day (keep in mind people run this whole loop in one go while you're plugging your way up there!). You can leave a car at the Rainbow Reach Shelter if possible and cut out the 2-3 hour walk between these two spots. Alternatively, shuttle services from Te Anau will come collect you and return you to your accommodation. We were walking out of season so the huts were going to be first in first served. With this in mind we decided to walk in the opposite direction to Iris Burn Hut the first day and have the option of tenting if the huts were too full. Our next day to Luxmore Hut would give us the choice to keep walking all the way to Brod Bay for the same reason. Two of us were nominated to drop a car back at the Kepler Shelter while the rest of the slower members of the group began the walk into Moturau Hut. By the time we returned and began giving chase, they had a 30 minute head start and were only caught at the hut itself. This first section takes you over a large swing bridge from the car park, before heading straight into beautiful native bush. Just before Moturau Hut, you'll emerge out onto a wetland area with large boardwalks directing you towards Shallow Bay. A fork in the track will take you to Shallow Bay Hut which is a short detour away at the mouth of the Waiau River or on to Moturau itself. Moturau is a large 40 bunk hut right on the shore of Lake Manapouri which means it's full of charm and full of sandflies. We stopped to regroup here and have a snack before continuing the long but mostly flat meander up towards Iris Burn Hut. Although this is easy terrain, 22km is a long first day when you haven't eaten any of your food or drank any of the beers yet. We were 6.5hrs including a few stops along the way for what was a fairly fit and experienced group. Although Iris Burn wasn't completely full, a few of us opted to tent at the almost deserted tent site a short walk from the hut. You'll need serviced hut tickets for these locations in the off season and a booking for each bed in season. It was around dinner time that I realised there had been two distinctly different trains of thought when it came to packing between the males and females in the group. One half had gone for lightweight, minimalist cuisine that looked as though it had been dredged up from the bottom depths of the pantry. Whereas the others had planned 3 course cooked meals for each night of the trip and were debating the best way to cook a pizza in a billy. Once the beer supply had been diminished on the first night, I quietly offloaded some of our excess rations into the other packs to make the climb up to Hanging Valley Shelter a little more equitable. After an interesting night where I'm fairly confident there was some untoward behaviour taking place in the bunk across from us, we woke to ferocious winds ripping mercilessly through the trees around the hut and a not inconsiderable amount of rain. I'll continue on in most sorts of weather if I'm confident my gear is up to the task and I have back up options in case of emergency but this was getting a little borderline. I had never been up on the ridge before so at this point I didn't know if we would be encountering any steep drop offs which would in turn make the high winds much more dangerous. We had some breakfast and discussed our options as we could always head back the way we had come and no one in the group was interested in putting ourselves in real danger. With the tents as a back up should we get stuck on the ridge for some reason, and full waterproof gear, we decided it was worth walking up to the ridge below Hanging Shelter and reassessing when we got there. I have to recommend that if you're a beginner or haven't spent a great deal of time in seriously bad weather, the best decision would have been to turn back at this point as cold wind and rain are the perfect combination for hypothermia. The walk up from this side is quite steep and most groups who had come down it the day before had commented to us that it was extremely difficult. I'd have to preface that it's difficult for a great walk but essentially still a really nice track that happens to be a massive climb. The only thing that will cause you issues here is if you're carrying too much weight in your pack. Drink all the beers the night before. 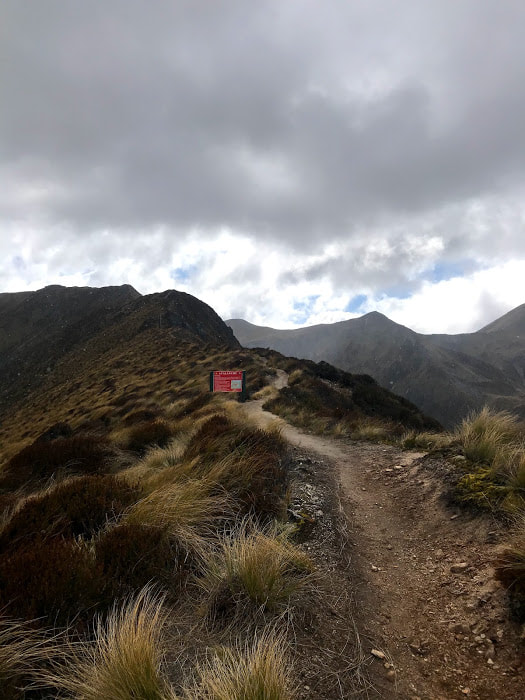 The wind was so strong at this point it was impossible to stay standing for more than a few seconds After following the switchbacks up to point 1167 we sat in the howling gale and had another impromptu meeting. The ridge was actually nice and wide with no steep drop offs that we could see so the worst case scenario of being blown off your feet was winding up in a tussock slightly off the track. It wasn't ideal but the risk was low so we decided we'd make a go of it. We paired up to help with the not ending up in tussocks thing and worked our way up to the shelter in between the stronger gusts of wind. It was actually really hard work just moving and by the last 200m we ended up dropping off the track and picking our way along the slope just below the track to stay vertical. We finally reached the first shelter and piled inside for a cuppa and a break. Being inside a tiny building on the side of a cliff while it's being buffeted by gale force winds is a little unnerving but we were seriously considering just stopping there for the night. That was of course until about 20 other trampers coming from the opposite direction came charging in to escape the weather 10 minutes later. We had a quick chat with a couple of them and ascertained that the remainder of the trip to Luxmore was achievable if we could stay warm. Not wanting to sit around any longer we grabbed our gear and headed back out into it for a few hours of the most interesting conditions I think I've ever walked in. It was important to check in every 15 minutes to make sure no one was getting cold but for the most part we just had to put our heads down and try not to get knocked off our feet too many times. By the time we reached the Forest Burn shelter, the conditions hadn't improved even a little but we were comfortable with how fast we were moving and knew we'd be alright to get to the hut in one piece. It was one last push around the summit of Mt Luxmore and then we were dropping down to the hut and finally out of the weather. Luxmore Hut is a huge 54 bunk complex with two bunk rooms and one main living/kitchen area. The hut wardens here were fantastic and after initially being a little surprised to see us emerge out of the rain, they gave us the grand tour and had us settled in for the afternoon. The flushing toilets were a massive novelty for me and the fact that I didn't have to go outside to pee in the middle of the night was enough to cement this as one of my favourite huts of all time. After getting out of all of our wet gear we set about eating everything we still had in our packs which was pleasingly still quite a lot. We opted for the other bunk room to the large group of Scouts who were ensconced in the building when we arrived and I had one of those amazing sleeps that follows a mentally challenging day. The following day started with a quick side trip to the cave about 5 minutes walk from the hut. I'm not much of a spelunker so I waited for the other adventurers at the mouth and contemplated how desperate I would have to be to actually take shelter in one of those things. Very, just for the record. The walk down to Brod Bay Shelter is again on exceptionally well groomed paths with convenient staircases anyplace where the gradient becomes unfavourable. The two designated vehicle movers were once again sent ahead from here and we arrived back at Kepler Shelter exactly 3hrs after leaving Luxmore. The rest of the group had just emerged from the track when we returned with both cars in tow a little while later. I'm sure that last 10km of track is still very nice but mentally I can't fathom walking past a perfectly good carpark after three days in the bush when I'm that close to procuring a decent flat white. The drive to Wanaka was broken up with the obligatory stop at the Cadrona Hotel for some liquid refreshments and chips which were pretty well deserved on this expedition I think. 10 out of 10 for adventure but will have to go back to experience the actual views one day. Day 1 Rainbow Reach to Iris Burn Hut: 6.5hrs Day 2 Iris Burn Hut to Luxmore Hut: about 6-7 hours but could be much faster in good weather Day 3 Luxmore Hut to Kepler Shelter: 3hrs Lessons learnt: The Kepler is a fickle mistress, don't be fooled by the Great Walk label! 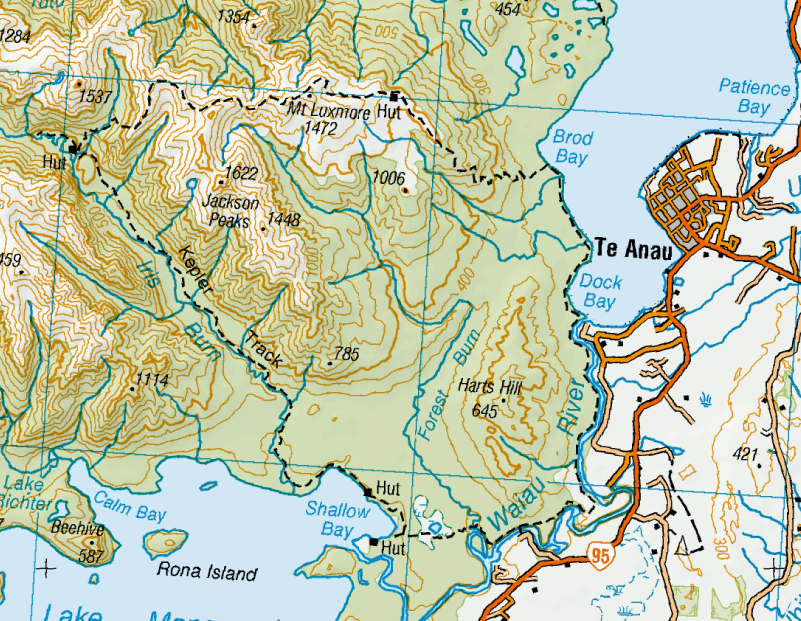 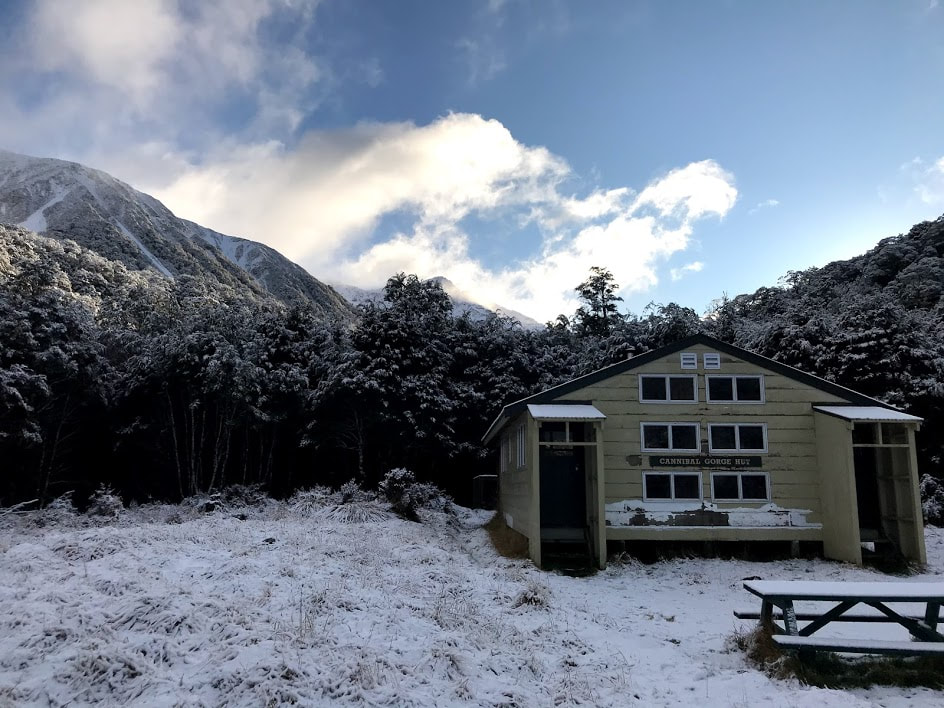 Sometimes a poor weather forecast means the end of even the best planned trips, but thankfully with a good hut, the right gear and even better company, you don't have to stay home pretending like there's still things on Netflix you haven't watched. While the St James Walkway at 66km is one of the longer trips in the country, Cannibal Gorge Hut is an easy overnighter or day trip covering the first section of track. This was our second time visiting in winter after we had wandered past a few years back on our way to Ada Pass Hut. With a group of ten and the baby in tow, it made for the perfect location with snow in the forecast and shorter daylight hours to contend with. With a name like "Cannibal Gorge" I'm sure you're wondering if the area had a somewhat colourful history and you wouldn't be wrong. The gorge is known as Kopi o Kaitangata in Maori and was where traditionally a slave would be slaughtered to provide food for the rest of the party of travelers. Thankfully the rest of us can make do with good old freeze dried meals these days but it certainly makes you consider how tough you had to be to survive living in that environment all those years ago! 2.5 hours from Christchurch and in the middle of the Lewis Pass, a large car park and shelter marks the beginning of the track. There is a toilet here just next to the shelter in case you decided to smash back a large flat white from the McDonalds by Pegasus as you were leaving town - or if you just need to pee that is. DOC puts the 8km walk into the hut at 3.5 hours and part of our group was almost exactly on this with a few breaks along the way. From the car park make your way along sections of boardwalk as the track winds its way downhill towards the first swing bridge. This is a bit demoralizing to climb back up on the return trip as the last 2km really gets you in the quads when you've already started dreaming of a hot shower. 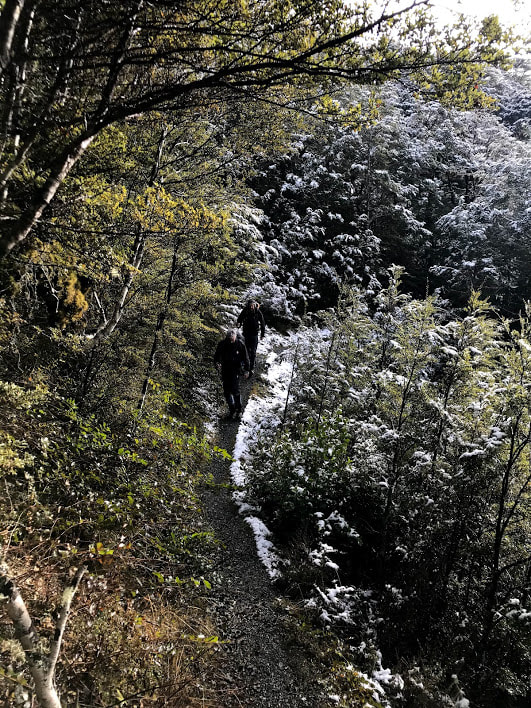 Once across to the far side of the Maruia River, the track remains a little higher above the bank as it winds north towards the hut. The track itself is well maintained and easy to follow even in snow as we had on the second day. There are a few spots climbing down and back out of the side streams where it can be a bit of a scramble up crumbling banks but mostly this is a easy to navigate and very runnable if you're that way inclined. Obvious signs will point out several spots which cut across avalanche paths but these only present a problem after significant snow fall. If you're at all in doubt about the snow conditions talk to your local DOC centre to get some advice before going. When the track eventually rejoins the river you're not far from the second swing bridge and the hut itself. We were 2.5 hours from car park to hut with no stops but some rather heavy packs so I would predict the super fit would fly through here in closer to 2hrs or alternatively if you're more of a novice expect to take the whole 3.5hrs. Cannibal Gorge Hut itself is a 20 bunk serviced hut with a fantastic coal fire and views out over a grassy clearing and back down the valley. There are two equal sized bunk rooms which makes it easy to split the snorers from the rest of the group or if you just don't like to talk to other people. We arrived in the early afternoon knowing that snow was due to hit a couple of hours later and we weren't disappointed. Although we only ended up with a few centimetres it was enough to make the walk out the following morning pretty magical. DOC does a great job of keeping coal stocked up for this hut but it sounds like some visitors have had issues getting the fire going. This is a very cold valley to be stuck in if you can't get that cranking so maybe do some research before you leave if you're not confident with your fire making skills! Total Distance: 16km Total Time: 5hrs return Pro tips: Mulled wine in winter is always worth the extra pack weight  5/21/2020 1 Comment MT SOMERS - DAY WALK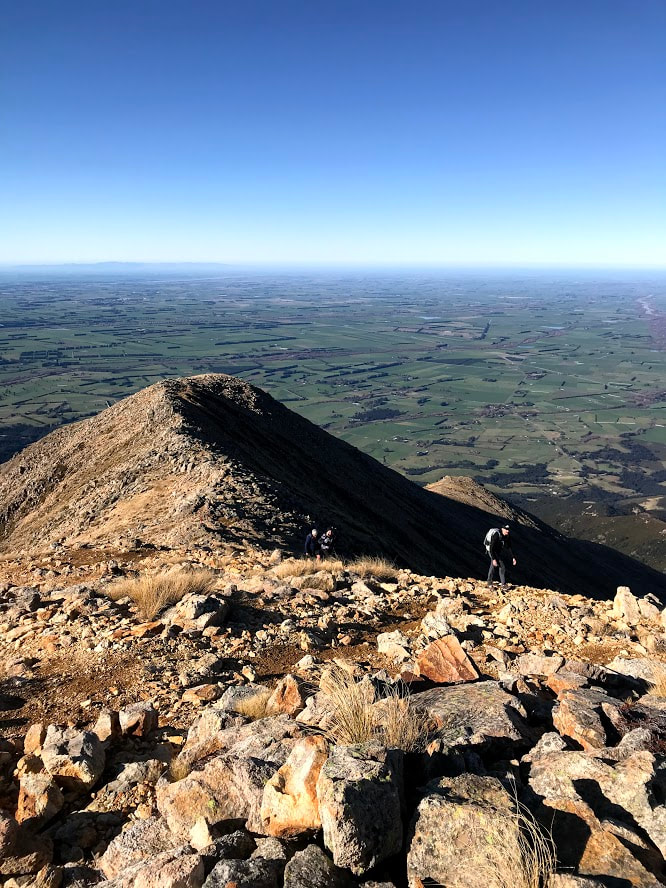 Looking back over the Canterbury Plains towards the Port Hills The wide variety of couples, families and friends we pass every time we venture out to Mt Somers is a testament to what a fantastic range of options this mountain offers to hikers. You can complete an easy overnighter into Woolshed Creek Hut; circumnavigate the whole mountain in a weekend or make your way up to the open plateau at the summit to enjoy expansive views of even Mt Cook on a clear day. Only 90 minutes south-west of Christchurch, as a youngster the small town of Staveley was known to me solely as the spot we were all bused to as kids for our Year 6 camp (and 7 years later a much rowdier Year 13 camp with many of the same students). I was excited to learn early on in my tramping life as an adult that just beyond the town was the start of a network of tracks I'd head back to visit almost yearly! Follow the signs past the Staveley store for Sharplin Falls and you'll find yourself at a large car park complete with flushing toilets and a small shelter. From here you can head north up towards Pinnacles Hut, along the river to Sharplin Falls or where we were heading along the South Face Track to the turn off with the Summit Track. The latter climbs steeply to begin with and is often muddy so poles are a big help through this first section. Once you've gained point 731 at Hookey Knob, the track evens out a little more before bringing you out of the beech forest for some open ridge travel to Staveley Hill. This section is well marked and easy to follow until you reach the signed turn off at 1085m.  Despite there being no snow this early in the year (May) the south side of the mountain receives little sun and the track became icy as we turned to make our way up to the summit. A poled route takes you through a stand of trees near the turn off before heading straight up the rocky south face. There is a clear track most of the way up and even if you lose it in places it's easy to pick up again between the poles. Once you gain the summit ridge, turn west and follow the route all the way to the trig at 1688m. The top opens out into a wide plateau large enough to host a game of force back without worrying you're going to fall off a cliff. A little further past the trig you'll find a monument pointing out the prominent peaks in every direction where you can stop and have a snack whilst dreaming of what it'd be like to climb Mt Cook (unless you've climbed it already in which case I'm concerned you felt the need to read this post to be honest). This is definitely an achievable climb for a range of abilities provided you've got a bit of fitness behind you. We passed 2 young kids climbing with their parents as well as getting the in laws up there ourselves. I feel DOC grossly overestimates the time for this walk in summer and I'd put it at a comfortable 3 - 3.5 hours from car park to summit for most people. We were 1.5h to the turn off and the same again to the summit. If you're looking for more of a challenge you can also approach this climb from Woolshed Creek Hut by following the Rhyolite Ridge Track to just below 1100m before navigating the open west ridge if you're confident using a map. If you have time, check out the falls on your return to the car park. 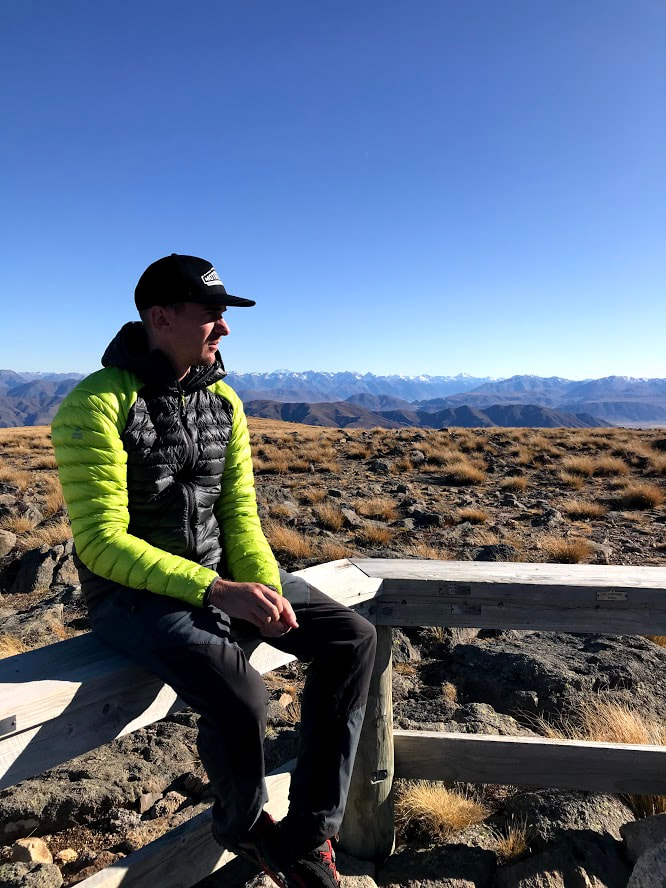 Taking a moment to relax at the top 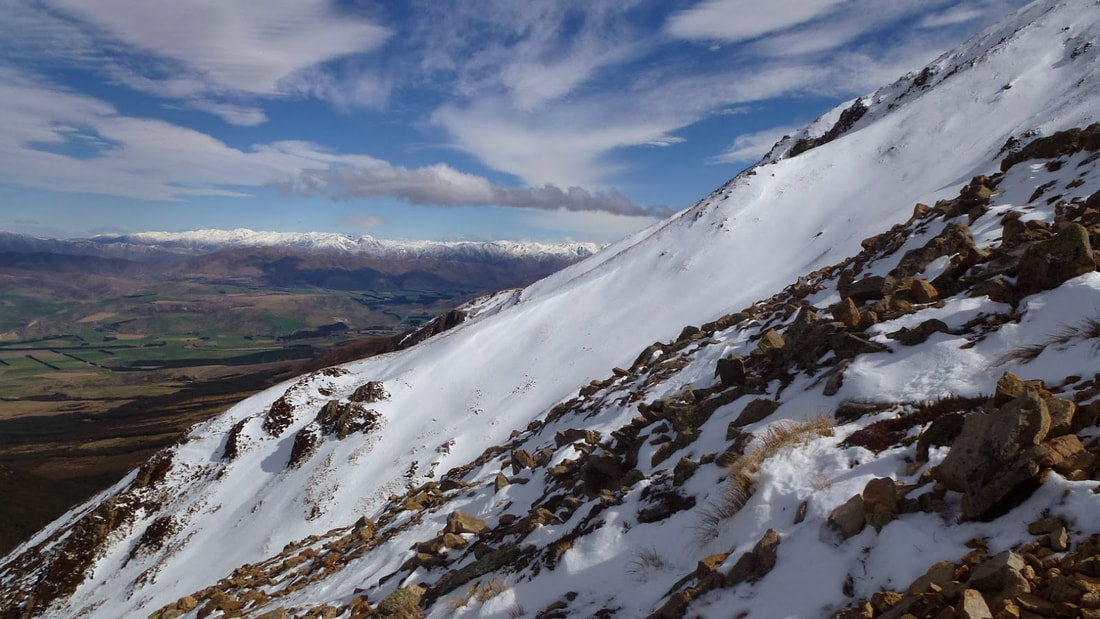 The summit ridge track in winter can require crampons as this side becomes quite icy 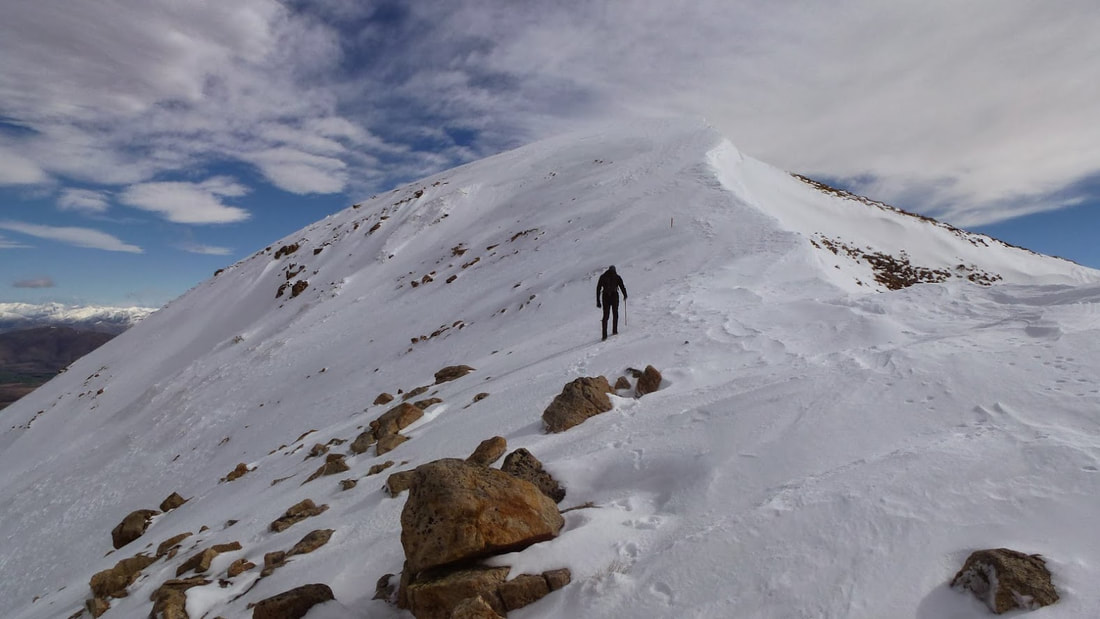 2/1/2020 1 Comment Mt Barrosa, Canterbury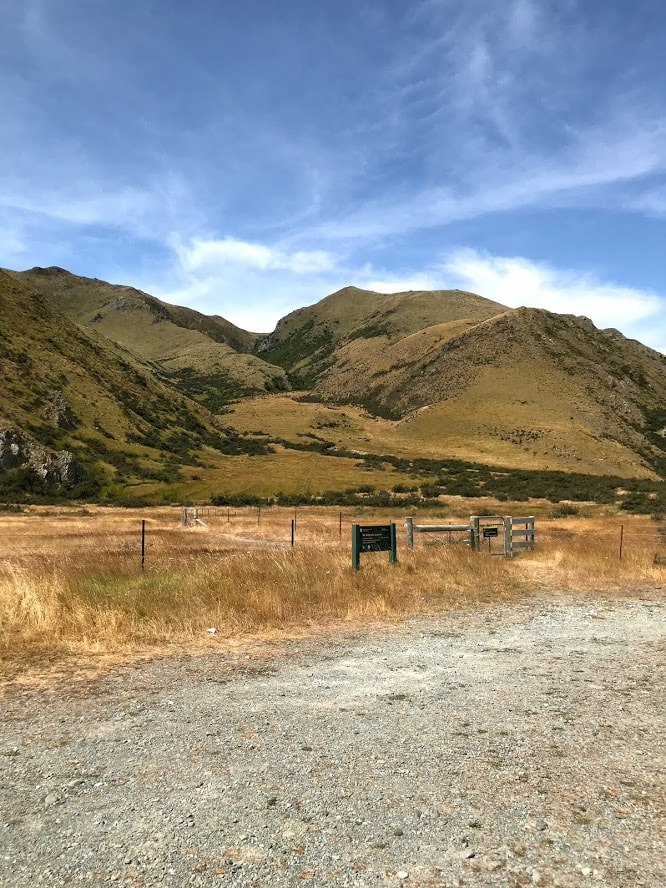 Looking up the start of the track from the car park If you're like us and have a dog and live in Canterbury then you'll appreciate how hard it can be to find new places to explore that are pooch friendly. Now that we've added a baby into the mix, finding appropriate weekend adventures has been somewhat more complex. On a positive note, it's meant we've had to look for and since discovered some really great tracks that had been right under our noses the last few years. Mt Barrosa is one of those little gems. Only 90 mins from the city and an awesome leg work out despite it's relatively short distance, I was surprised how much I enjoyed this track. I would highly recommend it to those with less time on their hands but wanting some decent elevation gains (840m to be exact) for trail running, hiking or serious dog walking. Just inland from the more well known summit of Mt Somers, Barrosa is a more achievable 1364m and the track begins right off Ashburton Gorge Road making access super easy. There is no toilet here so make sure to stop in Mt Somers village if you're less inclined to answer the call of nature in, ah, nature that is. You will also need to bring your own water as there is nowhere to fill up save for a stream at the beginning which I wouldn't rely on to be safe to drink. I went through a 2 litre bladder on a rather hot day just for reference. DOC puts the trip to the summit at 2.5 hours for 3.5km but I think most groups would be closer to the 2 hour mark if you're used to walking in the hills. This makes it possible to finish the whole trip in a morning then be back in town for Aunty Barbara's Poodle's 2nd Birthday with plenty of time to spare.  From Christchurch, head south to Rakaia and then inland along Thompsons Track and Tramway Road to Mt Somers Village 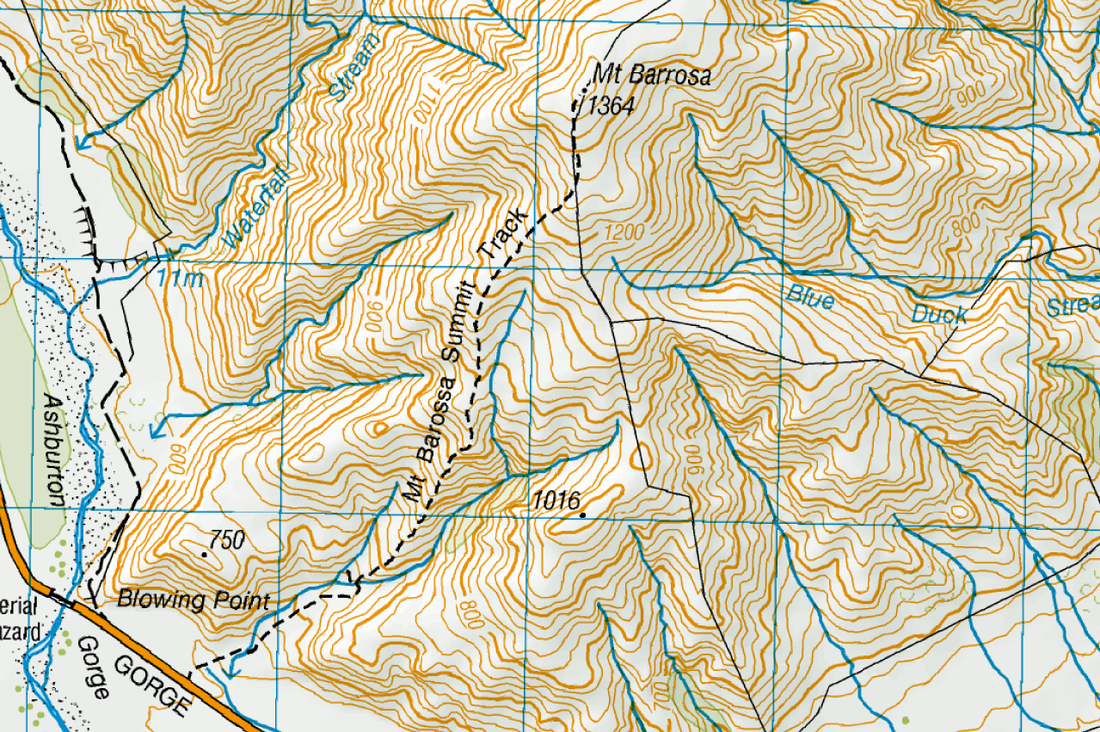 The first half of the climb is actually steeper and more challenging than the top half so hang in there if your lungs are feeling the burn early on! nWe packed the baby up into his carrier and set the dog off (under complete control of course) up the start of the track which climbs gently through grassy paddocks for the first 10 minutes. After crossing a small stream a large orange arrow directs you up the spur and off the 4WD track and straight into the climb. The slope is pretty relentless for the whole first hour which if you're a glass is half full kind of character then you'll be happy to get the elevation gain quickly behind you. Conversely, if you're a bit of a negative Nancy then go to your mind palace and try not to think about the quad burn, it'll be over soon. The track is clear and simple to follow if not a bit rough under foot in places. Eventually the gradient eases off and we had a short breather and a snack just passed the 1000m mark so the baby could have a roll around and eat some tussock. The track remains exposed along the ridge most of the way and the high winds made for a slightly more challenging ascent than on a calm day. It also stopped us from taking too many breaks and we finished the second half of the climb in one push. Towards the top of the mountain, you'll start to notice some pretty looking rocks scattered around the place. Barrosa and the Mt Somers area more generally are well known sites for discovering Agates, a rather novel reminder of their volcanic history. The summit itself was a little anti-climatic with no trig to signal the highest point but instead a rock garden of sorts to take in the expansive views from. Although the track here was easy to follow, a lack of route markings could make this significant;y more challenging in poor weather. You may want to carry a GPS or wait until you get a clear day to avoid wandering down the wrong spur on the return trip. The wind deterred us from staying too long and we made our way back down fairly quickly. The track is a little harder as you drop down through the steeper sections as the dry dirt and scree make for a slippery path. With a baby carrier to contend with, we took this part quite slowly and as a result were quite a bit longer getting back to the car than we would normally be just the two of us. If you're tossing up whether or not to carry trekking poles I think it's well worth it just for getting up and down that section of the ridge. All in all, we were still relatively quick with the total round trip taking 3 hrs 20 mins including stops. The little guy was still happy at the end, the dog was shattered so a pretty successful day trip as far as I'm concerned. If you're confident carrying a baby on your back up steep hills then this is a great option but unfortunately I wouldn't try it if you're not 100% confident in your fitness and/or footing. For those of you just rocking a day pack like a normal person then this is a fun little challenge that'll get your heart rate up but not ruin you for the rest of your weekend! 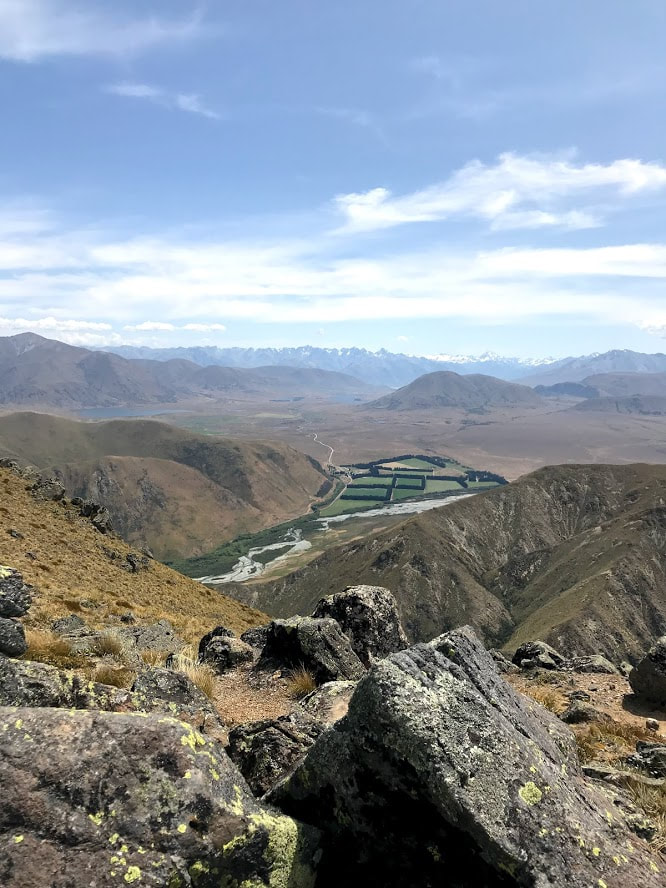 Lake Emma and Lake Clearwater in the distance 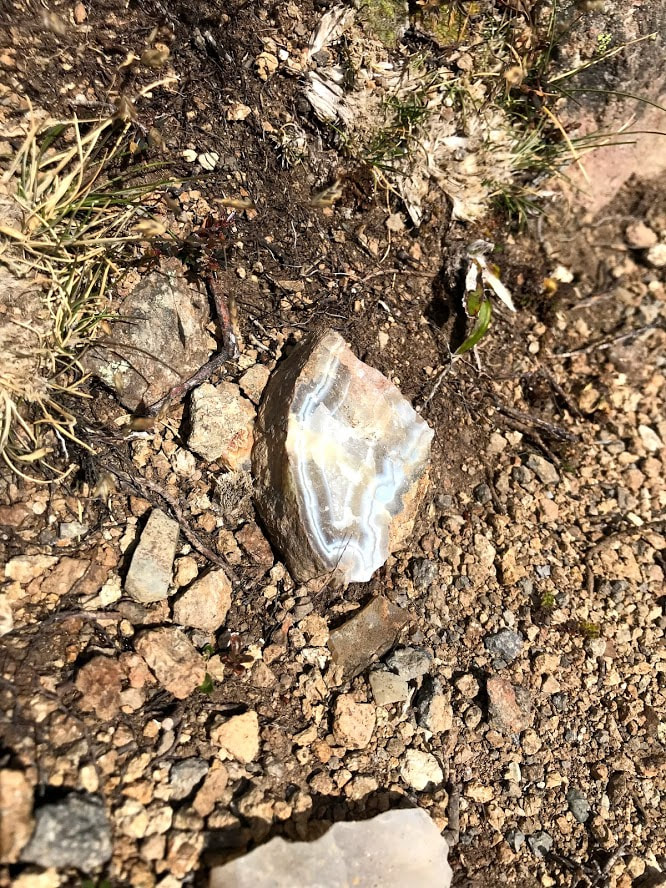 Agate spotting 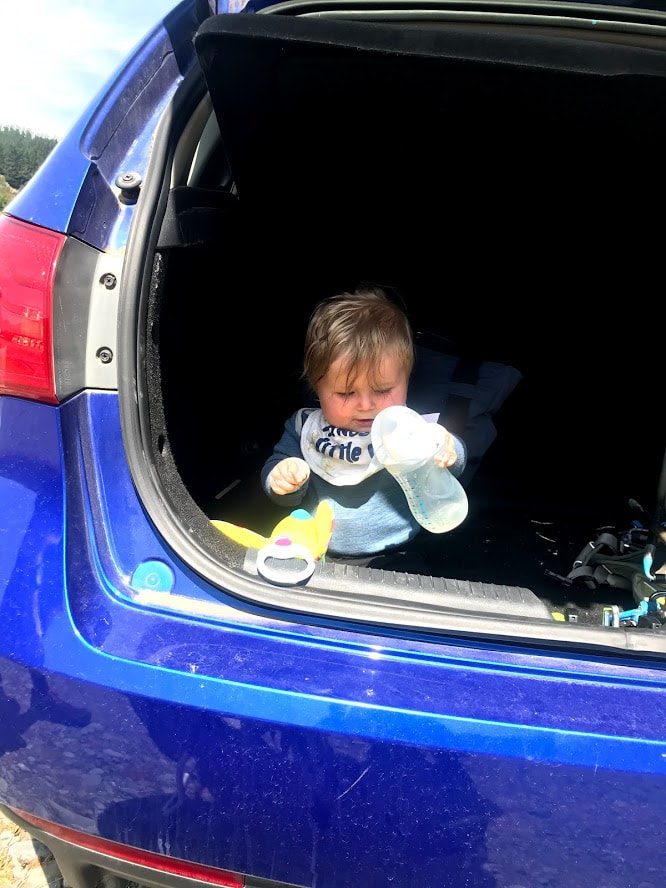 Keeping the baby entertained in the boot while getting ready 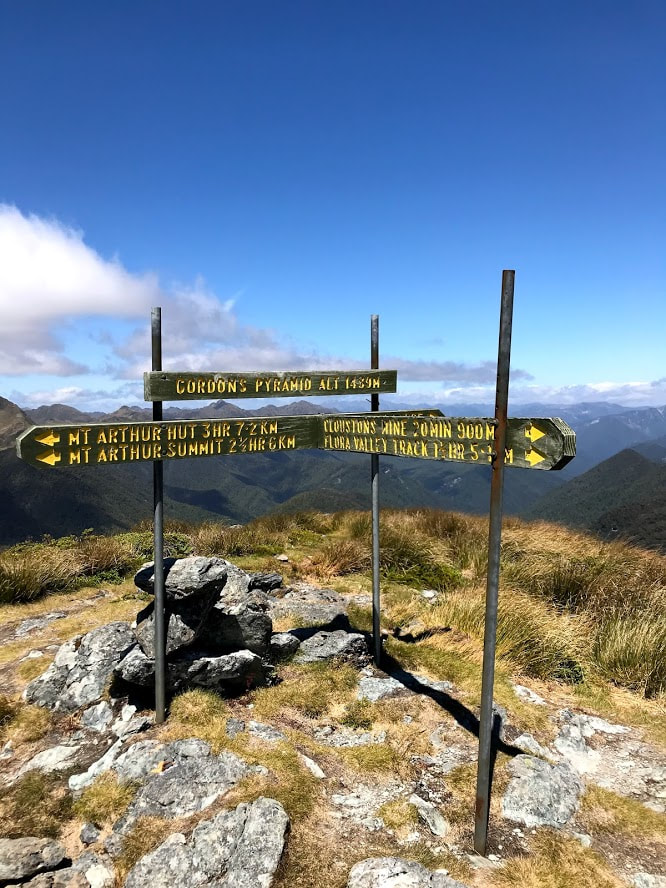 Standing on top of Gordon's Pyramid in very strong winds Having just graduated to the role of new parents earlier in the year, we were really keen to find a track we could take a baby on for a few days to get back into multi-day hikes once the weather warmed up. Knowing we would be based in Hanmer Springs over the New Year's break, it seemed like the perfect opportunity to do some exploring a little further north than we normally get from our home in Christchurch. The Arthur Range and Tablelands circuit just south of Motueka ticked all the boxes for us and although you could spend much longer exploring the various tracks and huts in the region, we settled on a two night, three day adventure taking us from the Flora car park to Salisbury Lodge and over the ridge to Mt Arthur Hut and out again. There was a bad weather bail out option at the top of Gordon's Pyramid that gave us some flexibility around the little guy (which we ended up using but more on that later). This is honestly a great trip for beginners as well as the more experienced of you with some really good hut options and a mix of forest and open tussock travel. One of the only real challenges we found after making the drive up from Hanmer in the morning, was the access road to Flora car park which is steep, very rutted and would be difficult to negotiate in a 2WD. Don't take your camper van up there! The car park itself is big but we arrived to find it almost at capacity already. The Mount Arthur day walk is hugely popular so it may pay to arrive early in the morning if you want to guarantee parking during busy holiday periods. There is a toilet and a shelter at the beginning of what starts out as a 4WD track and continues as such all the way to the Gridiron Rock Shelters. For those wanting to climb Mt Arthur directly, follow this track to Flora Saddle and turn off to your left up the Mt Arthur Track. Mt Arthur Hut is situated at around 1300m (about a 90 min walk) and the top of the mountain is another 5km and will take you 2-3 more hours to summit. Those who choose to complete the loop will descend from the summit to the second fork in the track (almost back at Mt Arthur Hut) and instead turn north to drop down to Flora Hut before heading back to the car park. We didn't stop at Flora Hut, just a quick look in to see what the accommodation was like (pretty neat and cosy) before we continued on up Flora Stream. DOC put the time to Upper Gridiron Shelter and Hut as 1 hour 30 mins. We were a bit quicker even with heavy packs so these are very achievable times. The Shelter is an impressive overhang with a small platform and two mattresses if you're game to sleep out in the open. While it was definitely a novelty, I don't know that you'd have an amazing sleep here so perhaps the Upper Gridiron Hut (3 bunks) might be a better option if you don't want to walk as far as Salisbury Lodge. We had our first break here, I was carrying the baby as well as some of our gear for the first time and it was a lot more weight than I'm used to! The stream here would be a great spot for a swim on a warmer day but we we gave it a miss in the milder weather and crossed the swing bridge instead. 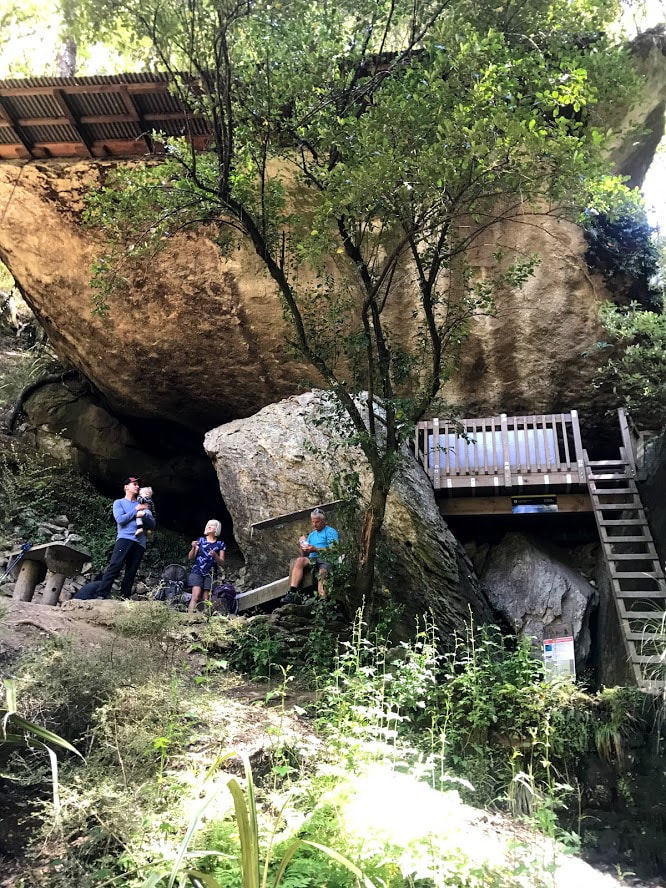 Up a steep slope is a small fire area and to the side the ladder leading up to the sleeping platform From here the 4WD drive track finally narrows to a single walking track but is no less easy on the legs. We made good time to the Growler Rock Shelter which would be alright to sleep at in an emergency but not nearly as comfortable as an actual hut. It made a great spot for afternoon tea but as the temperature was beginning to drop we got going rather quickly for the final march onto Salisbury Lodge. As you approach the lodge the track finally leaves the shelter of the forest and makes its way out into the open tussock of a large plateau. You pass the site of the old Salisbury Lodge a few minutes before the current version can be spotted through the trees. Salisbury Lodge is a serviced 22 bunk hut with some rather fancy (as far as long drops go) toilets, lots of firewood and a generous communal area. The views from the kitchen aren't bad at all and we reluctantly retired to the back deck to prepare dinner as we were camping out for the night. Thankfully for us we found a couple of decent spots to pitch our tents at the back of the hut but there aren't too many more options to do so comfortably in the immediate vicinity. We had no idea how the 8 month old would handle sleeping outside of his cot with us so we felt it would be more considerate not to be in the hut depending on how he went for the night. To cut a long night I mean story short we were glad we made that call. The temperature definitely drops overnight even in summer as the hut itself is at 1130m so we had brought a pretty serious insulation set up for the baby. There were so many things we learnt taking him tramping that it deserves its own post but rest assured he was warm and comfortable the entire trip! After getting a limited amount of shut eye it was time to de-camp and head into the first climb of the whole trip up Gordon's Pyramid. We had to retrace our steps a few hundred metres (you can take the Potholes track for a trip past Sphinx Valley Cave instead if you wish) before joining up with the clearly signposted Gordon's Pyramid Route. This is an easy to follow track with a short amount of scrambling as you make your way up through the forest to the open ridge line. I was still adjusting to carrying a significant load so it was a slow and steady climb for almost 2 hours up to 1489m whilst being buffeted by some pretty strong winds. Although it was a beautiful clear day, traversing the rest of the ridge with gusts that were nearly knocking us over didn't seem like the best idea with the baby. Once we reached the summit of Gordon's we immediately dropped off the tops to the welcome peace of the north side. This was our bail out option and would take us down off the tops past the old Cloustons Mine before rejoining Flora Stream and the way we had come in. 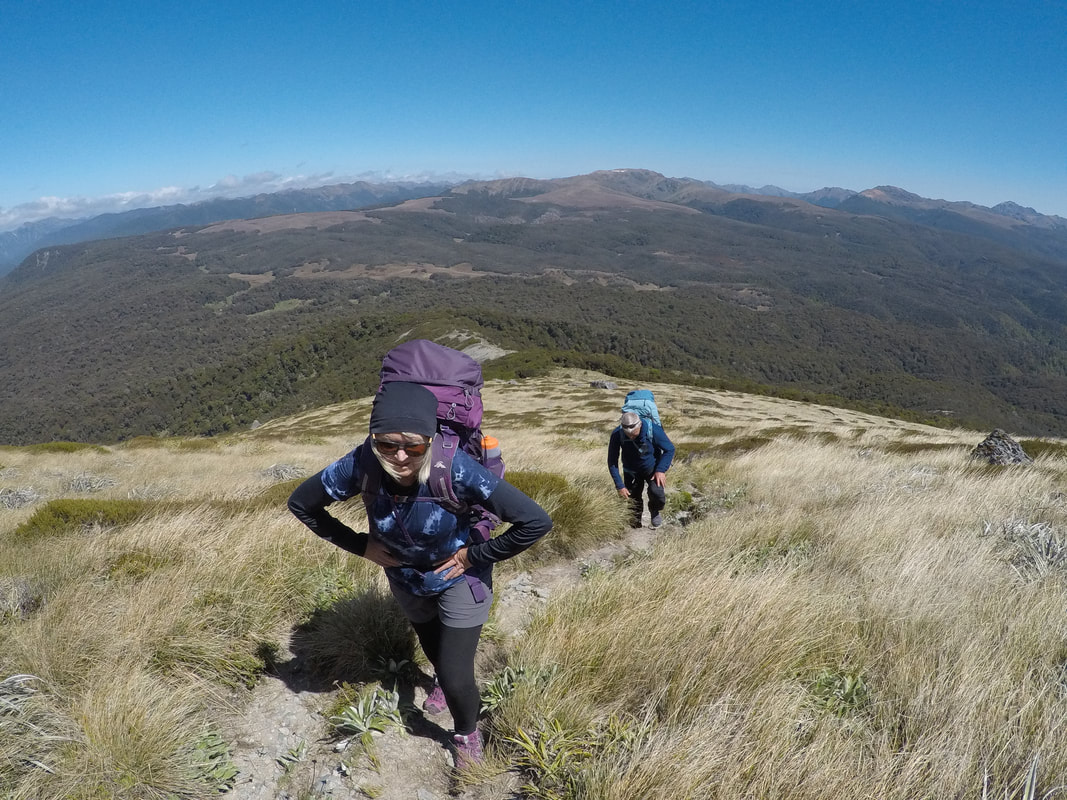 Feeling the leg burn towards the top of Gordons, Sailsbury Lodge is in the clearing in the distance After settling in for lunch and a breather out of the wind, we were joined by a guide and his client running the Mt Arthur, Salisbury Lodge, Flora Hut circuit for the day (I know, goals right?!). If this sounds like something you'd be interested in, check out Trail Explorers, they're a Nelson based company running private trips in the area and look like a great way to experience some of these tracks. From here we dropped quickly down a sharp incline to the bush line where the opening to the old mine is a short 2 minute detour from the main track. I'm going to be honest, the mine wasn't that exciting for me personally but the well cut track that descends at a very gentle gradient back to the valley courtesy of said miners was something I could get enthusiastic about. This 5km section took us 1 hour 20 mins before we were deposited back out onto the relative highway of the Salisbury-Flora Track. Having a rather long 4 hour drive back to Hanmer Springs we decided to make our way as far as Flora Hut again and stay the night before finishing the last small stretch to the car and driving back in the morning. This ended up being a great option as we found the hut empty when we arrived and made use of the picnic tables out in the sun to deal to the rest of our food supplies. The little stream just down from the hut and the relative ease of access from the road end makes this a fantastic place to bring kids and families. There is a lot of space for tenting as well as the 12 bunks in the huts which several groups made use of later in the evening. Just a word of warning to those heading into the area, be very wary of the innocent looking Weka, they're crafty and totally unafraid of you. My husband lost part of his bagel right from his hand following a ninja-like maneuver from one of the audacious little buggers. We made our way back to the car the following morning and passed around 25 people all heading up Mt Arthur. The car park was still full and luckily we only had to pass two other vehicles on the way back down the narrow access road. A few body confident festival goers on the way out to the highway made the drive out rather interesting but all in all it was a very successful first outing with the little guy. Flora car park to Salisbury Lodge - 3hrs 40mins Salisbury Lodge/Gordon's Pyramid/Cloustons Mine to Flora Hut - 5hrs Flora Hut to Flora car park - 30 mins Navigation - Very Easy Fitness - Moderate (if you haven't carried a big pack uphill too often the Gordon's Pyramid climb is tough) Bonus Points - If you're a keen mountain biker (or just fancy yourself as one) you can ride from Flora Saddle to Barron Flat 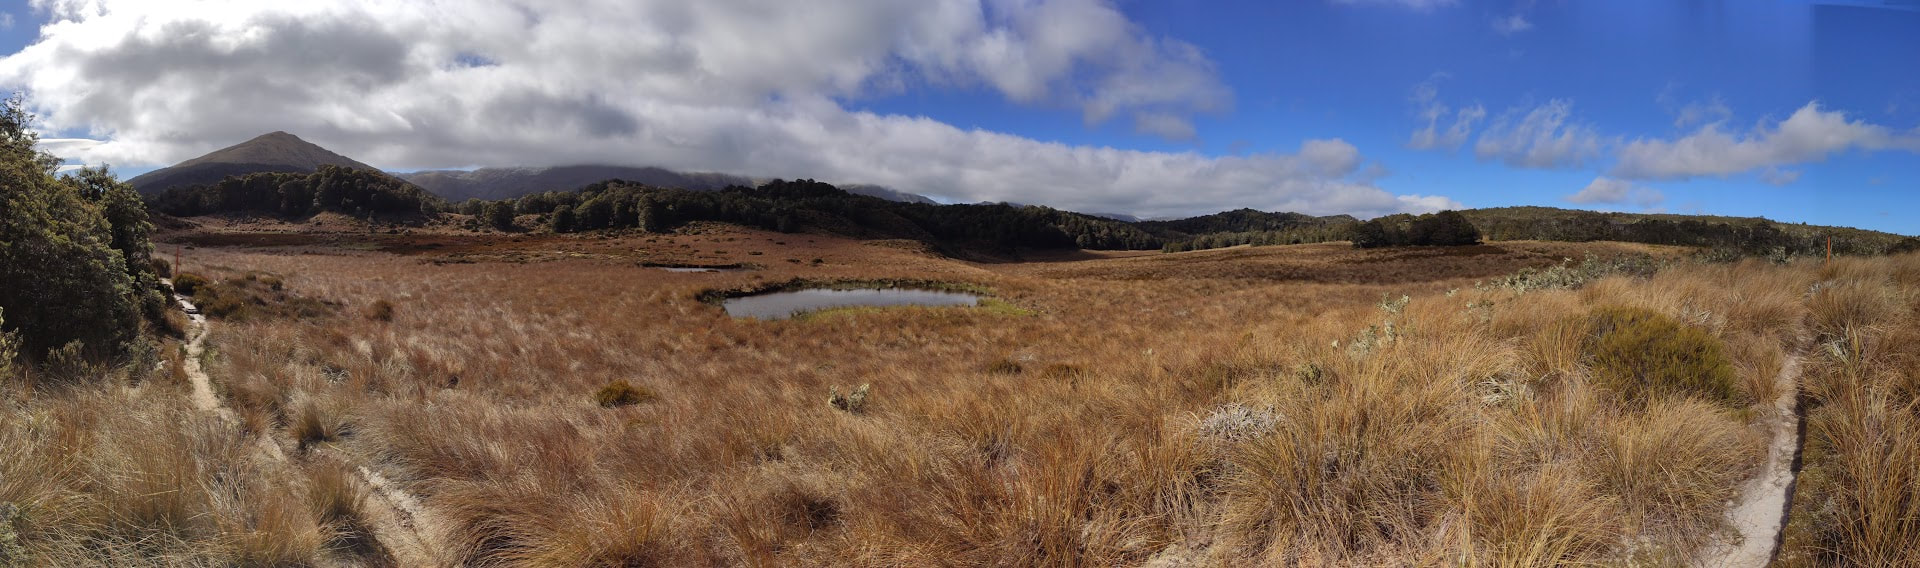 9/13/2019 4 Comments packhorse hut - day trip Banks Peninsula is full of fantastic day walks that are achievable for all levels of fitness and the Packhorse Hut track from Kaituna Valley is a great option for families and those just starting out with hiking. With a new baby in tow we were looking for something easy to stretch our legs on a stunning clear winter's day and we were rewarded with fantastic views and a beautiful drive with this trip. From the city, drive south through Tai Tapu and Motukarara before turning off up Kaituna Valley Road. Follow this just past the Kaituna Valley Scenic Reserve to Parkinsons Road (this is easy to miss as it's a small gravel road). There is plenty of parking just before the farm buildings and the track starts right over a stile in front.
The track itself is a wide 4WD track with a few ankle deep stream crossings and a fair bit of mud depending on the weather. It is well signposted the whole way so perfect if you're not too confident with your navigation! After crossing through farm land you begin to climb steadily in open country directly towards the hut itself. Once on the ridge expect great views of the south side of Mt Bradley in the north and back out to the ocean and Lake Ellesmere in the south. The climb is gradual but sustained so take plenty of water especially if it's hot. Our family of six plus a rather heavy baby took around an hour and a half to complete the 4km to the summit (this would be a nice, easy trail run for anyone needing to train some hills). 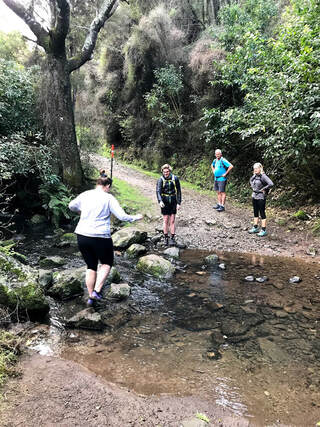 Trying to keep our feet dry The Packhorse Hut itself has been renovated and now has one large bunk room with 9 bunks in the back and a fire with plenty of seating in the front. A non-flushing toilet is situated behind the hut. Although there is water in a tank it isn't treated so bring plenty of your own unless you can boil it. This hut has to be booked if you want to stay overnight but would make for a great weekend adventure with kids or a first overnighter for beginner hikers. We had lunch sitting in the sun out the front of the hut before descending the same way we had come up. This took closer to 45mins as it is all down hill and easy walking.
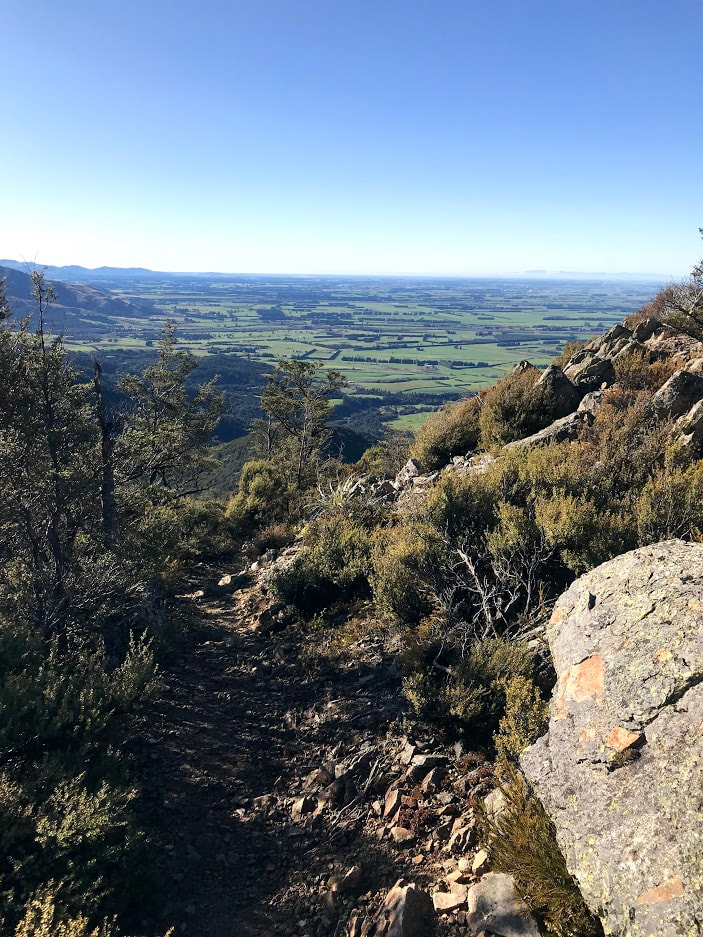
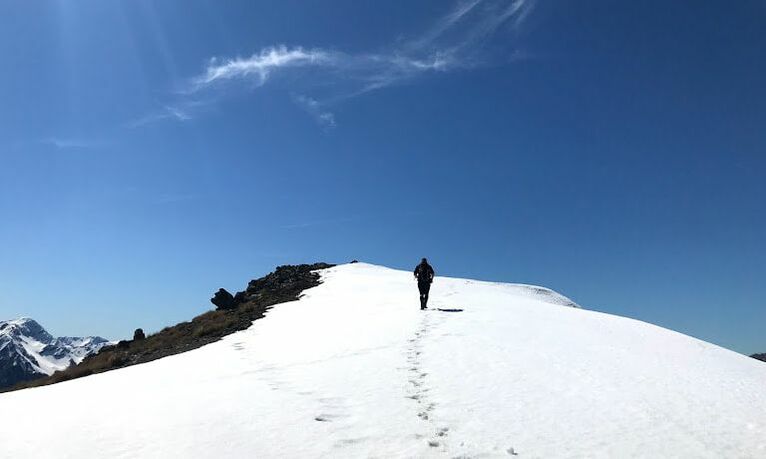
On your return trip to Christchurch stop at the Gebbies Garden Cafe at the turn off to Gebbies Pass Road for a coffee and to soak in the country atmosphere a bit longer before having to return to the city. Total Time - 2.5 hours Difficulty - Easy Bonus Points - Continue on to the Mt Herbert Summit (DOC puts this at 3hrs) 5/14/2019 1 Comment Roys Peak - Wanaka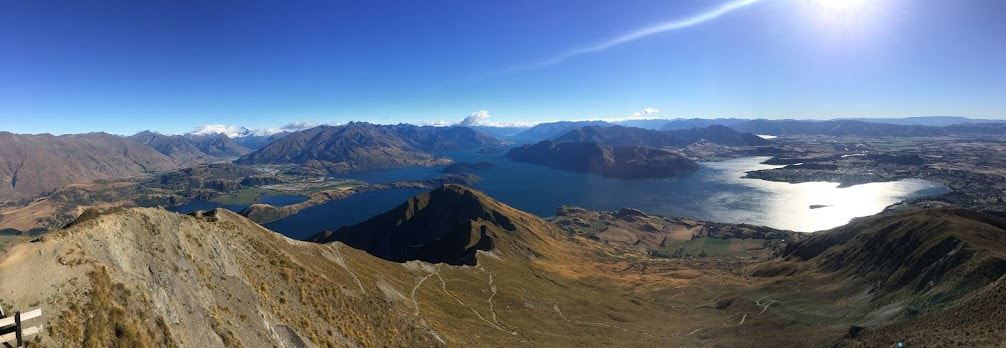 I know what you’re thinking - do we really need another trip report for Roys Peak? The answer is probably not but it seemed a shame not to put something on the website, particularly considering that we pop up Roys Peak pretty much anytime we are in Wanaka. Regardless of how popular it is no one can deny that it is a great little trip and therefore we think it's worthwhile writing about it. The Roys Peak car park is reached on the road from Wanaka to Glendhu Bay about 10 minutes out of town. It is well signposted and pretty much impossible to miss (look for the myriad of campervans and rental cars parked up). This track is extremely popular so I highly recommend arriving early to find a car park. If you’re a bit of an earlier riser try turning up in the dark with your headlamp to give yourself time to summit and watch the sunrise (which can be spectacular) from the top. 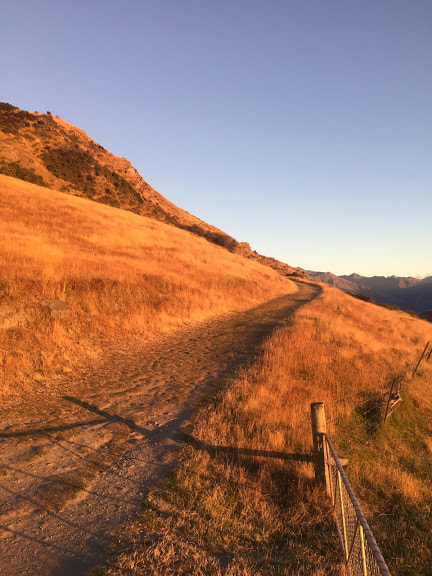 The four wheel drive track is wide and easy to follow all the way to the summit. The steepest part of the track is actually right at the bottom so if you are finding the first part really bad don’t panic - you are doing the worst bit. After this steep beginning the track traverses around the side of the mountain then begins to climb steadily again toward the summit ridge. If you are travelling up this part of the mountain in the dark it is not uncommon to see a string of head torches above you slowly making their way up, reinforcing just how popular the trip has become. Upon reaching the summit ridge you will notice the crowds and queues formed looking to the north. This is the now famous instagram spot where the masses flock to get that perfect snap looking out over Lake Wanaka towards Mt Aspiring. The important thing to realise at this point is that you are not at the top yet! The track continues to climb and skirts the western flank of the mountain before popping out at the summit. Don’t expect to be alone by this stage, I think I counted more than 80 people on the final part of the ridge watching the sunrise the last time I was up there. 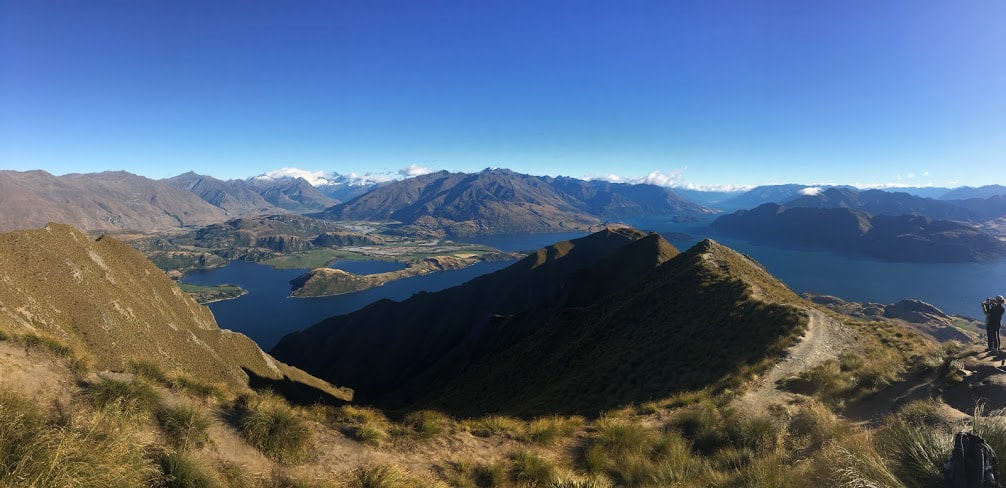 If you’re up for an extra challenge (or want to leave the crowds behind) try traversing along to Mt Alpha. It is possible to continue all the way out to Spots Creek via Mt Alpha but you will need to organise someone to pick you up at the end of the track which finishes about 10km out of Wanaka on the road through to Cardrona and the Crown Range. Doing this is definitely a more significant undertaking than Roys Peak so make sure you are well equipped and are comfortable with your navigation skills. Anytime I head up Roys Peak I try to embrace the crowds of people. As kiwis we are spoilt by the myriad of different tracks we have access to and the relative lack of people around. Most trips I do we hardly ever see anybody so it’s a bit of a novelty to share a track with tens if not hundreds of other hikers. You will see people heading up Roys Peak in sneakers and skinny jeans, and others who appear to have enough gear for an expedition to the Himalayas. As long as people stay safe then I think it is awesome to see so many people out there enjoying the outdoors. As per all our trips we recommend you take plenty of warm gear as it will be cold at the top - this trip is definitely an alpine excursion and shouldn’t be taken lightly (regardless of what the people in their jeans may think…). In winter there will be snow so best keep this trip as a summer option unless you have the skills and equipment to be up there at that time of year. Also, take plenty of water as there aren’t any good places to fill up once you're on your way. The return trip to and from the summit of Roys Peak is about 16km with a total elevation gain of about 1230m. The time taken to complete it varies significantly depending on your fitness levels. Most people will complete a return trip in 5 - 6 hours, if you are fit and running it will take a little over 2 hours. Alternatively, if you are keen to just plod and your fitness isn’t what it used to be then budget on 7 - 8 hours total and take plenty of snacks.
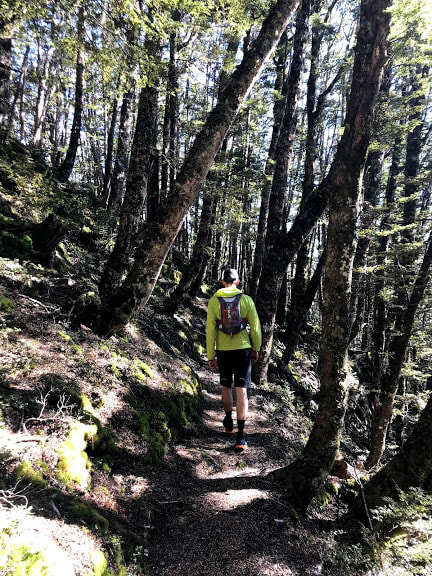
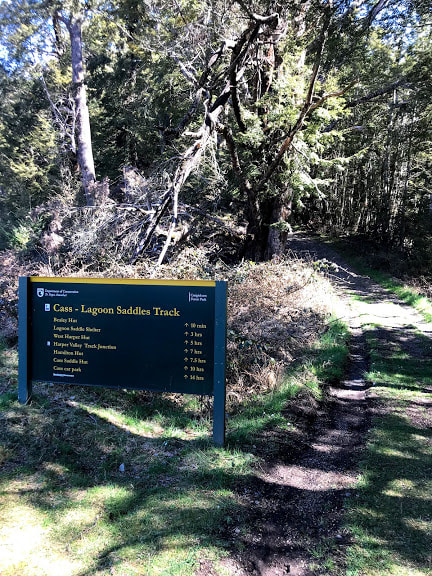
5/14/2019 2 Comments Mt Bruce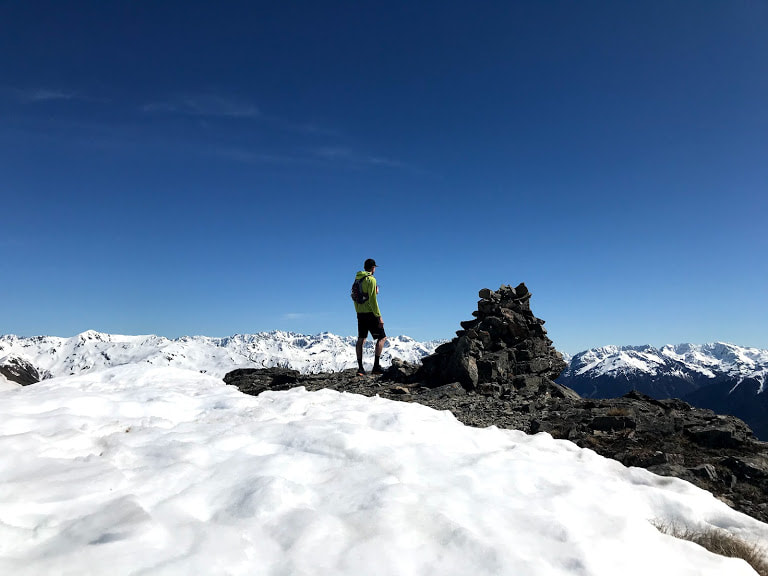 Rather substantial summit cairn When one of the lads put out the call for company on a cheeky trip up Mt Bruce we couldn’t help but jump at the chance. Mt Bruce is by no measure a large mountain at a modest 1630m ASL but it offers great views in all directions and the easy access makes this a stunner of a day trip in the Arthurs Pass region. Without snow it would be suitable to take beginners and those with less off-route experience up. The track begins at the Bealey end of the Cass-Lagoon Saddle track, with ample parking at the DOC signposted car park at the end of Cora Lynn road.
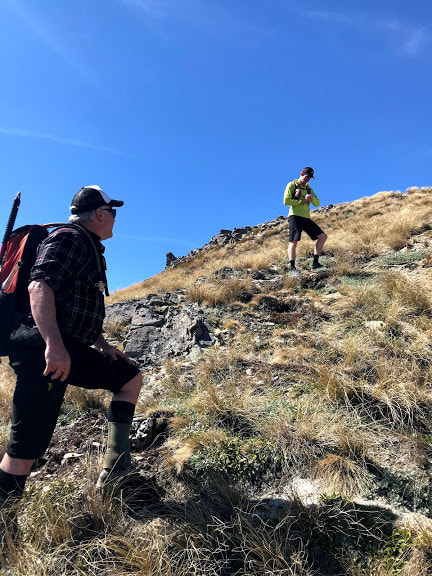
The day was clear with blue skies and light winds as we made our way from Christchurch towards Arthurs Pass to the start of the track. Our mate had spent the night at Bealey Hut, five minutes up the track. When we reached the hut he had already started up the track towards Mt Bruce so we wasted no time in chasing him down. The well formed track initially climbs steadily through a mixture of beech and pine forest for the first couple of kilometres and gains about four hundred vertical metres before the bush line is reached. Here the forest makes way to wide open tussock slopes which can become quite muddy after rain.
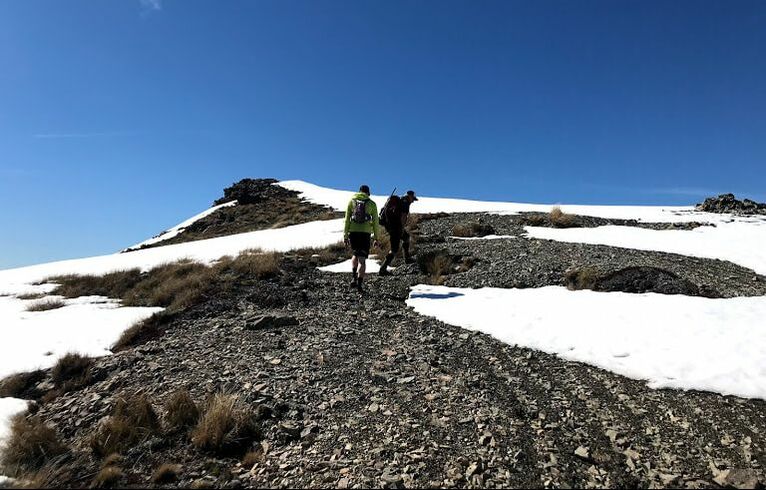
We chose to follow the track around towards Lagoon Saddle before leaving the track and following the broad northwest ridge towards the summit. The going is straightforward but it is definitely a gut buster at times. We had the odd area where we skirted large areas of steeper snow in order to stay on the rock and tussock as we were wearing our trail running shoes rather than boots. Having negotiated the worst areas we popped out onto the final part of the ridge and covered the last few hundred metres to be rewarded with magic views and an icy snow covered ridge. The obligatory summit photos ensued. We continued traversing the ridge before dropping down the northeast slopes making a beeline for the point where the track emerges from the bush. The going again was fairly straightforward and the route finding was very easy back to the track. A relaxed wander back to the cars topped off a great day trip. Allow about 2.5 - 3 hours to the summit, and 1.5 - 2 hours to get back down again. Distance ~11km total. 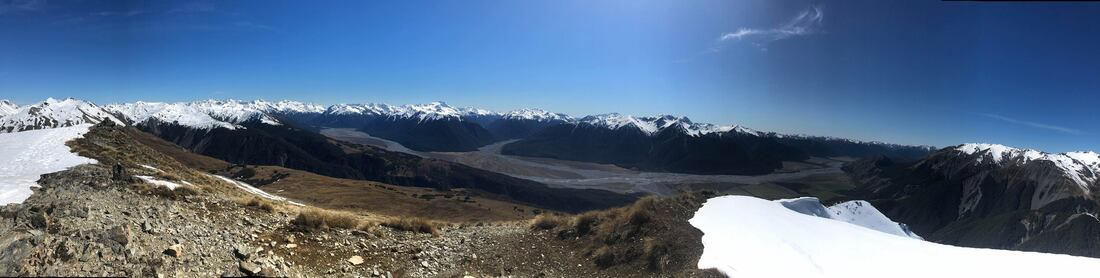 View from the top 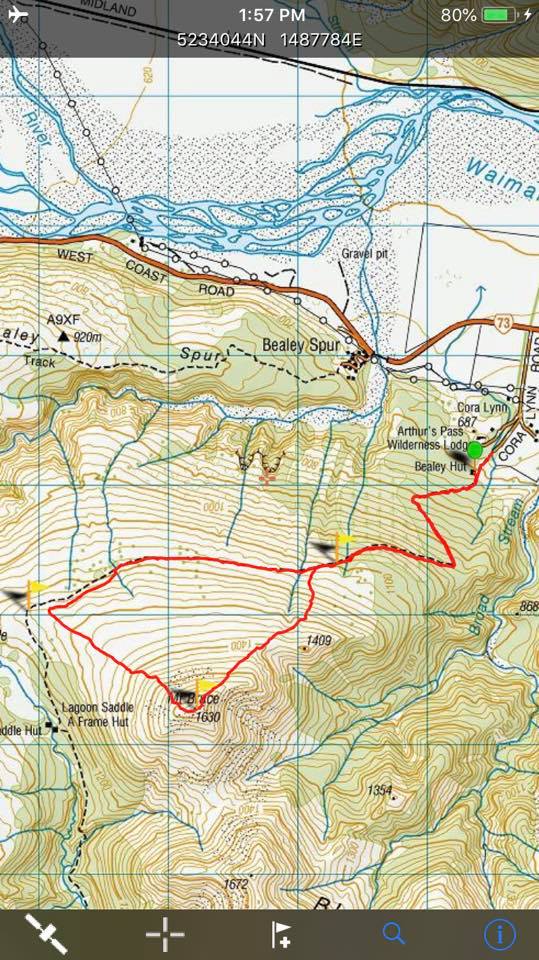 |
CategoriesAll Arthurs Pass National Park Avalanche Peak Bealey Spur Bob's Camp Biv Cannibal Gorge Hut Canterbury Foothills Carroll Hut And Kelly Range Cass Saddle Lagoon Saddle Castle Hill Peak Crow Valley And Crow Hut Edwards - Stanley Rivers Fowlers Pass To Lake Guyon Gloriana Peak And Ada Pass Hut Hakatere Conservation Area Hanmer Springs Hope Kiwi Jollie Brook Circuit Kahurangi National Park Kepler Track Lake Sumner Forest Park Lathrop Saddle Little Mt Peel Manuka Hut Marlborough Maukuratawhai Mt Barrosa Mt Bruce Mt Cassidy Mt Potts Mt Princess Mt Somers Mt Tapuae-o-uenuku Mt Te Kinga Mt Torlesse Mystery Lake Nelson Lakes Packhorse Hut Poulter Hut Roys Peak St James Sylvia Tops Tablelands Circuit - Salisbury Lodge The Five Passes The Three Passes Travers-Sabine Circuit Tribulation Hut Waiau Pass And Blue Lake Wanaka West Coast |


 RSS Feed