|
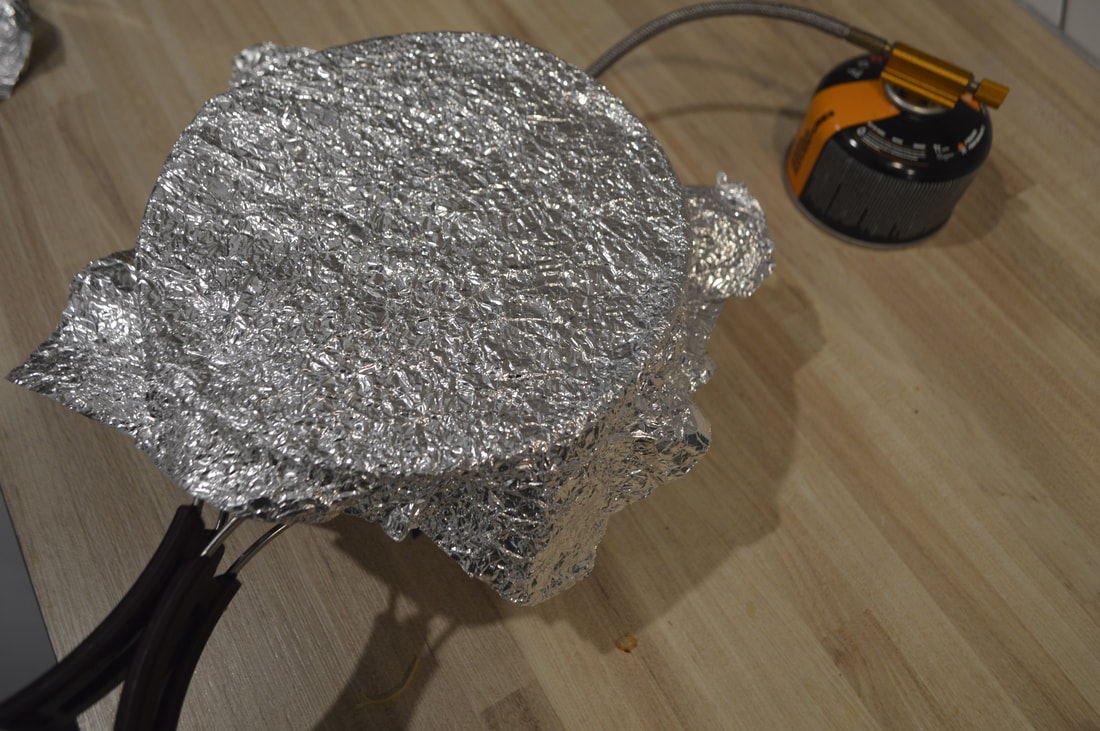
9/7/2020 1 Comment BACK COUNTRY PIZZA Serves: 1 Packed weight: 214g Cooking Time: 25mins Energy: 2686kj This is a super satisfying meal at the end of a long day and doesn't require a lot of ingredients. A good non-stick fry pan makes all the difference. Nutritional information based on a Ham, Cheese and Pineapple combination. Ingredients (per serve) 1/2 cup Plain Flour 1/2 Tbsp Powdered Milk Pinch of Salt 1/2 sachet of tomato paste Selected toppings 1 Tbsp Olive Oil Tin Foil to cover pan 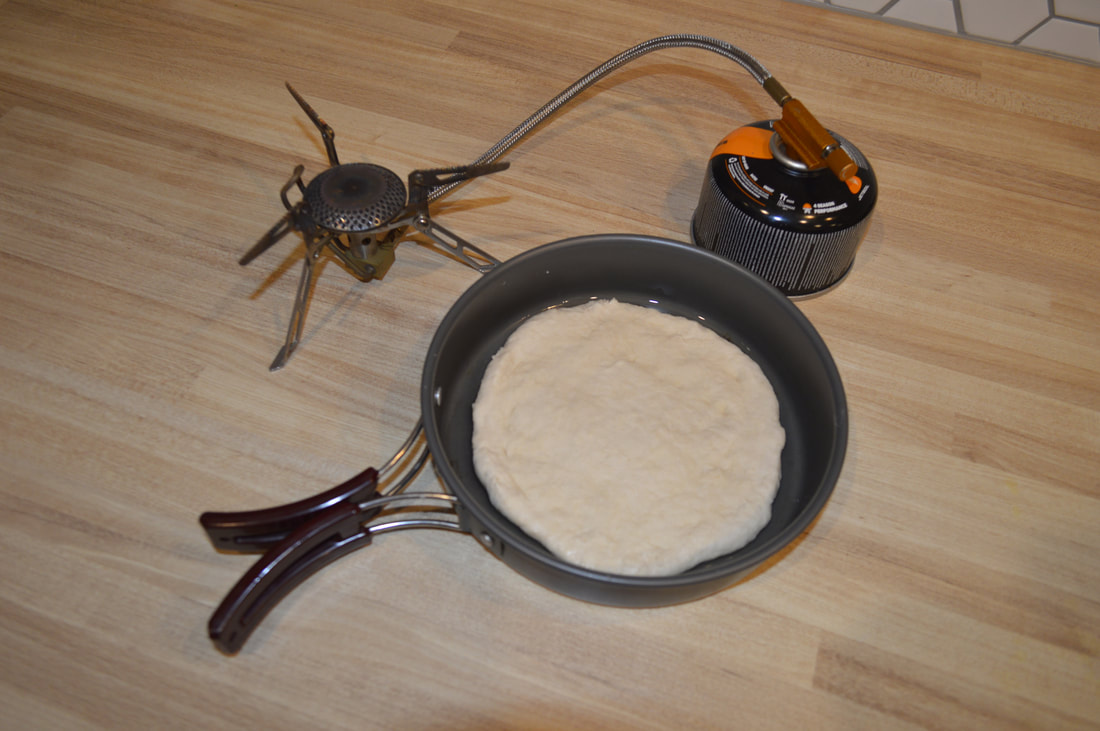 Prep at Home Pack flour, powdered milk and salt together in a ziplock bag Dehydrate fruit or vegetable toppings like pineapple or capsicum and pack in ziplock bag Pack other ingredients separately Cooking Re-hydrate toppings as required Add 1/4 cup of water to flour in a small pot or bowl (do this slowly so as to not add too much) Mix until dough just comes together and is not too sticky (see above!) Add half the oil to your pan Press the mixture into the bottom of the pan leaving just enough room to get a utensil under for flipping Cook on one side until just starting to brown Turn off heat and flip the pizza Add tomato paste and other toppings before covering with foil and pressing around the edges of the pan Cook for approximately 15 mins until cheese is melted and base is golden Nutritional Information (per serve) for ham, cheese and pineapple
Energy (cal): 642 Energy (kJ): 2686 Fat: 26.2g Carbs: 72.4g Protein: 26g Total weight: 214g Pro Tip: Using a small pot to mix the dough is much easier than mixing in the bag but make sure to rinse it out before the dough starts to dry!
1 Comment
6/21/2020 1 Comment MANGO and CHICKEN CURRY Serves: One Packed weight: approx 132g Cooking Time: 20 mins Energy: 2510kj Ingredients 1/4 cup plain white rice, cooked and dehydrated 100g chicken mince, cooked and dehydrated 1/2 chopped mango, dehydrated 3/4 cup chopped capsicum, dehydrated 1 tsp mild curry powder 2 Tbs coconut milk powder Prep at Home Cook and dehydrate rice over night Cook (with a small amount of water not oil) and dehydrate chicken mince over night Slice capsicum and mango into small pieces, dehydrate over night Place all ingredients in a zip lock bag Cooking Boil one cup of water in a medium sized pot Pour in contents of bag and cover, leave to sit for 10 mins Bring back to the boil and let simmer for 10 mins, adding more water if needed until the rice and chicken are re-hydrated 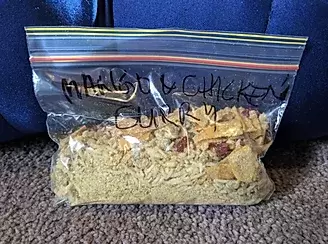 Nutritional Information (per serve)
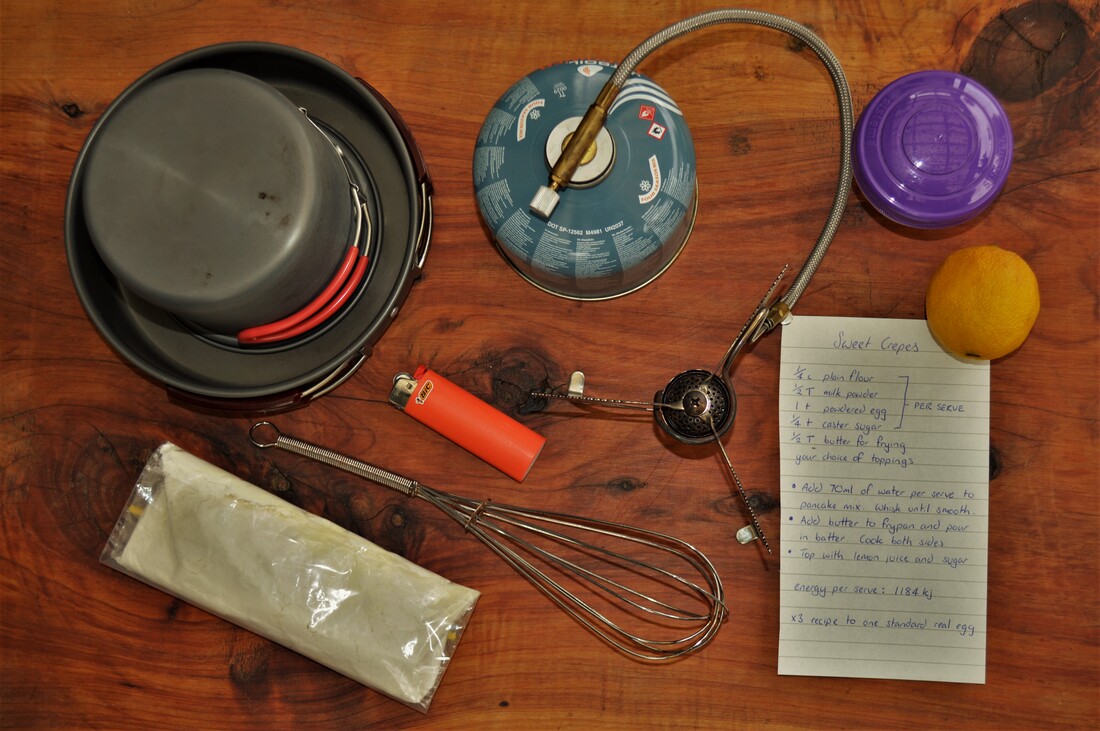
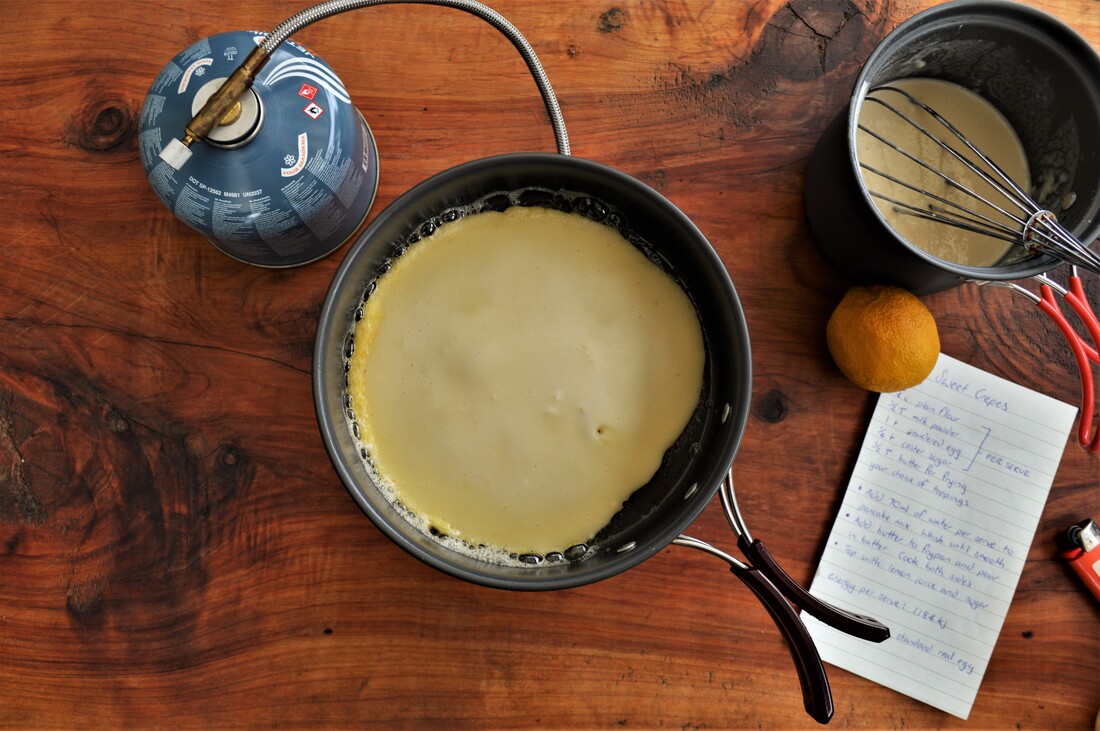
Energy (cal): 600 Energy (kJ): 2510 Fat: 25.7g Carbs: 60.3g Protein: 27.2g Total weight: 132g 3/3/2020 0 Comments Sweet crepes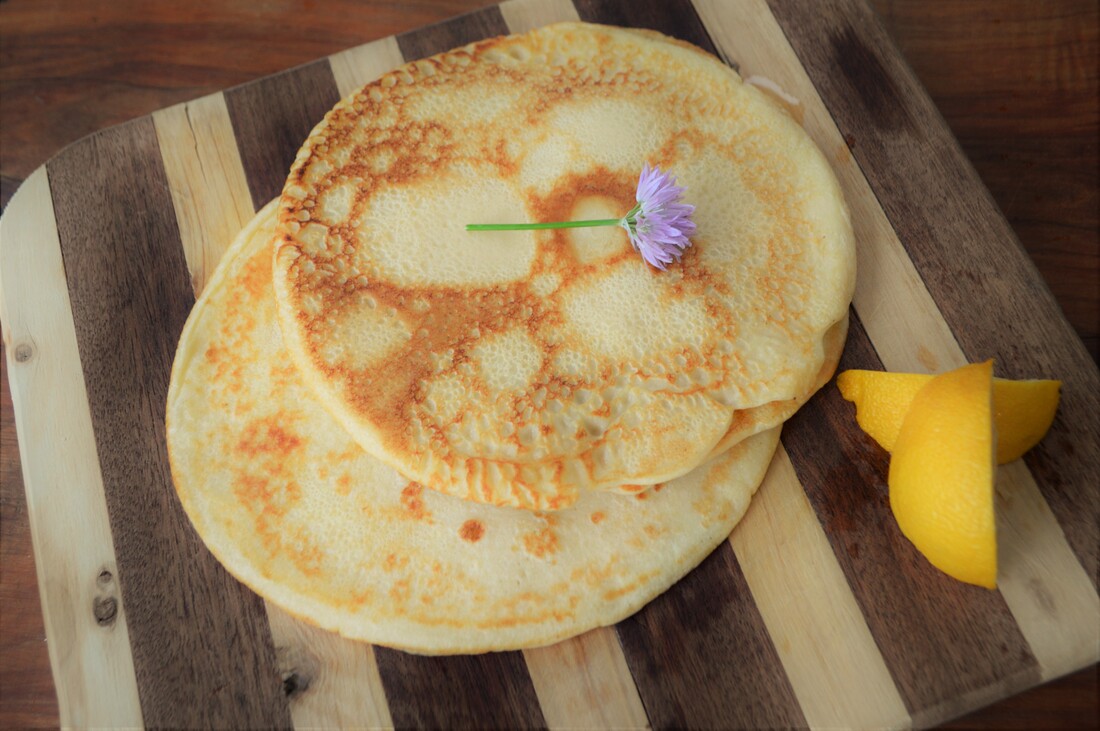 Serves: One (or more) Packed weight: approx 77g Cooking Time: 15 mins Energy: 1184kj This is a quick and easy treat for after dinner and takes up minimal room in your pack! Use a small non-stick camping fry pan and a cooker with a good wide base for stability. Top with lemon juice and sugar to serve. Ingredients (per serve) 1/4 cup plain flour 1/2 tablespoon powdered milk 1 teaspoon powdered egg 1/4 teaspoon caster sugar 1/2 tablespoon butter for frying *If using a whole fresh egg you will need to triple all other ingredients (will make 3-4 crepes)
Prep at Home Pack flour, powdered milk, powdered egg and sugar into a zip lock bag. Pack other ingredients separately (including toppings) Mark 70ml on your drink bottle or camp mug if you don't have another accurate measure for water Cooking Slowly add 70-75ml of water to the dry ingredients and whisk or mix with a fork until smooth (this is easier to do in a small bowl or pot) Light cooker and melt butter in a fry pan over the heat Pour crepe batter into pan without filling to the edges Cook on one side for a few minutes until you see bubbles appear Flip and cook on remaining side Serve with your choice of toppings 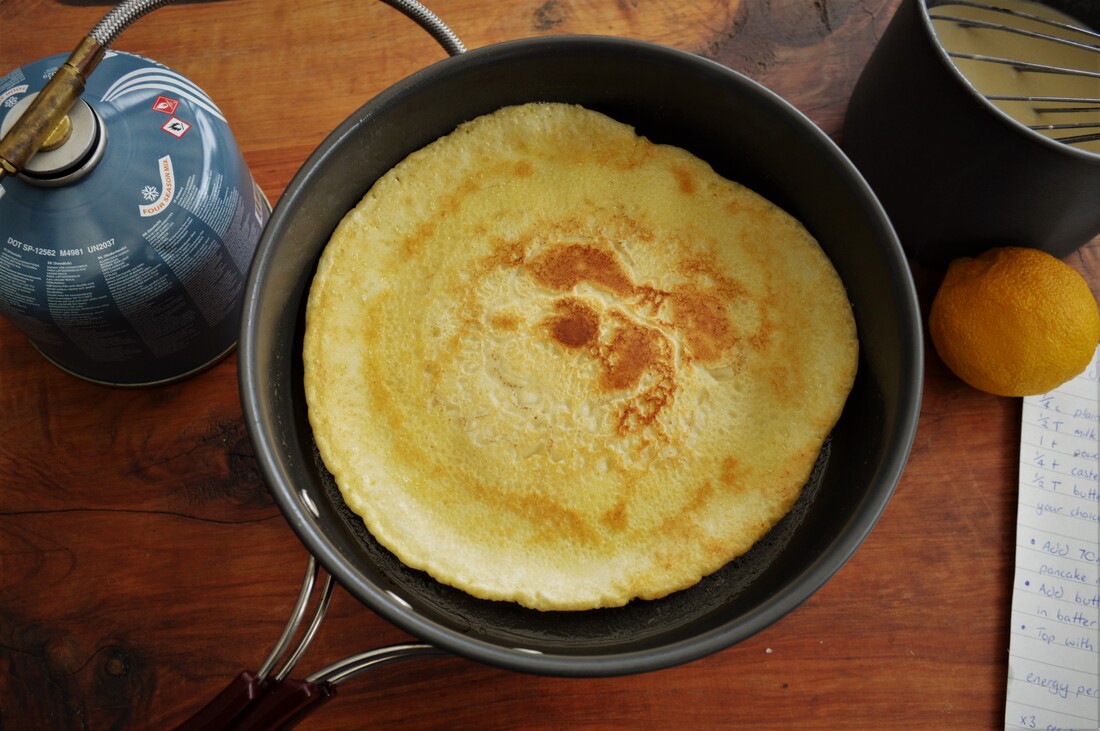 Nutritional Information (per serve)
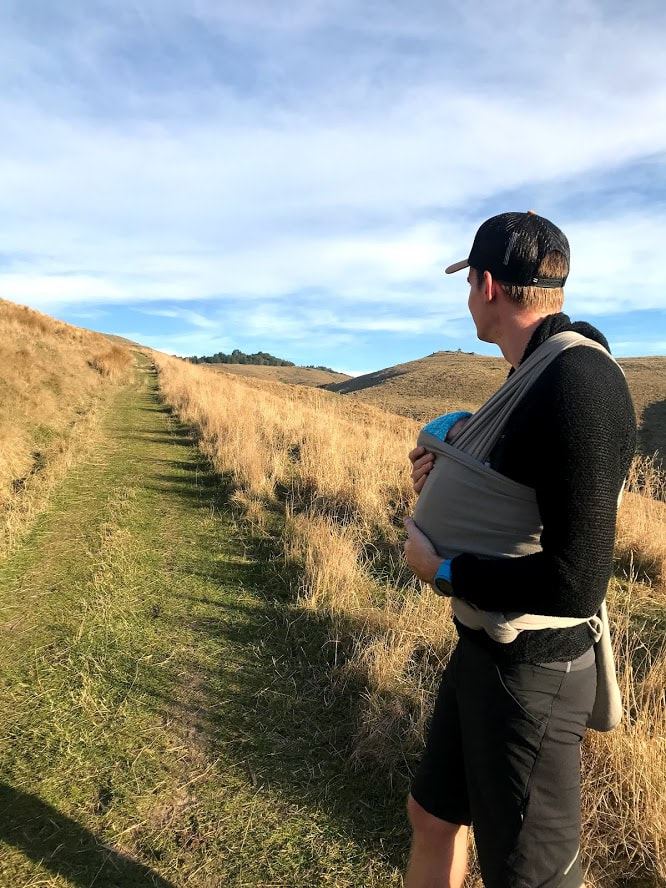
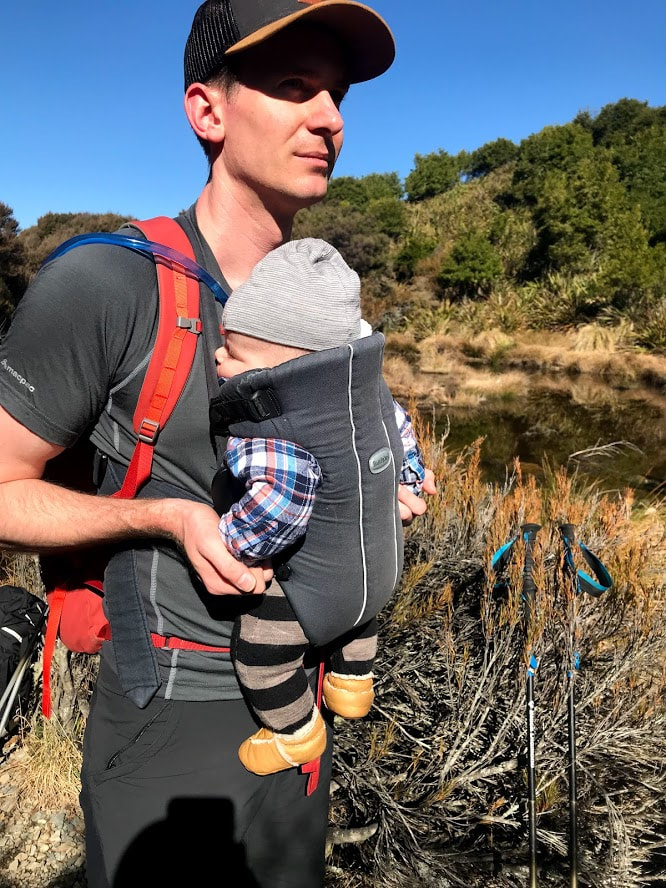
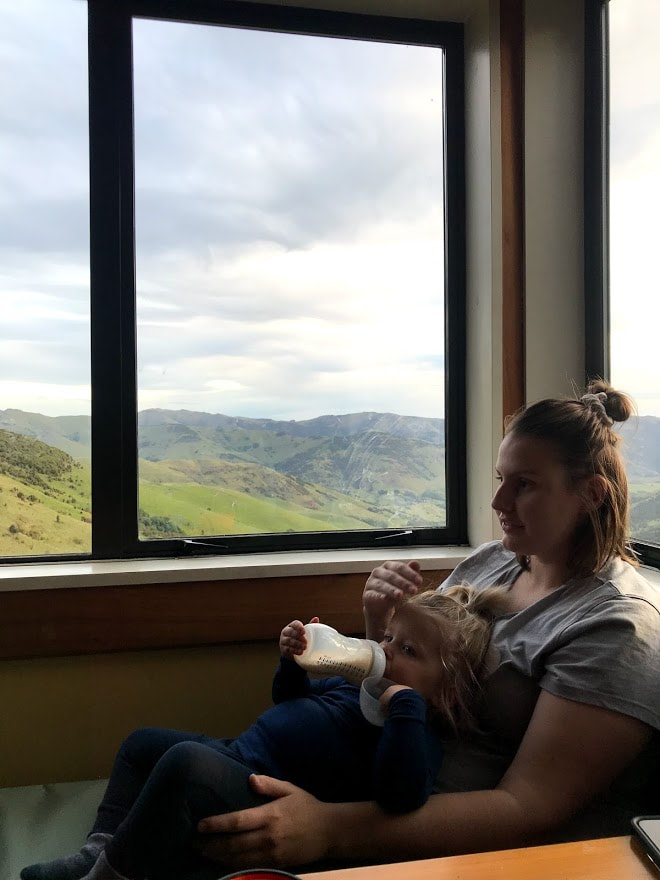
Energy (cal): 283 Energy (kJ): 1184 Fat: 11.5g Carbs: 38.2g Protein: 8.2g Total weight: 77g 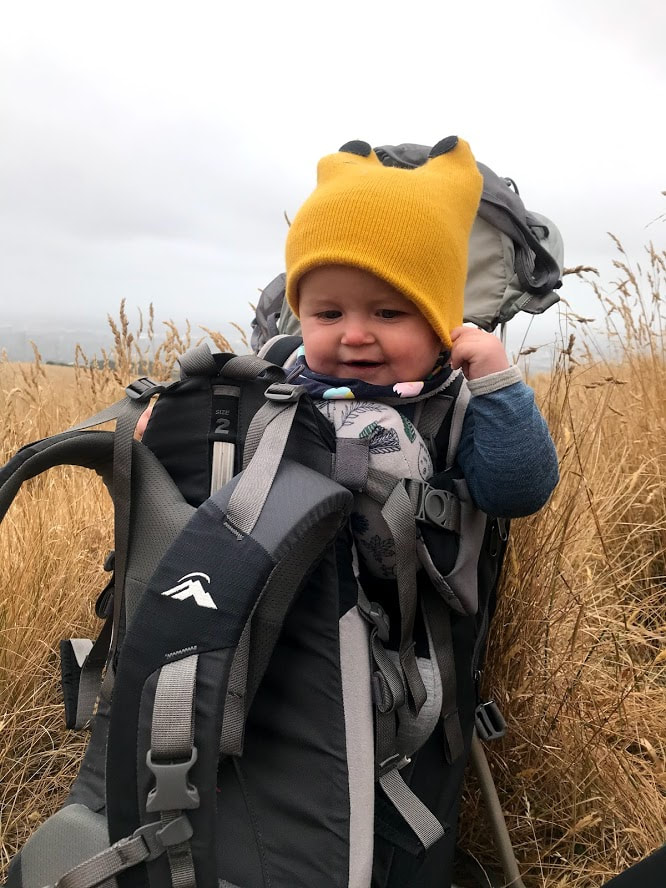 I should have realised taking this photo that he was going to tear that beanie off his head and drop it on the track about 30 seconds after we started walking again! Lots of very well meaning people advised me that when I became a mother I'd have to give up a lot of my outdoor hobbies for the foreseeable future. Multi day hikes were definitely off the table and day trips would be possible as long as it was to a local park and not a far off mountain range or lake. While hiking with kids (and babies in particular) definitely presented some challenges that were new to us, the last 21 months have taught me that if something is really important to you, you'll find a way to make it work anyway. There's been some trial and error along the way and a few things I wish I'd known in the beginning but I'm hoping that the following post will give you some confidence to get back out there postpartum and enjoy the great outdoors as a family (and without tearing your hair out!). 1. Your body will heal and get back to full fitness in time but it might be a lot longer than you initially expected. Before I get into gear and what to do with nappies in the wild I really feel like I needed to state this from the get go. It took me months to get back to pack carrying fitness again and it felt like forever. Every single one of us is different so if you bounced straight back into running two months postpartum then you go girl! My journey however was a very slow, methodical process of gaining strength and confidence in my body again and it was incredibly frustrating at times. I literally had to start with walking around the block, then walking up a little hill for the first time and so on. I also didn't do much baby carrying myself until I felt 100% certain I could stay stable on uneven terrain (with poles). All I can say is have no expectations of yourself and stay away from social media until you know you're in a good place mentally with your recovery. I had this warped idea that I should be out running again at a certain point because I saw other Mums out there doing that at the same stage I was at. My body just wasn't ready and that's okay. 2. How to transport them and at what age can they go in a backpack? This is the question I've seen crop up most often on forums with parents wondering what's appropriate at what age. We started out using a sling for the first month and didn't love it to be honest. It was fiddly to put on and my son was gaining weight quite rapidly and this just wasn't a comfortable way to carry him. We bought a second hand front pack (Baby Bjorn Baby Carrier Mini) and as well as finding it perfect for those first few hikes, it turned out to be the only way we could get him to sleep for weeks! The front pack was great when he was 2-6 months as he was kept warm by whoever was carrying him and having the weight so close to your body meant it was easier to walk with him. The downside of a more minimalist front pack was the lack of a waist belt though. With all of the weight distributed across your shoulders instead of your hips like with a hiking pack, it meant he outgrew his welcome in this earlier than we had anticipated.
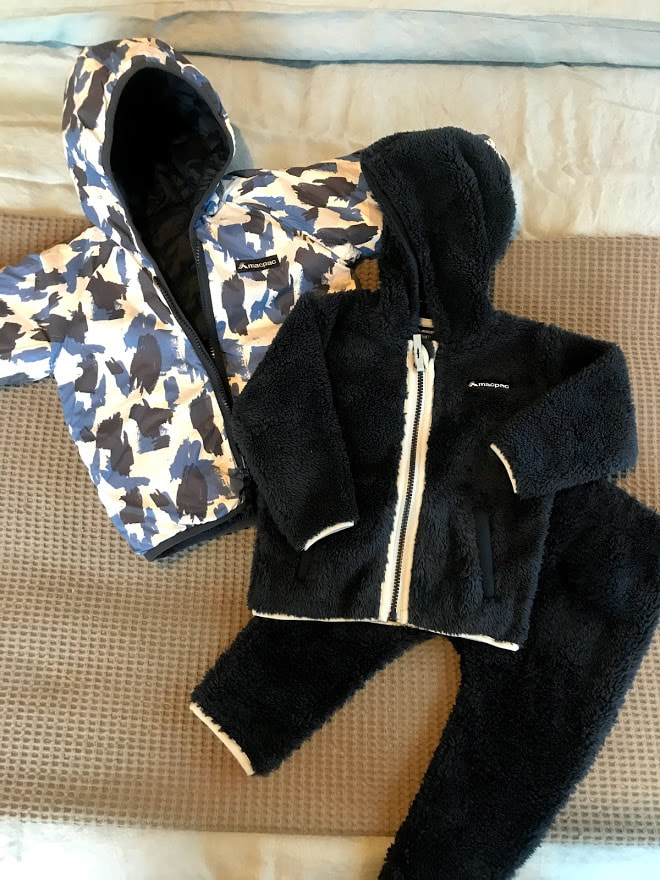
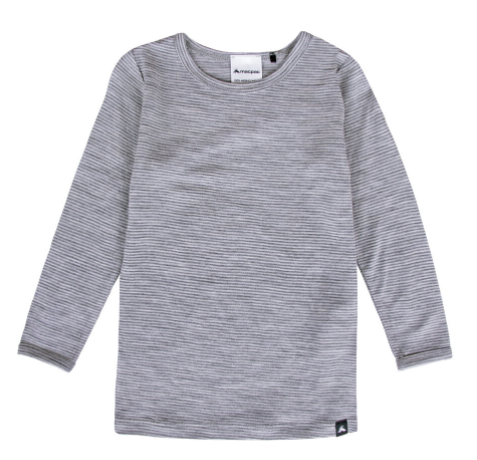
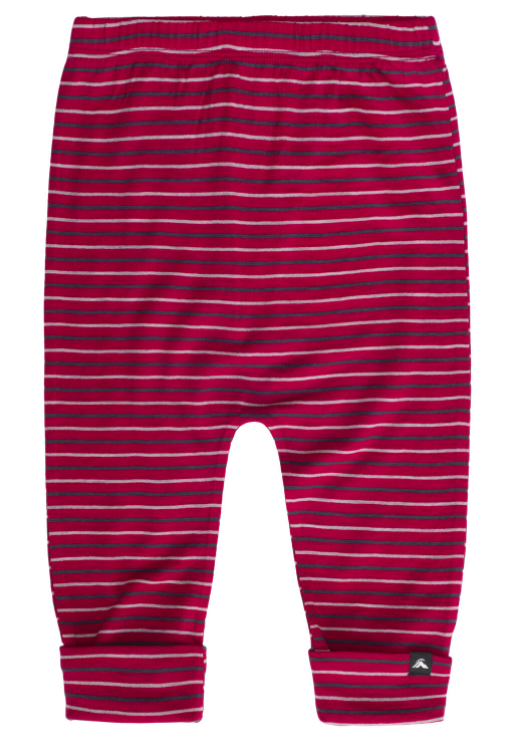
At about six months, we started transitioning him into a proper child carrier with the Macpac Vamoose. I work for Macpac so I never bothered looking at other brands here as I knew the Vamoose had all the features I wanted. The pack has an adjustable back harness which meant both me and hubby could wear it comfortably at our two quite different heights. The pack itself has heaps of storage as well as a small detachable day pack and we found we could pack enough gear in this and a 65l pack for both Max and ourselves when heading on overnight trips. The carrier has adjustability for your baby as well and it's been great having the option of moving his seat lower as he's grown over the last year or so. It also features a removable sun shade and rain cover, both of which we've needed often! If you're looking at carriers and don't know where to start, take your child into a store and ask to fit them in a carrier for you to try on. You'll soon know what you like and dislike about a particular model right there in the shop. Max and I actually helped with the how to video below after I realised there was a need for more helpful information out there on this. 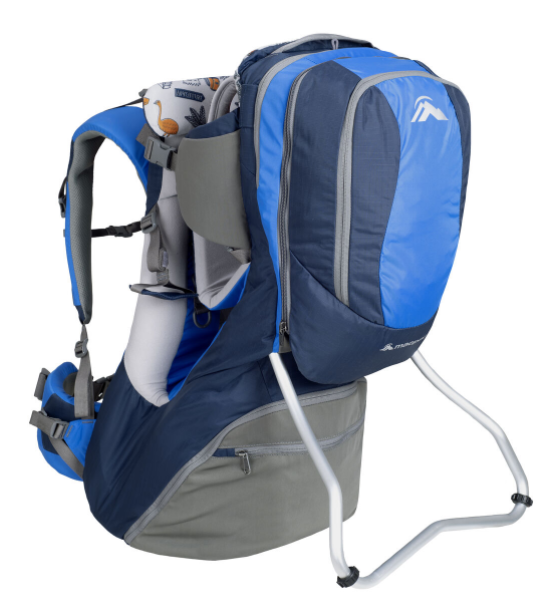 I like how easy it is getting Max in and out of the Vamoose and he loves being up high on our shoulders 3. What do I need to take other than the usual? To save a little time I'm going to assume you have a standard packing list for multiday walks and just want to know the extra you'll need for bubs. Nappies The hardest and first question on everyone's minds is usually nappies/diapers and how to manage this over several days. My advice would be to just stick to what you're doing at home and take a wet bag with you. If you usually use disposables then keep using these but carry a waterproof lightweight bag to pack out all the dirty and used ones and factor this into how much space you're going to need by the end of the trip in terms of storage. Pro tip: if your dog has their own pack, this is a great place to stash some of the used nappies for the trip out! We roll with a mix of disposables and cloth nappies and on our first 3 day hike when Max was 7 months old I had him in cloth during the day and then a disposable at night. This was mainly because he soaked through anything else I tried at night so this was the only safe option. I washed the cloth nappies on the second day and hung them out to dry in the sun so these were ready to use again the next day. Any solids need to be disposed of responsibly in either a long drop or a hole dug well away from any water sources just as you would yourself (make sure any disposable wipes or liners are packed out in your rubbish bag though). Similarly I have a small travel pack of wet wipes for number twos and a muslin cloth that can be washed and reused for just wet nappies. Food Breastfeeding is pretty amazing for multi day excursions when bubs is little as you don't have to worry about carrying bottles and formula with you. I have found it hard to locate a comfortable spot on the side of some tracks to feed on occasion but I was fortunate that this was an option for us for the first year. For bottle feeding I found pre-portioning formula in zip lock bags or buying the single serve sachets was an easy way to transport powder for each day. We had a filter bottle which we could use to treat river water during the day and boiled water in the evening for his bottles. Fruit, crackers, cheese and all the snacks we usually took anyway were great to keep him happy once he was older and eating more solids. Baby food pouches are super convenient but the extra plastic packaging is something I don't love so we try to find alternatives where we can to using these. The main challenge was to pack enough food as though there were three adults as he always ate more than we anticipated! Water was best straight from my hydration bladder which he learnt to drink from early on. Clothes and Sleeping Bags Figuring out what we were going to have him sleep in was a bit of a mission. When he was still little I wanted him to have his own bag so that I could be sure his face wasn't covered in the night but that he'd still be toasty warm. We ended up layering him in a Primaloft onesie inside a homemade down sleeping bag made from a sewn together child's down jacket. This isn't an option for everyone but it worked really well having him tucked up between us and I could still feed him easily in the night. Now that he's almost two, we just bring an adults bag for him and tuck up the end so he doesn't disappear to the bottom of it. This means we all get some sleep as co-sleeping hasn't worked well for us when we've attempted that while camping. We also carry a merino blanket to wrap him in either in the pack or in the tent/hut if needed. The clothes I regularly pack for him are: Merino top and pants Fleece onesie (now fleece jacket and pants) Primaloft Onesie (now jacket) Wool Beanie Wool Mittens Wool Socks L/S Cotton Tees to keep the sun off Sun Hat Waterproof jacket and pants Regular shoes as he's too small for any hiking boot brands *I add regular cotton pants in summer too Things that are hard to manage are their feet and hands getting cold while they sit not moving in the pack. I found buying onesies with built in foot and hand covers helped and on some of the winter trips we layered our own wooly socks over his feet and legs for extra protection. His body was easy to keep warm as it's snuggled in the pack but his limbs and face we always check every 20mins or so to make sure he isn't getting cold. He's big enough now to fit some fleece mittens that work really well. Safety and First Aid This was the official end to super minimalist hiking for us as a couple. We no longer went with the "we might be uncomfortable but we won't die" attitude and had to adopt a more cautious approach. We now carry (as well as our beacon) an emergency shelter option in the form of a bothy bag if we don't already have a tent with us. This gives us the option of getting out of rain and wind and warming up super quickly should anything happen. We also have multiple sets of back up clothes for Max. Now that he's walking around, trying to keep him warm and dry can be more of a challenge so I plan on having to change him at least twice a day. The same goes for food as I mentioned earlier, there is nothing worse than a hungry toddler but also we're much more likely to be overdue for any number of reasons so having at least another day's worth of food is standard now. Also take walking poles even if you don't think you need them. A dynamic weight on your back and uneven terrain will throw up challenges even the most stable walkers will struggle with. 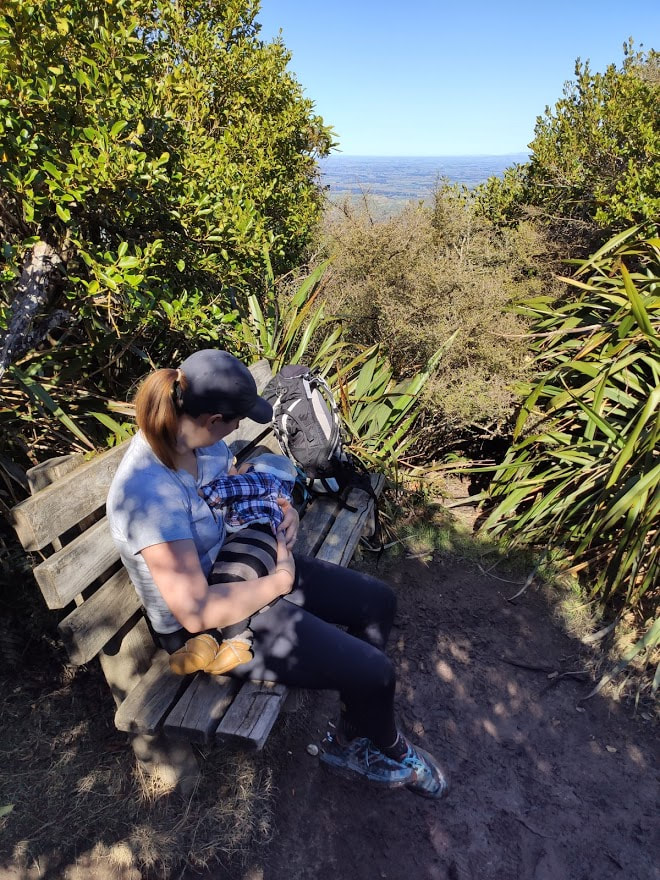 Breastfeeding halfway up Little Mt Peel 4. How do I make this work? Firstly I'm going to be honest, if you haven't done much hiking before having your baby then don't expect to find the process of planning and executing a trip easy the first time. It wouldn't have been even without small people! Start simple and test out your child's tolerance levels for being in a pack with just a walk around the block first. We went for lots of short walks before graduating to longer stuff so that we knew he was going to be relatively comfortable being carried. Secondly you're going to need a certain level of physical strength and fitness to carry your child and enough gear to go on overnight walks. We didn't attempt this until I was confident I could carry 20kg for 4-6 hours as no matter how we split our pack weights up, that was about the minimum we could get it down to. Walking poles make a world of difference but also pick tracks that don't require too many steep climbs, difficult river crossings or are overgrown in significant places. There are so many amazing places to explore in this country, leave the really technical stuff for another time. Thirdly, and this probably should have been my very first comment on this post (this is your reward if you're still reading!) bring help. We have been so lucky to have friends and family come away with us and act as a spare set of hands which has made continuing our adventures in the outdoors so much more achievable. You can absolutely do it on your own but having another couple of packs to spread gear around, someone to hold the baby while you eat dinner and another voice to distract and amuse is priceless. Lastly, it's not rocket science and in our experience the good times have always outweighed the more difficult aspects of hiking with a baby. We definitely had to put up with some serious judgement from complete strangers in the early days as many people don't feel that the outdoors are suitable for anyone under the age of 18 for some reason. Yes if you take a baby to a hut it will quite likely cry in the middle of the night and we've opted to tent in some locations for this very reason. I have to be clear though, 2 minutes of a crying hungry baby who then gets fed and falls asleep again is nothing compared to sleeping next to a traction engine of a snorer who carries on the whole bloody night. People should buy ear plugs. That's all I have to say about that. 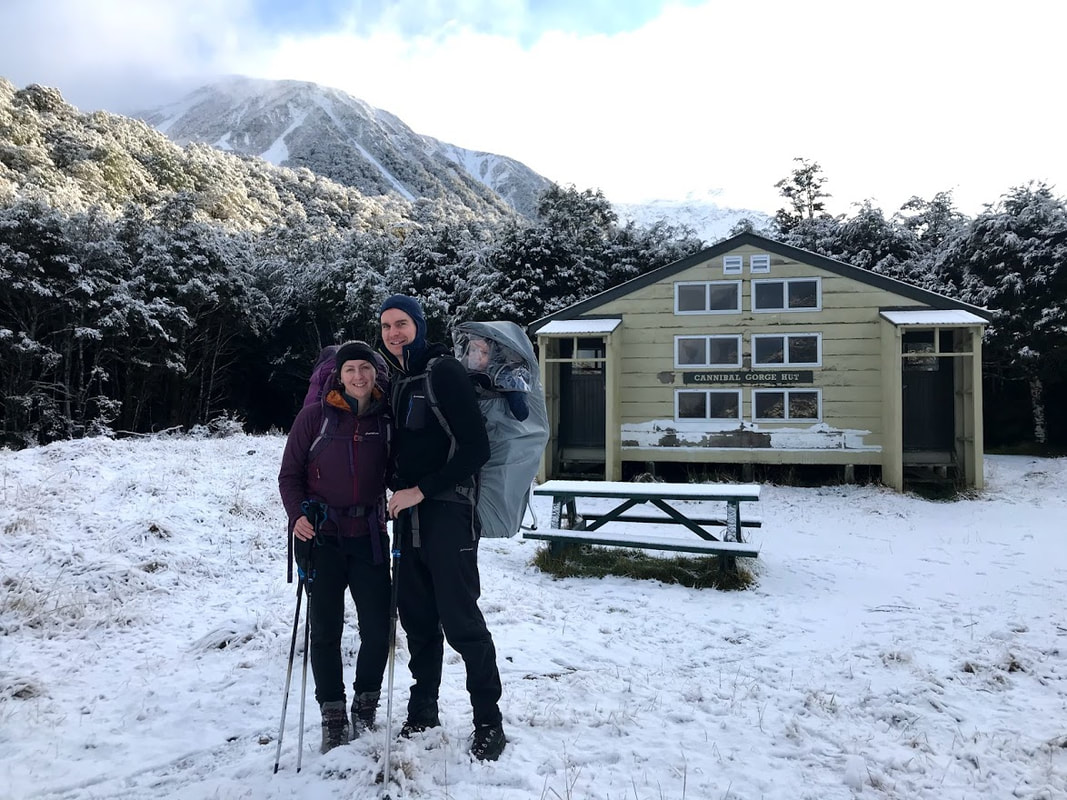 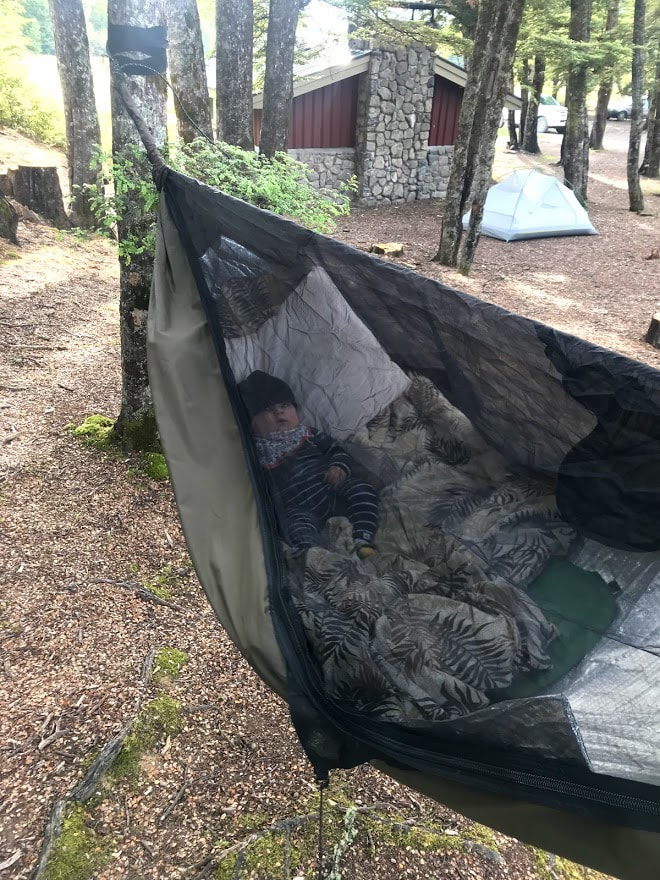 Some hammock time to keep off the sandflies while we broke our camp Top Bonus Tips
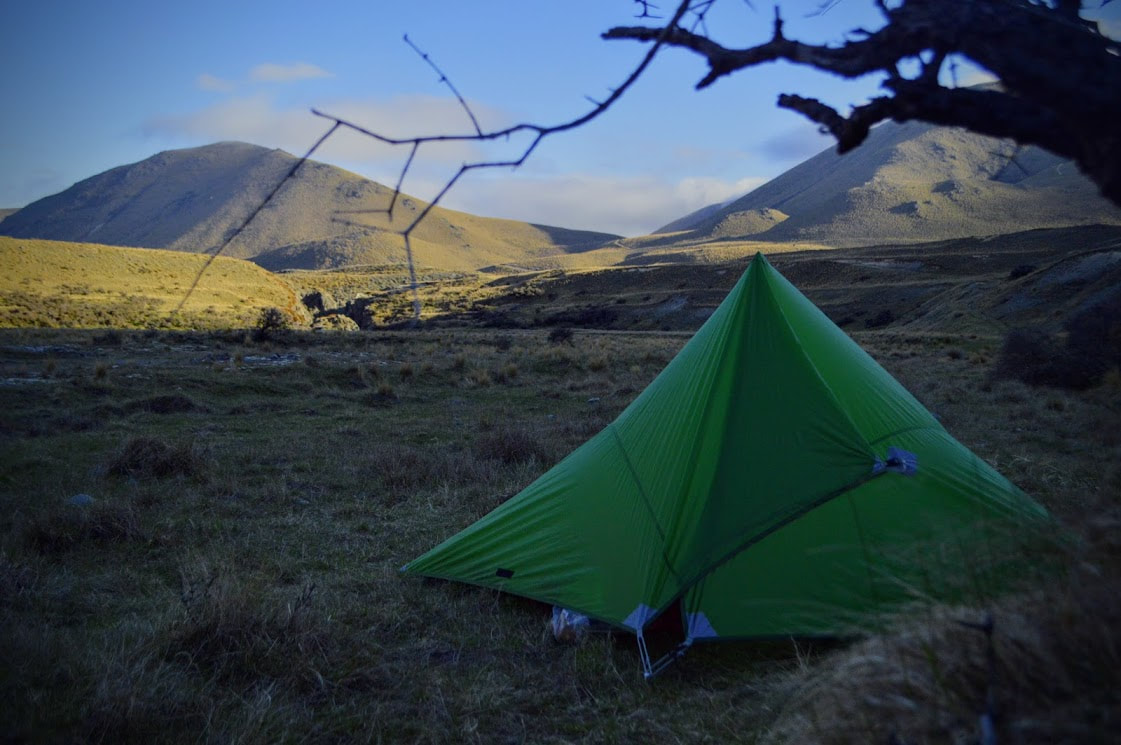
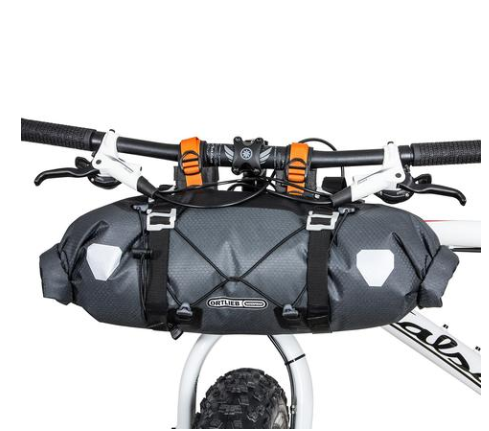
- Hammocks are great play pens before they start crawling. The mesh helps protect from pesky sandflies and you can keep them dry and warm while you manage things around camp. - Plan plenty of breaks into your trips once they're walking. We let him out to run around every half an hour and explore things. It keeps him happy but makes for much longer walking times so just factor that in. - Sleep is much harder to manage in summer when it's light outside until much later. Sometimes it's just easier to keep them up a couple of hours later rather than fighting to stick with your normal routine this time of year. - Primaloft synthetic insulation is a huge winner for kids. It'll keep them warm even when wet (although it's reasonable hydrophobic anyway) and is a lot easier to look after than down options. Our Macpac Pulsar Onesie was the most useful thing we bought for him. No matter the weather we knew we could zip him up in that and we wouldn't have to worry about him getting cold. If you have any specific questions or just want to know more about how we take our toddler hiking please leave a comment below. 5/27/2018 1 Comment Bikepacking for Beginners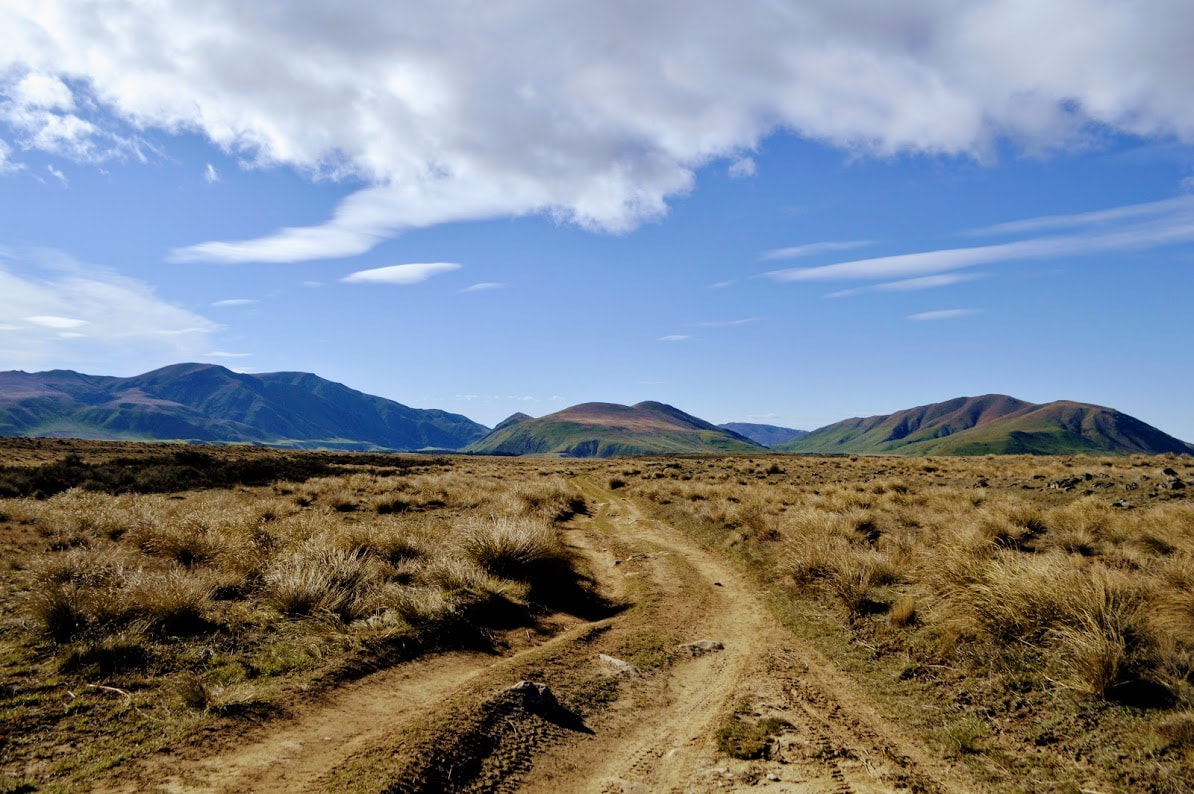 The beautiful Hakatere is full of 4WD tracks perfect for Bikepacking I've always enjoyed a bit of mountain biking but despite being an avid outdoors-woman it had never occurred to me to mix my love of hiking with the sport. When I first heard the term bikepacking I thought of all of those sad looking people I saw on the highway through to Arthurs Pass, struggling in the wind and rain to push their bikes, laden with panniers, to some undisclosed location. I've never been one for road cycling so I couldn't think of anything more miserable to be honest. Then a while back I came across a blog by Mark Watson of Highlux Photography fame (a beautifully curated photo blog following his path from Alaska to Patagonia) and it got me all intrigued about the idea of multi-day, off the beaten track expeditions by bike. Since then we've dabbled in a few adventures of our own and learned a thing or two about what makes the art of bikepacking pretty darn cool. Still not sure what this is all about? In a nutshell, bikepacking is a combination of trail riding and lightweight, minimal camping. It allows you to cover much bigger distances than you might do on foot and enjoy riding in areas that are can't be reached in a single day of biking. The terrain might range from reasonably technical single track right through to forest trails and 4WD tracks. The best thing about it is you don't have to run out and buy a bunch of really specific bike packing gear, as long as you have a bike (that bit's pretty important) you can adapt your current hiking kit to suit riding instead. Alternatively, if you want to dive right in, wallet first, there are a plethora of awesome brands out there making seat packs, frame bags and handlebar bags so if nothing else, you'll at least look the part! STEP ONE: WHERE AM I GOING? It's all very well saying you've become a bikepacking machine but finding the right trip for you may be the difference between Instagram glory and a miserable weekend away. If your'e a confident rider then look for tracks that will challenge you enough to be fun but allow you to still maneuver with the added weight of your camping gear either on your back or attached to your bike. If you're less technically able like myself but have a good level of fitness then choose a 4WD track or forest track that will be easier to ride on but still get you to some super good looking wilderness. If you're not used to riding for 6 hours then I wouldn't recommend making your days that long unless you don't mid a seriously sore butt the next day! From Christchurch I would recommend the following: For the Purist: The Old Ghost Road - 84km of Grade 4 Advanced biking with 5 bookable huts along the way. The logistics are a little more involved as this is a one way trip but you'll be rewarded with incredible views (unless it's raining) and a pretty good yarn to tell your mates when you get back. For the Weekend Warrior: The St James Cycle Trail - 64km over 2 days of mostly intermediate riding. The weather in this part of the country can change dramatically in a small space of time so be prepared for anything including snow. There are several huts along the way with great camping spots at each to set up a tent if needed. As a bonus when you get to the ed it's a 20 min drive back to Hanmer Springs for a soak in the Hot Pools and/or a cold beer. For the Newbie: The Hakatere Conservation Area - Mostly Grade 2 biking across a wide expanse of land littered with tracks and huts. Head into Manuka Hut via the Stour River or Boundary Creek Hut from Buicks Bridge (add in a side trip to Mystery Lake if you like punishing climbs!). Connect up several huts for longer days in the area or keep it short and sharp the options are endless. STEP TWO: WHAT DO I TAKE? So you've got a bike and helmet but what else are you going to need to make it in this new world of bike hiking? As a general rule go as light as possible without skimping on safety and without rushing out to buy new lightweight gear (unless that's what you really want to do!). The old adage to "beg, borrow or steal" is a good place to start and even now I still operate on a communal gear supply within our extended family depending on what I need for a trip. Let's start by breaking down your bike gear vs your camping gear. Bike A bike that can handle the terrain you plan to ride on. It doesn't need to be fancy but if in doubt get it serviced at your local bike shop before you take it miles into the wilderness. Helmet and Gloves - If you can get hold of some padded bike shorts these will make a huge difference also! Basic Repair Kit - Tyre levers, set of Allen keys, patch repair kit, chain breaker with missing link, spare tyre tubes (preferably learn how to change a tyre before you leave) Bike Pump Any packs/bags you plan on attaching to your bike Camp Lightweight Tent Solution - I take a tarp like the one above as it packs down small and weighs next to nothing but any small tent will suffice. A second tarp to sleep on is a good idea if you think the ground will be wet. Sleeping Bag (go small and light but still warm enough for the conditions) Sleeping Mat - you can lose a little weight by using a short mat and stuff your pack or a dry bag under your feet Stove, Pot and Gas - You're probably going to be eating freeze dried food due to the weight restrictions so you'll only need a set up big enough to boil 2 cup of water Spork - eat straight out of the bag or your cooking pot to save space rather than bringing a plate Along with food and clothing, you should be able to fit the above in a backpack of around 25l if that's your only option. If you can attach some of your gear to your bike with compression straps, bungee cords or similar, then you will be much more comfortable riding and you can substitute the bigger pack for a smaller hydration pack or none at all. Don't forget to add in appropriate personal gear and a first aid kit + Locator Beacon if you have one. STEP THREE: WHAT DO I DO?
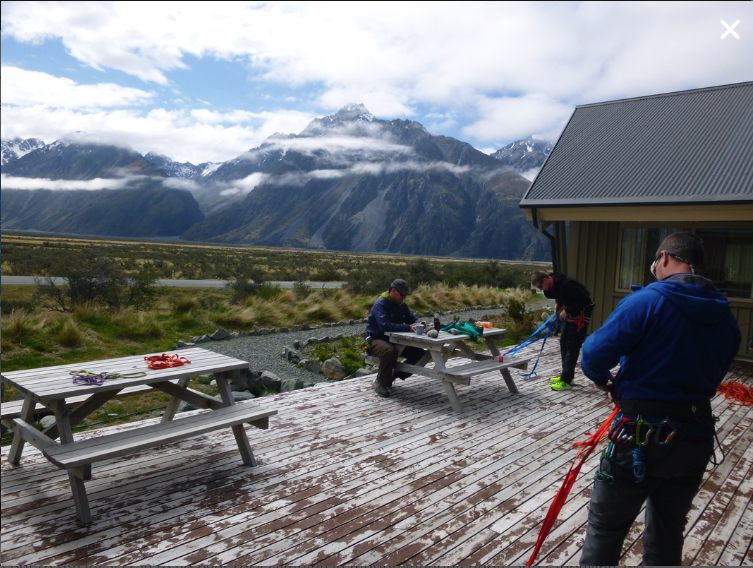
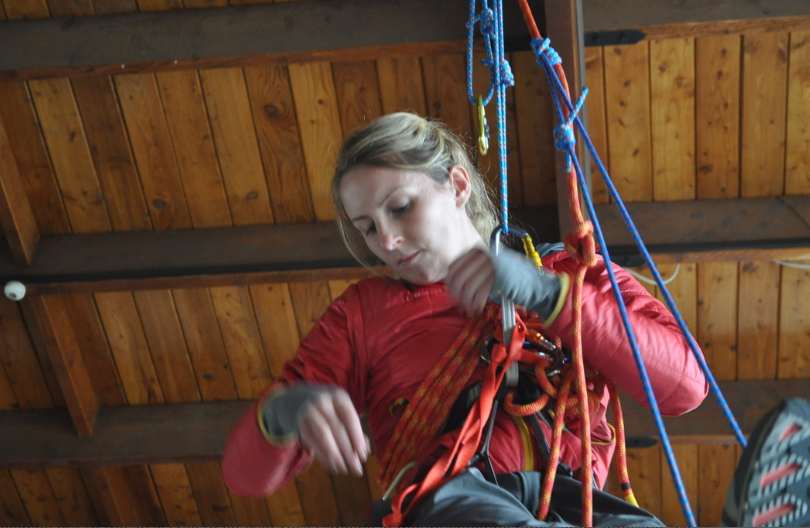
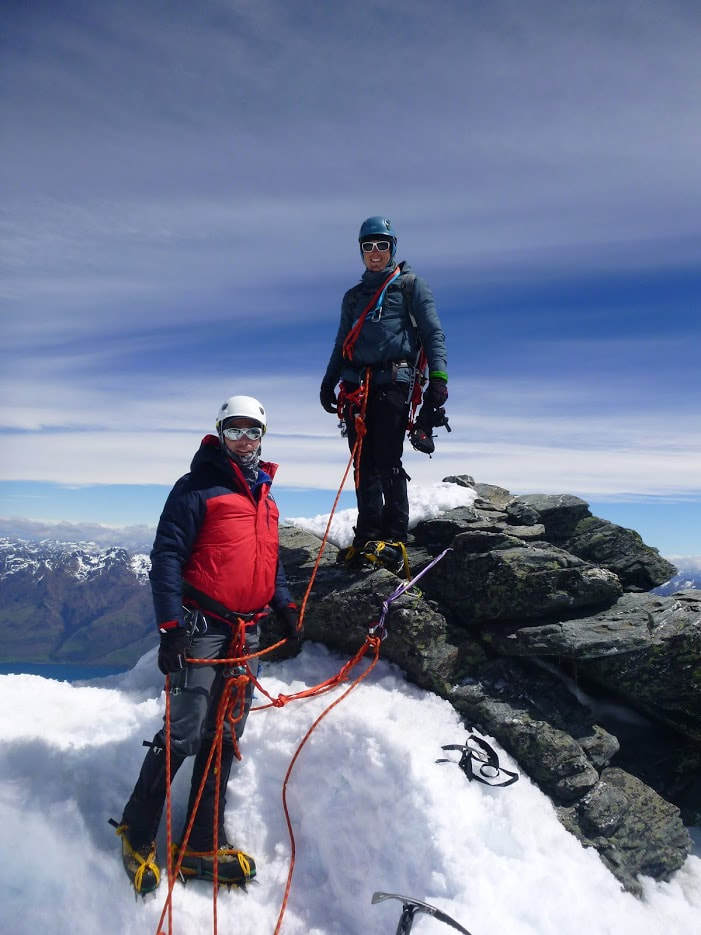
Planning a bikepacking trip is not dissimilar to a hiking/tramping trip although you may want to take a few things into consideration. Bike fitness is different to walking fitness so if you're not sure of your ability plan a trip that's slightly shorter or easier than what you think you can do. That first trip will be a good gauge for what you're capable of and more importantly what you're going to enjoy in future! Before you go: - Most importantly, let someone know where you're going and when you intend to return - just like a hiking trip. - Check the weather. Riding in the rain can be dangerous especially if you're a novice and tracks can become muddy and difficult to negotiate. Make sure you have enough warm gear and a change of clothes for the end of each day. - Make sure you've got some way to transport your bike to the start of the track and a pick up option if you're not coming back the same way. - Check you have enough food and snacks to last the trip as well as some emergency rations in case you get caught out for an extra night. - Get your bike checked out by a mechanic or if it's already had a recent service make sure the chain is lubed and your tyres are pumped up. - Rethink packing any of those luxury items you might normally walk with, they'll feel twice as heavy especially if you're carrying them in a backpack On yer Bike: - Riding with the added weight of camping gear will slow you down and make it harder to maneuver your bike. You will also use more energy as your whole set up will be heavier and harder to get uphill. Allow yourself extra time and plenty of rest stops when you need them. - Drink lots. It's easy to forget to drink water when you need to stop and get the bottle off your bike (if you're like me and can't ride on uneven trails one handed) so schedule regular breaks and fill up whenever possible. Even better, if you know this might be an issue grab a hydration bladder that you can sip away at hands free while you demolish those trails. - Enjoy waving to all of the walkers as you cruise effortlessly passed them in a cloud of dust and superiority. For more information check out these awesome websites www.bikepacking.com bikepackingnewzealand.co.nz 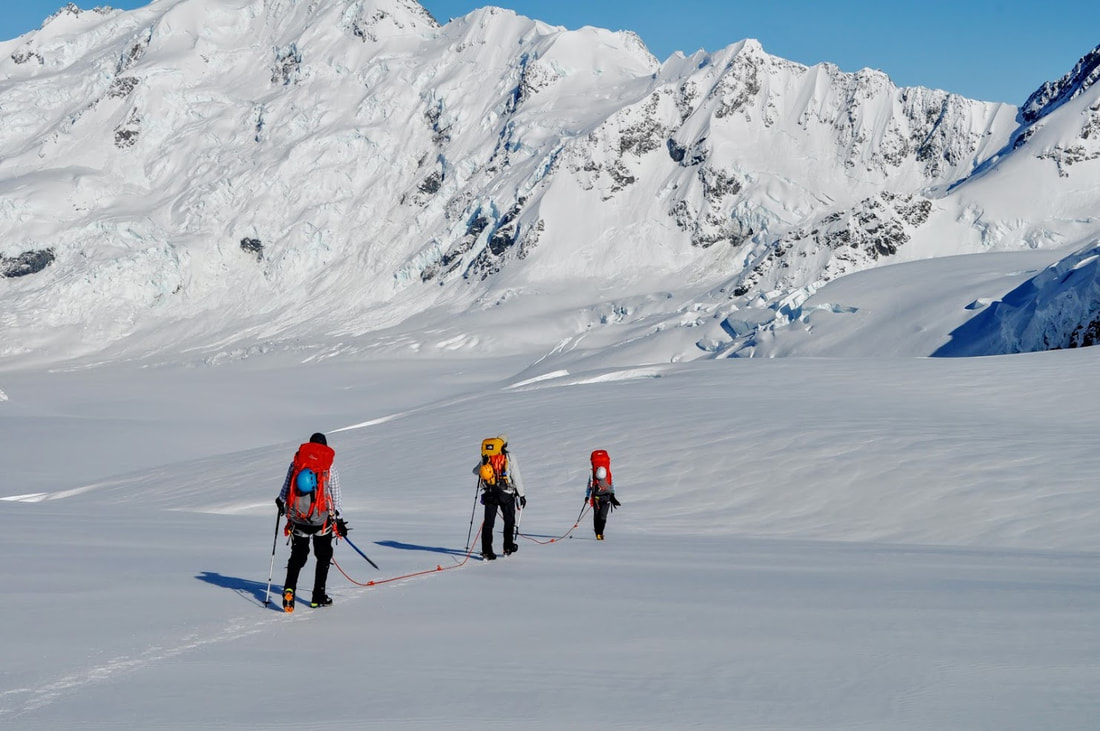 There comes a time in the life of every tramper/hiker where you look up from the valley floor to a towering snow capped peak, while still ankle deep in mud and swatting away the sand flies you think to yourself "I could climb that". Before you venture off the dirty scree and onto that majestic looking glacier it may pay to look into some level of instruction course to get you started with the basics. We reached this very point in our wilderness journey and decided to put our newbie alpine selves in the capable hands of the team at Adventure Consultants in Wanaka for a 10 day Alpine Climbing Course in the New Zealand Southern Alps. I had previously suggested a trip to Rarotonga for our 5th wedding anniversary, but who needs white sand beaches when you can be chipping the ice off the front door at 2000m? After raiding the product department at work and pulling together some last minute second hand gear we finally loaded up the Subaru and prayed it would make it all the way down south. Our first morning started at the Adventure Consultants headquarters (you may have heard of these guys from the movie "Everest") where we met our fearless leader Mark Austin and the other two members of our group, Matt and Greg. The weather wasn't looking favourable for the next 48 hours so we spent the morning signing waivers and culling our gear to the absolute essentials. I realised pretty quickly that this was going to be a one pair of undies per four days sort of trip. After heading out to the local crag to go over rock climbing in mountaineering boots and rappelling, we enjoyed one last beer in town before the real adventure began. Day two saw us pile into the trusty AC van for a drive up to beautiful Mt Cook Village and the New Zealand Alpine Club's Unwin Lodge. The weather had us changing plans backwards and forwards as we waited for the airport to call us with a chance to get up the glacier. This gave us time to learn more rope skills on the front deck of the lodge and hanging from the ceiling in the communal kitchen - prussicking out of a crevasse isn't too bad when there's a cup of tea and biscuits waiting for you when you finish. We ended up having to spend the night as the weather refused to clear by evening. This gave us a chance to check out the Hermitage and Museum in the village the following morning. I was feeling pretty grateful for crampons and my full Macpac kit when I saw photos of the first mountaineers to attempt summits in the park. We also spent some time on a concrete block climbing wall learning to use cams, nuts and slings to make equalized anchors. Thankfully we finally got the call around 3.30pm that we had a window to fly. With our packs all ready to go in the van we loaded up and tore off across the road to the airport and our transport for the day. The flight in was stunning as we helicoptered straight up the Tasman Glacier and past Mt Cook to our accommodation for the next five days, Kelman Hut. Sitting atop a rocky ridge at 2460m this is a DOC Hut with a serious view. 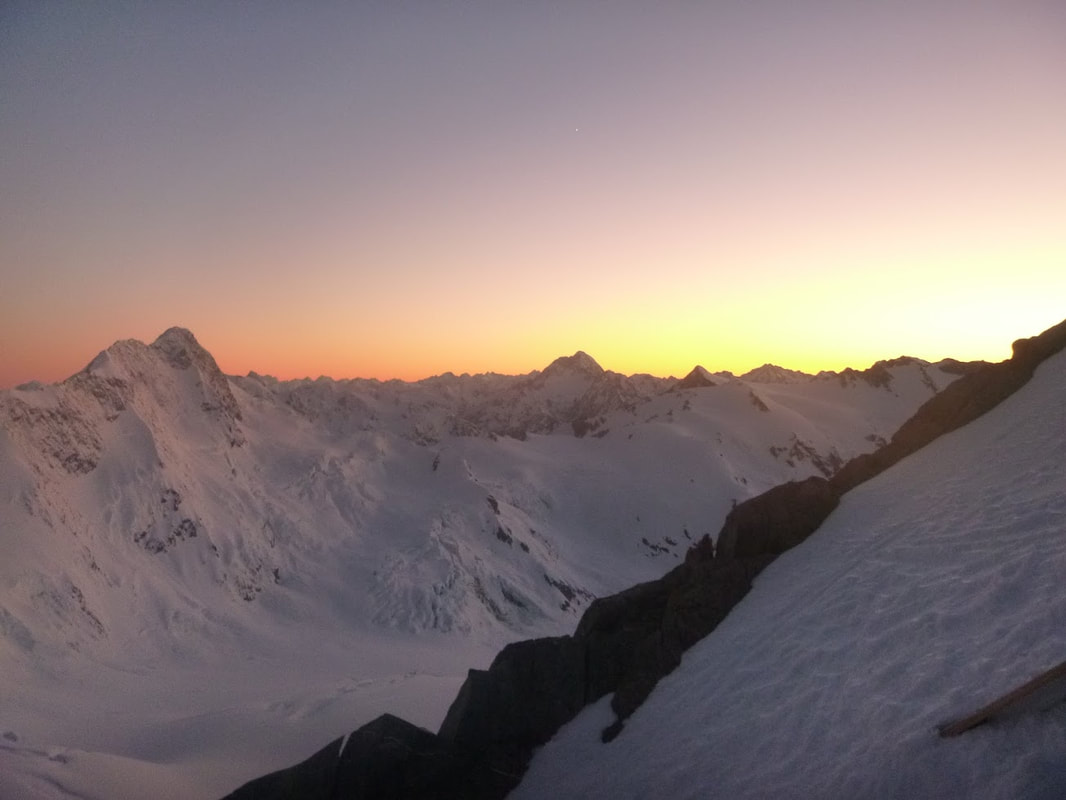 Looking out the back door at Kelman Before we could make the trek up to the hut we had to learn how to use our avalanche transceivers and practice roping up for glacier travel. When Mark was happy we could dig each other out of a couple of metres of snow, we stuffed as many of the food bags as possible into our packs and trudged up to the hut for a late dinner. Our first piece of technical terrain was encountered at the hut where snow had piled up so high we had to climb down to the front door. Kelman is a well stocked, 22 bunk shed with a well appointed kitchen and most importantly, reception for sport radio. We were sharing the place with four american ski tour guides who split their time between skiing off Mt Cook and trying to make meals out of condiments they had found left in the hut. Day four was straight out into the white stuff and learning how to self arrest when falling head first on your back down a snow slope. I fear I was more gifted at the falling than the self-arresting but I didn't impale myself on my ice axe so I saw it as a win. We then trekked across the glacier towards Tasman Saddle Hut where our guide made us walk off the edge of a cliff to test our newly found crevasse rescue techniques. I was reasonably thankful we were also in a total white out and I couldn't see how high I was for the 20 minutes it took my husband to build an anchor and pull me back up to safety. 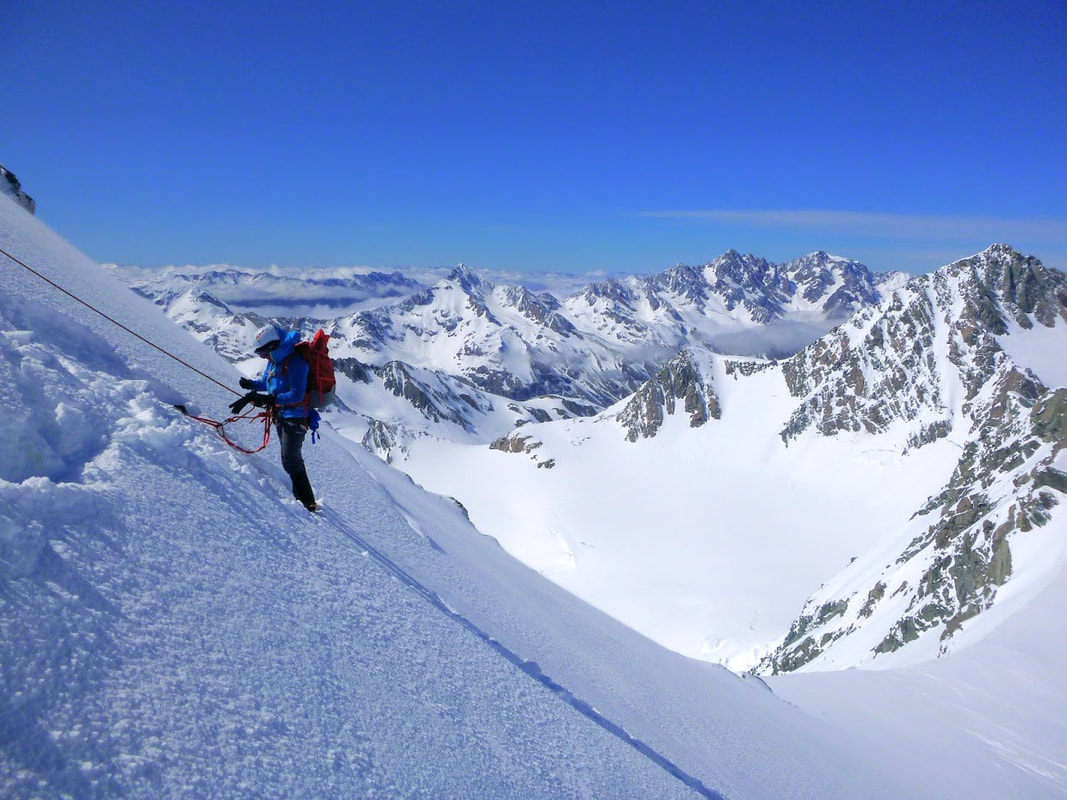 Pitchin! Day Five was our first real climb and an opportunity to put together everything we had learnt so far. Mt Aylmer sits at 2699m on the opposite side of the glacier from Kelman and took three really straight forward pitches to summit. We used a running belay to wander down the west ridge and then slogged through soft snow all the way back to the hut. The weather came to the party the next day again for our last climb which was the most challenging and fun of the trip. We started out down the glacier to a slope we had practiced crampon techniques on a few days earlier and began the first of eight pitches up to the ridge line. Having to climb up, build an anchor and then belay was pretty physical and I was definitely feeling it by the time we had stopped for lunch. We set off again on a running belay with Mark just gallivanting un-roped across the ridge line. All was going swimmingly until I hit a boulder twice the height of me that I had to shimmy down on my stomach. The team came through though and Greg talked me down from the ledge without any disasters. I should have known that this wasn't the hardest thing I was going to do all day and when we ran out of mountain 120m above the snow slope to the hut I may have had a moment or three. Mark had all five of us cram onto a ledge the size of a rubbish bin lid and attach our belay devices to the rope. The first rappel wasn't too bad as it was broken up by a small shelf about half way down. The second however was just a straight vertical drop down bare rock to scratch up with your crampons. It felt pretty damn good to get to the bottom and even better to end up with a three minute walk back to the hut. Dinner was late and it was an early 5am start to listen to the All Blacks thrash the Wallabies the following morning - well worth getting up for. We walked out down the length of the Tasman Glacier over dozens if crevasses and with heavy packs to our helicopter rendezvous point. There was just enough time for a lesson in using ice screws before we were being whisked back down the valley to Mt Cook Village again. Back in Wanaka we hit the showers hard and demolished a few burgers at Red Star. There was one more climb on the cards which saw us heading south to Queenstown and the Remarkables. Unfortunately all five of us managed to forget the food box so it was a hungry climb up to Single Cone in high winds. After picking our way through the deserted ski field it was an easy climb up to a couloir below the summit ridge. We pitched this and popped out on the top where a snow cave had been elaborately fashioned out of the mountain, seats and all. The last two days covered avalanche awareness, weather and lead climbing to wrap up the course. We were really impressed with Adventure Consultants right from our initial inquiries right through to the instruction we received on the course. I would highly recommend them for guided trips or climbing courses in the Southern Alps and definitely felt like we got value for our money. Breakdown: $3850 each for 10 days 2 Helicopter rides 3 peaks climbed 5 days in an alpine hut 1 Rugby World Cup back to back victor 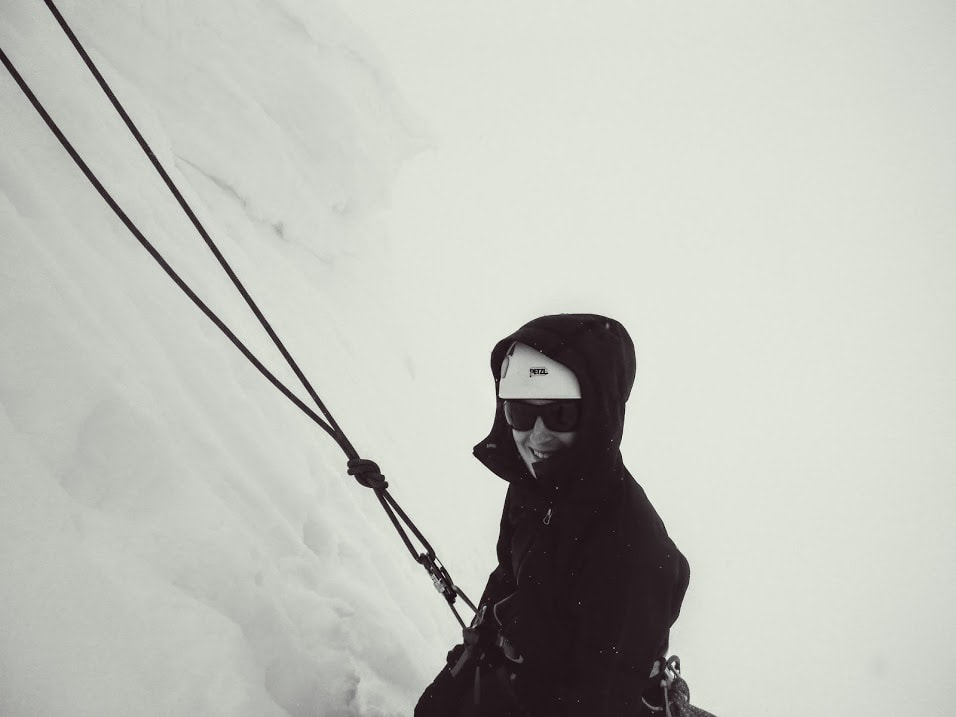 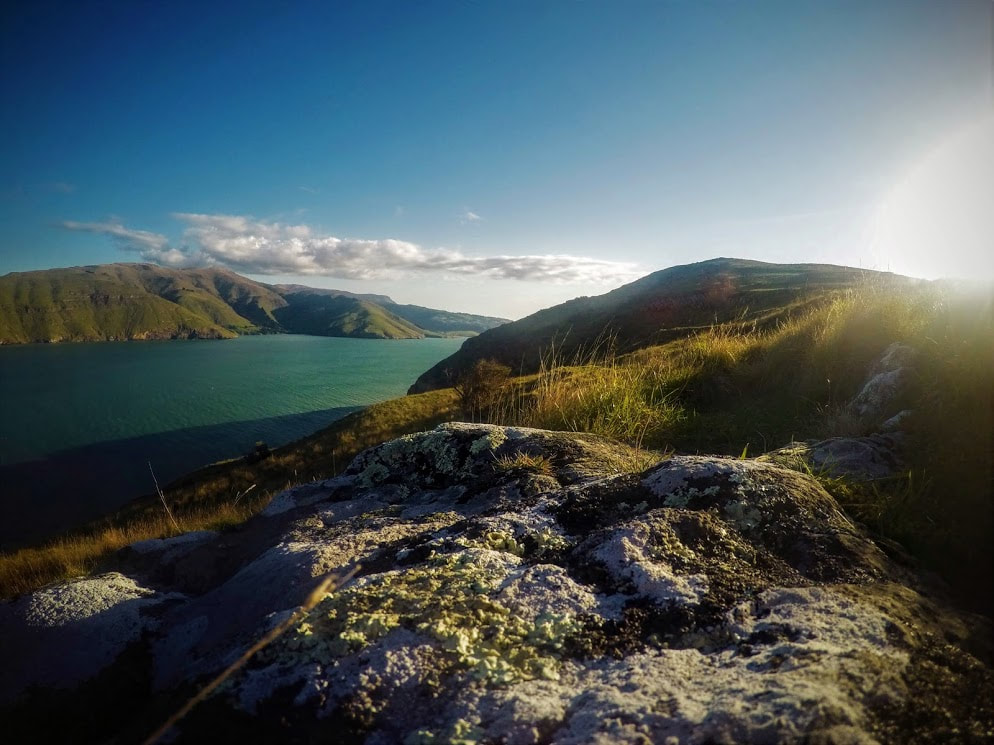 Banks Peninsula is a goldmine of tracks for walking, trail running and mountain biking I have a love-hate relationship with mornings. That is to say I love sleeping and hate having to get up. But every now and then (read very infrequently) I feel motivated enough to get up at some miserable hour to head off for a mission. Having been suffering from the dreaded ‘wilderness withdrawals’ I had big plans for my Monday off work and set out to come up with a plan to make the most of the fine weather forecast. I knew I wanted to do a good bit of trail running and to try and push myself a little harder than I normally would. I figured a day trip to Diamond Harbour sounded like just the ticket. Diamond Harbour you say? Hardly sounds like a hardcore outing. Certainly it isn’t the first thing to come to mind when you think of trail running, but what ensued was a fun day filled with technical trail, a good dollop of climbing, and views to rival any. The plan was simple: park the car in Lyttleton, head up the bridle path to the crater rim, then follow the crater rim all the way around to Gebbies Pass, cross the road and follow the trail up to Packhorse Hut, traverse behind Mt Bradley and over Mt Herbert, then drop down to Diamond Harbour and catch the ferry home. Simple enough right? Of course in reality some parts were a bit trickier than I had first anticipated! The travel is initially easy going up the bridle path and around as far as Gebbies Pass. You can either run the road or take the Crater Rim track (which generally follows the road) - I have to admit to running the road for the majority of this first section. Once you hit Gebbies pass you are on trail for the rest of the trip and I saw no need to tire my legs any more than necessary before hitting the harder (and higher) portion of the day. When I was planning the trip I had initially wanted to start in Diamond Harbour and run back to Lyttleton but all the trip reports I could find were for the other direction. I’m picking this is because if you go the other way you end up with a soul destroying slog up to the crater rim from Gebbies Pass. Seriously you can see the next 5km of road stretching out and up in front of you into eternity. Definitely type 2 fun. From Gebbies pass you turn left (towards the head of the bay) and cross the road. You will see a gravel area and a 4wd track that leads you to the track to Packhorse Hut. The track when I went was in a miserable state. Christchurch had been hit with record breaking rain in the weeks prior to this trip and the track showed it. In most places it flowed with water and I ran into significant sections where the track had washed out entirely. Still all things considered the track was enjoyable, initially climbing through pine plantation before popping out into tussock and up to Packhorse hut. I arrived at Packhorse Hut 4 hours in at 10:30am feeling pretty good and happy with how the day was progressing. After smashing down some food and refilling my hydration bladder I started on the climb up to Mt Bradley. 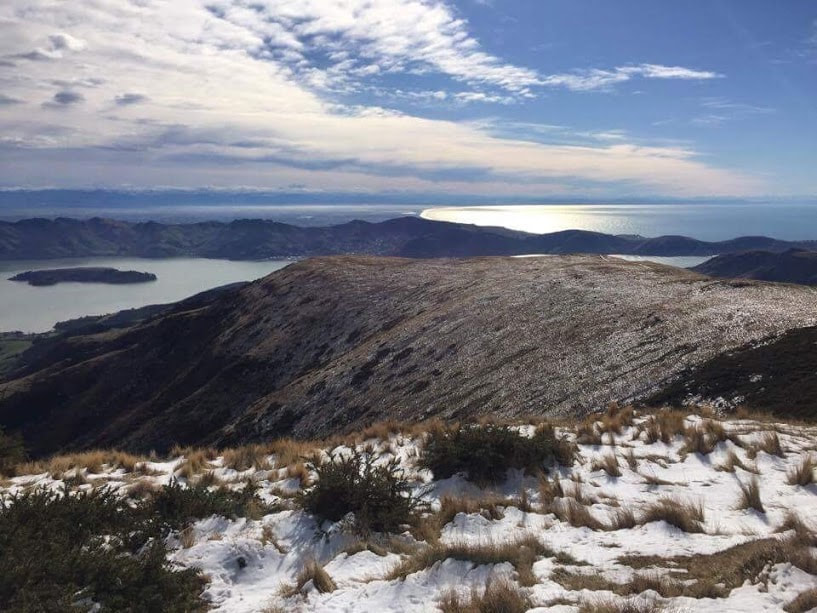 The track here climbs somewhat steeply and then traverses under the mountain and around towards Mt Herbert. This is where the fun started. All that rain I mentioned earlier? Yea that froze. The track would have been perfect for ice skating but it proved less so for running. As this part of the track is south facing it gets hardly any sunlight and as such had frozen solid and wasn’t thawing anytime soon. I ended up holding on to any foliage I could and sidling above or below (watch out for the bluffs!) the track to get past the worst bits. When I finally made it back into the sun on the saddle between Mt Bradley and Mt Herbert It had taken me about 40 minutes to cover less than 1.5km. Thankfully here the ice made way for snow and I passed the Mt Herbert Shelter around midday. The final 9km from here drops down from the summit through farmland directly into Diamond Harbour. I must admit that I found this section a bit tedious; constantly dodging cow crap and trying not to fall over in the mud. It would definitely be more enjoyable if it were a bit drier. The old pins were starting to tire somewhat by now too so I was happy to be on the home stretch. The track crosses Marine Drive and drops down alongside a stream directly to the ocean. Once you pop out at the water's edge there is a track to follow the 500m around to the ferry wharf. I ended up using the last of my energy sprinting this to try and catch the rapidly approaching ferry. I got a few strange looks from the locals as I ran down the wharf covered in mud and no doubt looking somewhat haggard. My total time for the day was 7 hours and 15 minutes and distance was just over 43km with about 1700m of climbing. The ferry costs $6.50 and is a hell of a lot quicker. 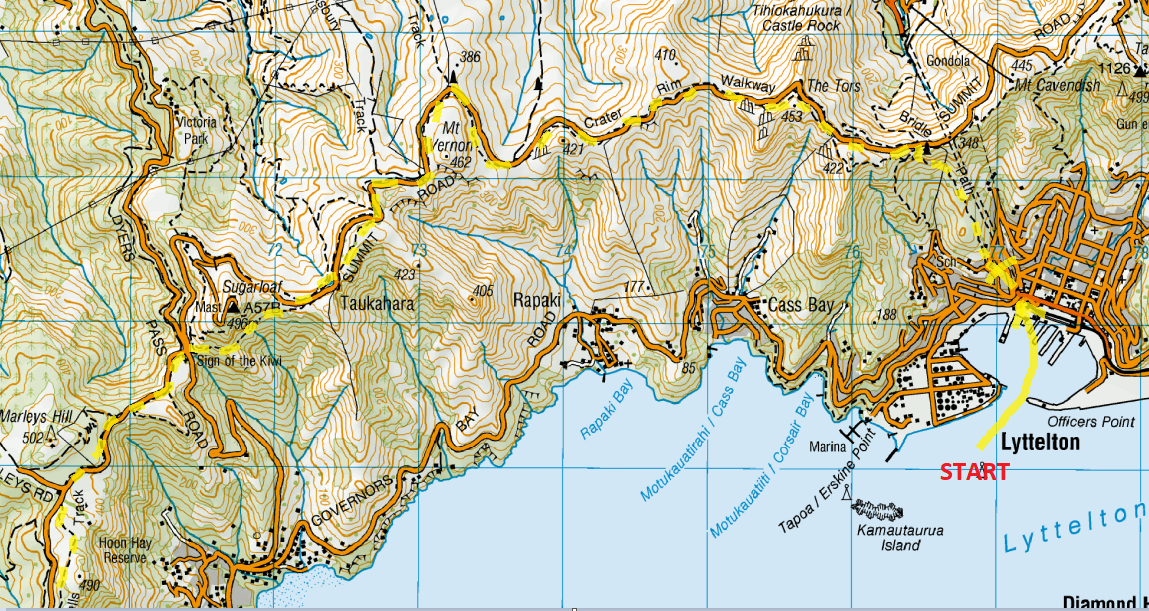 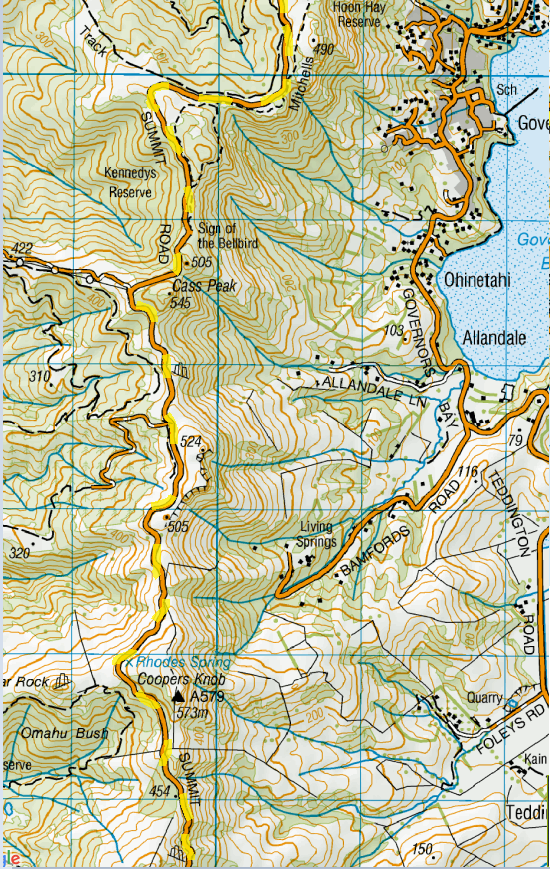 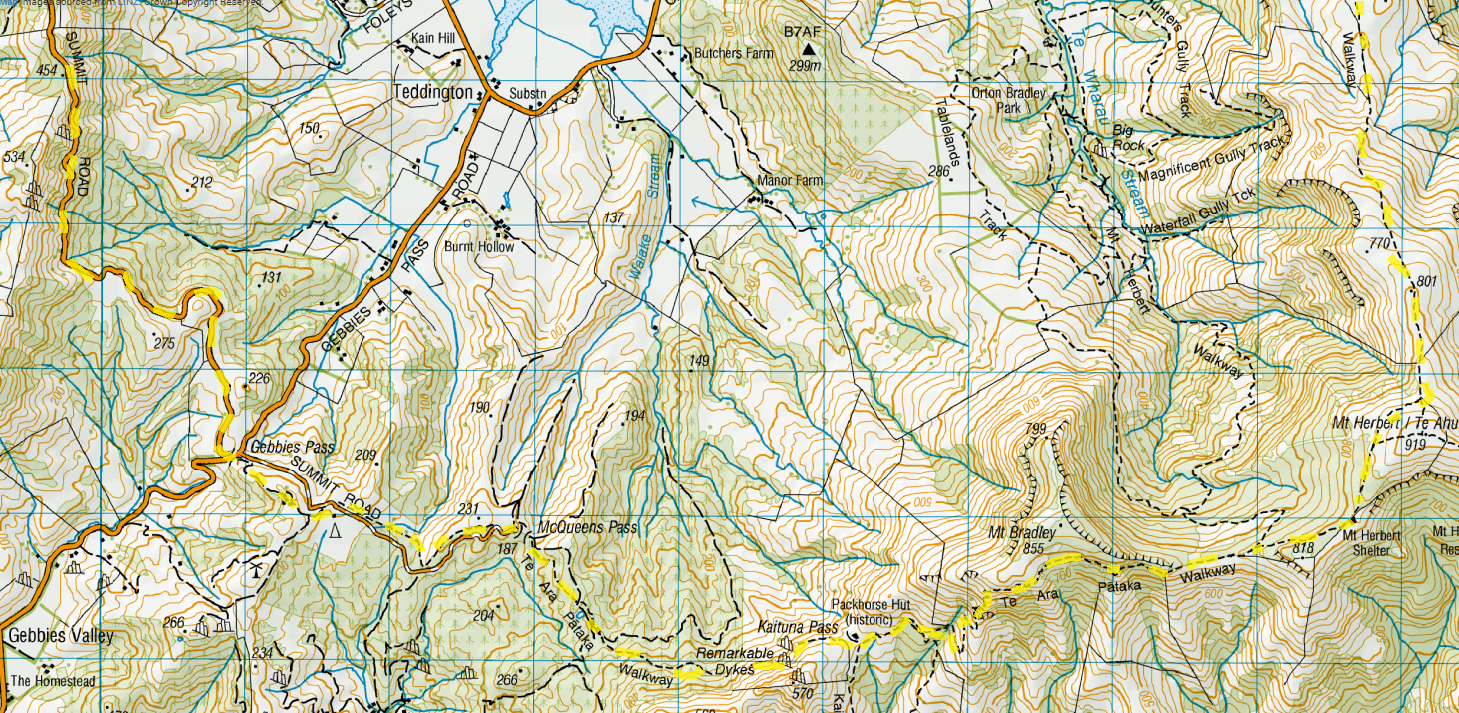 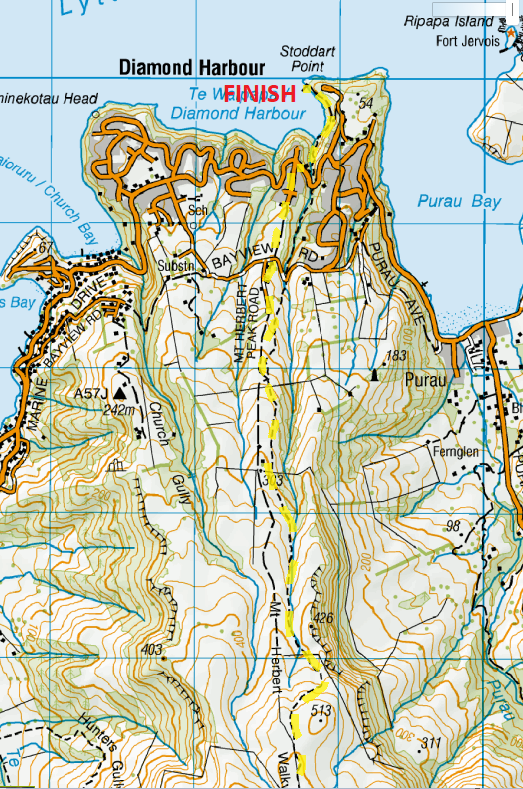 |
Categories |


 RSS Feed
Proudly powered by Weebly